
Photo: Pixabay.com
Monthly Tips from EAGC’s Horticulture Committee
To open any of the links in these articles, just click on the site address.
Horticulture Tips – April 2026
Cucumber Beetles
If you don’t take care of this problem it may amplify over the years. Every year you do not use some form of maintenance or management system they will get worse. Whether striped or spotted, they cause significant damage to not only cukes, but also squash, beets, beans, peas and other crops. They are a vector for viral diseases: In beans, bean blight. In cucumbers, bacterial wilt and cucumber mosaic virus.
Pest management: look at their lifecycle. They overwinter in soil, dead vegetable debris, and heavy mulch. The general 30% rule: if your plant is not damaged more than 30%, don’t worry. Over 30%, step in. Start scouting at least 2x per week as soon as your plants are in the ground.
Controlling adults, it’s best to remove them by hand. But they fly! Encourage insects predatory to cucumber beetle adults like lacewings, assassin bugs, lady bugs. Diatomaceous earth does not work against these pests.
Kaolin clay, like the brand Surround, controls cucumber beetles by creating a white, chalky film on plants that repels them, irritates their bodies, and gums up their antennae, making feeding and egg-laying difficult. You can dunk plants before transplanting. It’s a physical deterrent, not a killer, best used preventatively by spraying plants thoroughly, especially early in the season, and reapplying after rain to maintain the barrier and protect against damage.
Organic insecticides: Spinosad can be used as a soil drench to kill larvae before they pupate in the soil. Also use it in mulch. Sunlight and oxygen rapidly degrade Spinosad in the soil and It’s not proven effective as a spray against adults. PyGanic Crop Spray and azadirachtin are labeled for cuke beetles. Since the beetles are most active between dusk and dawn, it’s better to spray in the evening after pollinators have left the area. PyGanic is a contact insecticide that provides a short-term knock-down of adult beetles with no residual effect. Follow instructions for how and when fruit can be eaten following application.
Nematodes (Nema Seek is specific to cucumber beetles). Don’t use these if you are using an insecticide also. (In the case of organic Spinosad, wait at least 2 weeks after applying Spinosad before adding beneficial nematodes.) Keep the soil moist for 3-5 days to be most effective and apply when the pest’s larval stage is active. In NH, they usually begin to pupate early to mid June. They rapidly turn into beetles to feed, mate, and lay eggs at base of plants. Significant research on nematode effectiveness has not been done. And if your neighbor has cucumber beetles, you need to address adult cuke beetles, rather than the larvae.
Using a row cover as soon as cucumber seeds or seedlings are planted can help to prevent new cucumber beetles from attacking plants. Cucumbers and other cucurbits at the cotyledon stage and with one to two leaves are more susceptible to the bacterial wilt the beetles carry. Row covers must be removed to allow for pollination UNLESS using cucumbers that are self-pollinating.
Crop rotation is a frequently suggested method of deterring cucumber beetles, but there is some research that suggests that rotation is ineffective in the average home garden since the beetles can fly throughout the garden.
Patti E. Horticulture Committee
Horticulture Tips – March 2026
Help your plants thrive with a Chelsea Chop
Mark your gardening calendar for the “Chelsea Chop”! It’s a late-spring pruning technique of cutting back some perennials by one-third to one-half. British gardeners coined the term based on the timing of the prestigious RHS Chelsea Flower Show, which concludes in London in late May. Done to improve plant quality when plants return from the show, cutting back creates bushier plants, prevents flopping in tall species, extends bloom time by delaying flowers, and can increase overall flower numbers.
How to Perform the Chelsea Chop
Timing: Perform the Chelsea Chop when plants are in active growth, but before they start forming flower buds. In England, this is typically done in late May. In the Exeter, NH area, the timing is the same, around Memorial Day, before plants set flower buds. But the weather is always a consideration. A warm, mild, or wet spring can trigger earlier growth, allowing for a mid-May chop. Colder zones in the state may require waiting until early June. Chopping should be avoided during droughts or extreme stress, as plants need adequate moisture to recover.
Method: Use sharp, sterile shears to cut back stems by 1/3 to 1/2. This process is not for the faint of heart! It is a bit unnerving to take a pair of shears to a completely green, healthy plant and chop off the top half!
Techniques: You can cut the entire plant back, or cut only the outer stems to create a shorter, wider, and more stable plant. You can also selectively cut each plant stem by trimming right above the joint where the stem meets a group of leaves. To extend the bloom season and stagger flowering, chop only half of a plant’s stems. The unchopped stems will flower early, and the chopped stems will bloom later.
Common Plants for the Chelsea Chop
The technique is best for these late-summer or fall-flowering perennials that tend to grow tall or become “floppy”. Ideal candidates are tall, summer-to-autumn blooming perennials, especially straight native species (vs. cultivar counterparts), since they tend to be taller and less “tidy.” Cutting back the stems makes them grow sturdier and less floppy. It reduces the need for staking. Since the plant isn’t putting resources into growing overly long stems, it will put energy into lateral branching and producing more flowers for a staggered, longer-lasting display.
Sedum (Autumn Joy)
Echinacea (Coneflower)
*Aster (New England Aster)
*Phlox paniculata
*Solidago (Goldenrod)
*Helenium (Sneezeweed)
*Rudbeckia – Brown-Eyed Susan (Rudbeckia triloba)
*Milkweed
*Ironweed
*Anise Hyssop (Agastache)
*Common Yarrow
*Achillea millefolium
*Catmint (Nepeta)
*Mountain Mint
*Joe Pyeweed
*Coreopsis
*Natives
The Chelsea Chop is not suitable for flowers that flower only once, such as Peonies, Irises, Aquilegia, Roses, or woody plants. If you are tentative about experimenting, there are plenty of YouTube videos that show how to use the Chelsea Chop to keep your garden well-maintained and looking beautiful!
Patti E, Horticulture Committee
Horticulture Tips – January 2026
Happy New Year! All of our New Hampshire gardens are tucked under a blanket of snow and ice right now, but it’s not too early to think about gardening. Signs of spring can be hard to spot, yet they’re quietly there if you look closely. Daylight hours are beginning to lengthen, the sun sits a little higher in the sky, and birds at my feeders grow more quarrelsome as early territorial instincts kick in. Garden catalogs are trickling in as well, and just leafing through those colorful pages is a reassuring reminder that winter does, eventually, loosen its grip.
While these small signs of spring are encouraging, winter can be a good time to take stock of how our landscapes weathered the past growing season. With growth paused, stressed shrubs often reveal themselves more clearly, and in my case my concern is my boxwoods that struggled through summer and fall with severe spider mite damage. It took me too long to identify the problem last season and the mites did much damage before I began to really treat for the right problem. Our plants were stressed from the bad drought with local watering bans, an invitation for insect attack.

A son-in-law visiting from Ohio asked as he looked at the shrubs last summer, “Have you had trouble with boxwood spider mites? Our boxwood have been severely damaged and we’re having them professionally treated.” It was then that I realized it wasn’t just me, this season’s spider mite explosion went beyond my little garden.
I know the insect’s eggs are on the plants, but it would be fruitless to treat now. The mites are dormant and sprays would ineffective in freezing temperatures. So I pause on the way to the bird feeders, looking down at bronzed foliage and thinning caused by last year’s infestation. But when temperatures remain above freezing, I will be prepared to fight, armed with horticultural oil for every boxwood before new growth begins.
And please! No drought this season!
Ann H., Horticulture Committee
Horticulture Tips – December 2025
Japanese Umbrella Pine (Sciadopitys verticillata)

Some plants make a lasting impression the first time you encounter them. For me, one of those was the Japanese umbrella pine, Sciadopitys verticillata. Years ago, while walking through my Virginia garden with a friend in search of foliage for flower arranging, she stopped suddenly—captivated not by the lovely bronze leaves of my cleyera I planned to share, but by a tree with glossy dark green “needles” radiating like the ribs of an umbrella. “What is this?” she asked. That’s my Japanese umbrella pine, I answered. I could see that she was as hopelessly smitten with the tree as I was when I first spotted this exotic youngster 10 years earlier. And sorry, no, I didn’t allow her a cutting.
The Japanese umbrella pine is unlike any other tree. It is the sole surviving species of an ancient lineage once found across the northern hemisphere. Its thick, evergreen needles form in whorls of 20–30 at the tips of branches, giving it a bold, architectural presence year-round. The bark matures into an attractive reddish-brown, adding winter interest.
Hardy in Zones 5–9, umbrella pines are slow growers and best sited carefully. They prefer evenly moist, well-drained soil, protection from harsh afternoon sun (especially when young), and benefit from consistent moisture during drought. They reach reproductive maturity and start producing pinecones after decades. Once established, they are notably pest-free and low-maintenance – trees for gardeners who think long-term.
I was especially touched at the November meeting when fellow member Lee generously gifted me with a tiny rooted umbrella pine—grown from cuttings from her magnificent 30-foot specimen. Knowing how much care and patience this tree requires makes her gift all the more meaningful.
If you encounter Sciadopitys verticillata at a nursery—or are fortunate enough to receive one as a gift—be prepared to be dazzled. Plant it thoughtfully, tend it gently, and enjoy watching a truly ancient and extraordinary tree become part of your garden’s future.
Ann H., Horticulture Committee
Horticulture Tips – September 2025
Dividing Perennials – When and How
Fall is the season when many gardeners assess their garden beds – which plants were successful, which need to be relocated for better light or moisture, which are losers headed for the compost, and which are in need of dividing. Some perennials never need to be divided – they maintain their size, form, and bloom for years. And some perennials should not be divided, for example Baptisia or Lupine, which have long, deep taproots, or shrub-like plants with woody stems, such as Lavendar and Russian Sage. Plants like Nepeta (catmint) and Agastache (hyssop) are so vigorous that they may need to be divided every year.
Most perennials do benefit from division, however, and the “when and how” of division are important to success. Gardeners know when a plant needs to be divided when they notice the center dies out (think ornamental grasses, irises, and daylilies) or its blooms decrease in amount and size. And sometimes division is necessary when a plant outgrows its space.

When to divide? Standard advice is to divide fall-blooming perennials in the spring, and spring and summer-blooming perennials in the fall, but time constraints and weather conditions don’t always cooperate. Whenever it’s divided, it’s important that the plant is not flowering, so all its energy is used for regrowth and recovery.
• If division of spring and summer plants doesn’t take place in the fall, spring is still a viable option – just expect to see reduced blooming for the next season.
• Dividing in the summer is risky – if it can’t be avoided, wait until after the plant has finished flowering and divide on a cloudy, wind-less day. Then pay close attention to watering.
• Do fall dividing at least eight weeks before the ground freezes, so the roots can become established.
Some of the advantages of spring division:
• It’s easier to see what you are doing with new growth.
• A newly emerged plant will experience less damage.
• Energy stored during the winter and spring rain will help recovery.
• Plants have the whole growing season to recover.
Fall division advantages:
• Some gardeners have more time in the fall compared with spring.
• It’s easy to locate the plants that need dividing.
• Perennials with fleshy roots, such as Peonies, Oriental poppy, and Siberian iris are best divided in the fall.

Now for the “How” of dividing. Years ago, Becky Mitchell hosted a how-to-divide workshop at her home, and I still refer to her techniques for successful divisions.

• Water the soil well a day before the digging.
• Dig up the entire root ball, using a spade or fork. Be sure to dig well away from the crown of the plant and loosen the roots completely before pulling it up.
• Remove as much soil as possible from the roots and tease them apart gently. At this point, Becky recommends placing the root ball in a tub of water spiked with SuperThrive, overnight if possible.
• Break the plant into sections, preserving as many roots as possible. Some root balls will divide easily by hand and some will require tools. Use two forks or spades to pull a clump apart. A sharp knife can also be used to divide dense rootballs. In some cases, a Sawzall or reciprocating saw may be needed – ornamental grasses or Siberian Iris, for example.
• Each division should have 3 to 5 shoots to thrive and should be replanted as soon as possible. Water thoroughly and keep them watered as necessary.
Finally, I’ve found a chart put together by the University of Minnesota Extension to be very helpful in determining which perennials are candidates for division and when to do so.
LuAnn F., Horticulture Committee
Horticulture Tips – June 2025

Attracting Pollinators to Your Vegetable Garden
Pollinators are under pressure from all fronts: climate change, reckless use of pesticides, and habitat loss. The decline of pollinators in your home vegetable garden may be affecting your crop production. Pollinators are not just honey bees. Some pollinators are big and bold like hummingbirds and others tiny and inconspicuous like solitary wasps and hoverflies. Different pollinators are attracted to particular plant or flower types. By offering various kinds of blooms, and nurturing the ecosystems in your own backyard, you will attract an assortment of pollinators that will help your vegetable garden produce abundantly. You can attract more pollinators to your vegetable garden with these simple steps.
Use Native Perennials
Planting native perennials and shrubs around your entire property which bloom at different times will keep a continuous supply of nectar available. Attract pollinators to your area, and they will find the blooms in your vegetable garden. Native plants often have a symbiotic relationship with particular pollinators. They provide blooms and they act as a host for various stages of pollinator development in your ecosystem. Keeping the pollinators thriving in your yard is key to keeping them happy and working to pollinate all of your blossoms. Utilizing a variety of perennial natives, especially host plants, that thrive in your zone and bloom throughout the various seasons will also ensure that new generations of pollinators will have a home in your garden space.
Early blooming perennial shrubs like chokecherry, serviceberry, and some viburnum do multiple jobs in the environment. Attracting pollinators in early spring, like bumble bees and solitary mason bees, and then later in the season providing fruit for birds. Along with mid-season milkweed, monarda and rudbeckia, and late-season solidago and aster, they offer both flowers and act as host plants for specific butterflies and moths.
For more information on Northeast natives, check out the Wild Seed Project https://wildseedproject.net/blog/comprehensive-plant-list
Interplanting With Vegetables
Interplanting annuals with your vegetables can also help bring pollinators directly to your garden AND help control pests. As a gardener, nothing is more exciting than seeing a solitary wasp fly from a garden flower over to a cabbage worm on your kale and carry it away. As with perennials, plant in groups so pollinators don’t have to fly long distances, and include varieties that will bloom in different seasons. Dill, borage, chives, and calendula are among the annual edible flowers and herbs ideal for this use since they also offer the gardener the benefit of fresh edible flower herbs to pick and eat. Bear in mind, it’s not just about the flowers. For their larvae to survive and thrive, butterflies and moths also need non-flowering plant parts like the leaves of carrots, dill, and parsley.
Add a Wildflower Strip
Planting a wildflower strip near your vegetable garden can dramatically increase the number of butterflies and the diversity of insects attracted to your space. Wildflowers attract all kinds of beneficial insects: those that will provide pollination and predatory insects like hoverflies and ladybugs that will feed on aphids. Beware of the “wildflower” mixes that are offered by many companies because they may contain invasive plant species. Check packet labels and research varieties included. Refer to the state of ME Department of Agriculture invasive species list for additional information. https://www.maine.gov/dacf/php/horticulture/invasiveplants.shtml
Wildflowers, both dead and alive, are an essential source of sustenance and shelter for pollinators. Don’t cut back your flower stems at the end of a season. Leave seed heads for winter bird food and stems for pollinator shelter.
Leave the Leaves
Don’t just leave wildflower stems. Leaves, dead twigs, and hollow perennial stems left in the ground through winter are also crucial since they offer protected sites for laying eggs and cocoon nesting. Do not clean up leaves and other plant material until 5 consecutive days of 50° have passed in spring. Cleaning up too early can reduce beneficial insects by 90% and delayed maintenance can save thousands of pollinators. Avoid using “bee hotels” that offer a block of holes to attract egg-laying. They may harbor and spread parasites and diseases.
Don’t Forget the Water
Keep a shallow dish of stones filled with water, especially during excessive heat and drought. Bees get thirsty too!
No matter the size of your property, you can provide something valuable. Small actions can still yield big results.
Patti E. Horticulture Committee
Horticulture Tips – April 2025
Garden Thoughts for April
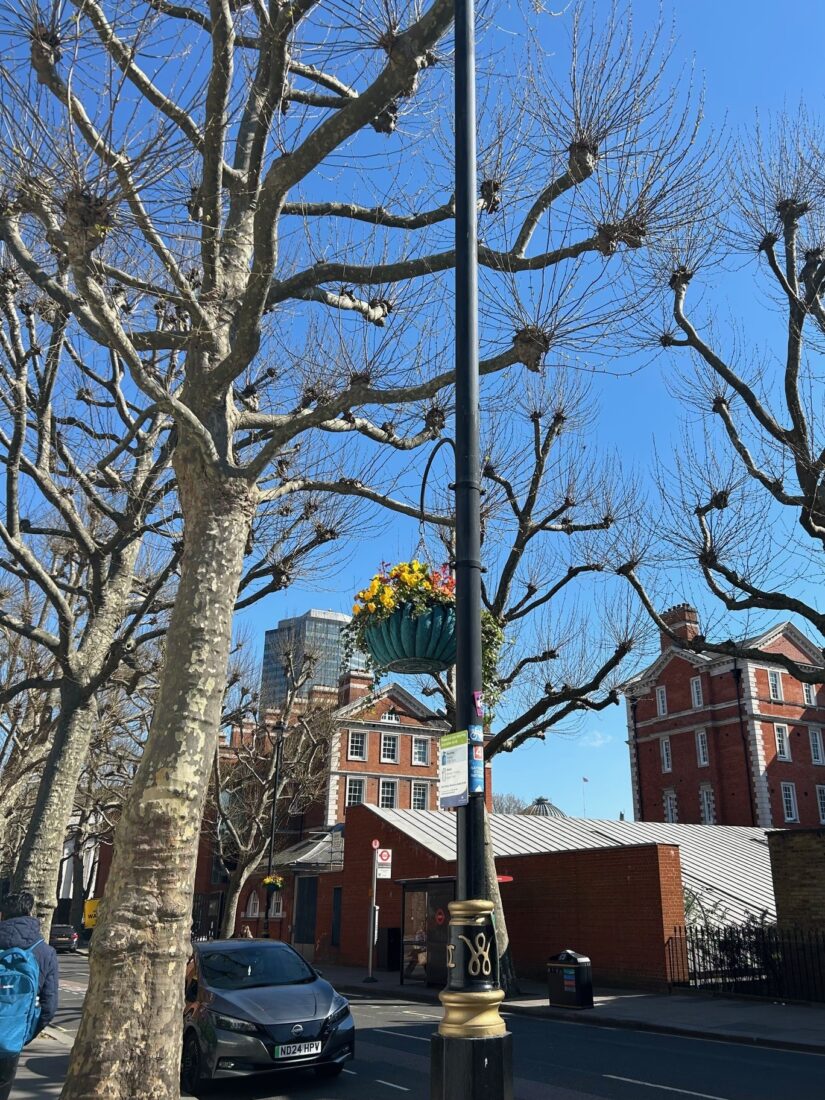
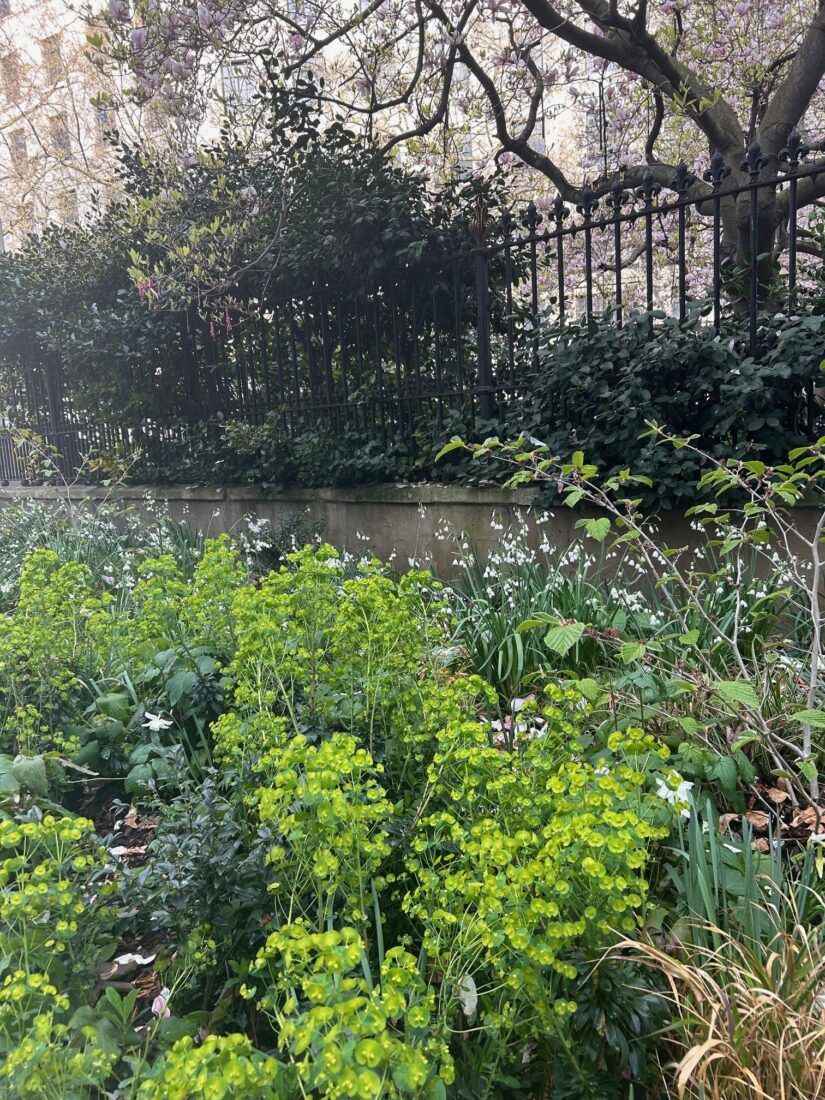
April seems to be arriving a bit late (snow on April 12!) and so are my garden hints for this fickle month. My excuse is that I recently returned from two weeks in London where gardens were doing all the proper April things. (See attached photos.) Unusually, however, there was not a drop of rain and gardens may suffer.
Here, we can be grateful for the cool, wet weather slowly waking up our gardens and woodlands. It is best to stay out of your garden beds but there is still plenty to do:
Examine your garden tools. Maybe a little rust removal or edge sharpening is in order?
Assess your supplies. I know I need to buy a fresh bottle of Superthrive, a wonderful potion for new plantings and for getting divisions off to a good start.
Gather your hoses and other watering equipment.
Inspect your pots. I’m terrible about not getting mine clean in the Fall.
Treat yourself to a new plant. I’m looking at a Clematis (Guernsey Flute) that is hardy to Zone 4 and can be grown in a pot. I’d better get my order in before it sells out.
Edge, edge, edge! While you should refrain from tromping around in your garden beds, April is a good month to refresh the edges of your beds.
Judicious pruning. I could write at length on this topic, but one simple tip is to carefully remove any bits damaged in the Winter.
Smother. If you are planning a new garden bed now is a good time to start the process of smothering that patch of lawn or weeds. Start with a good layer of newspaper and/or cardboard.
Finally, some thoughts on garden trends. When I was in London, I attended a talk by garden designer Jo Thompson (jothompson-garden-design.co.uk) touting her glossy new book, “The New Romantic Garden.” The gardens (a few celebrity names were dropped) were lush and gorgeous but I couldn’t help wondering at the expense of all those plants and their care.
Then when I arrived home, Margaret Roach’s “A Way to Garden” blog/podcast shared her conversation with Teresa Woodard discussing her new book, “Gardening to the Max: Joyful, Visionary, Maximalist Design”. Whew! Her message, while more rah rah than romantic, was similar to Thompson’s. It seems to me that the best message from these books is one that is familiar to all of us in the EAGC – we need to recognize the ecological benefits of gardens designed to provide food and shelter for wildlife and pollinators. To that end don’t be too hasty “cleaning up” your garden. You’ll find me cleaning my garage instead.

Becky M., Horticulture Committee
Horticulture Tips – March 2025
I Don’t Kill Tobacco Hornworms
I attended a showing at our local library of Doug Tallamy’s video lecture, “Nature’s Best Hope,” sponsored by Exeter Area Garden Club’s Environment and Conservation Committee and Wiggin Memorial Library. Tallamy, a University of Delaware entomologist, ecologist, and bestselling author on insects and the food web, drives home the importance of native plants to sustain the life cycle of insects that are critical to the life cycle of wildlife.
Tallamy’s concept of a “Homegrown National Park” encourages the transformation of yards into small reserves for native plants and wildlife, teaching that small actions can have a profound result. He advocates planting native species rather than or in addition to introduced plant species as these plants greatly support beneficial insects, especially caterpillars that birds depend on to feed young. 90% of the insects that eat plants can develop and reproduce only on the host plants that they share an evolutionary history. I have always considered myself an environmentalist but through Tallamy’s teachings, I realized I do not embrace the concept of a host plant well enough.
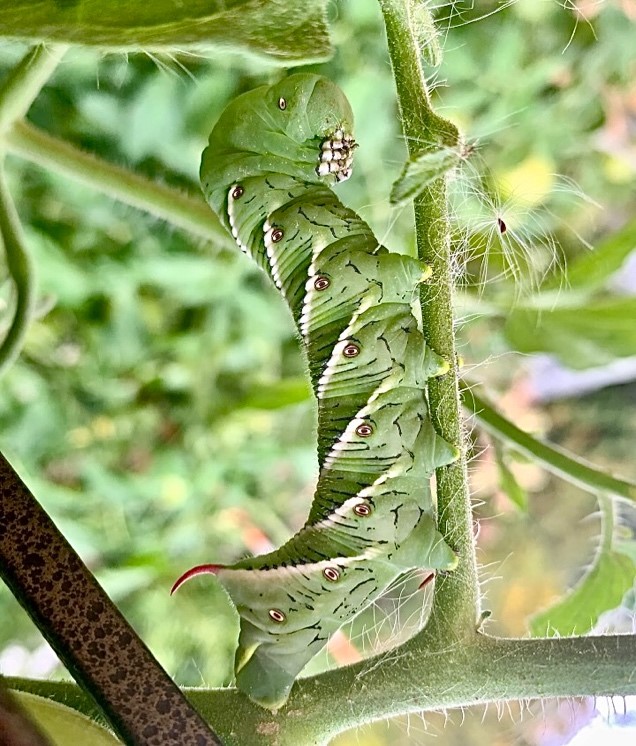
In his lecture, Tallamy emphasizes the critical role caterpillars play in ecosystems. He explains that caterpillars are a base of the food web, transferring energy from plants to other animals, especially birds. Being a bird lover who participated for years in the all-day Christmas Bird Count, this struck home. Most bird species, seed eaters or not, rely on insects to feed their young. A chickadee pair alone must feed their young a total of between 6,000–9,000 caterpillars for 16 days until fledgling.
Caterpillars get a bad reputation. What gardener wants to see decimated leaves, flowers, and crops in a garden? Yet, we know these caterpillars undergo transformations to become beautiful butterflies or champion moth pollinators of the night garden. Instead of eliminating caterpillars, we can take a natural approach, creating garden areas where caterpillars can freely feed. This allows the caterpillars to complete their life cycle to become pollinators or become part of the food chain. It works for me by simply having more tomato plants than I need and move those chubby Tobacco Hornworms from my healthy tomato patch to the sacrificial tomato plants. It works!
The garden club presenters ended the gathering by explaining Pollinator Mini-Grants that the Exeter Area Garden Club provides for Exeter and Stratham residents to create native gardens as pollinator corridor. They cautioned that “cultivars” are not the same as natives. Cultivars are basically grown from a native, but has been manipulated by the grower for certain traits like color or bloom size. The easiest way to identify cultivars are the quotes around a name so a coneflower that says, “Cheyenne Spirit” or “Yellow Beauty,” isn’t a true native. For all the details and the grant application, visit exeterareagardenclub.com.
Together we can provide more balanced landscape and a deeper respect for the natural world by thinking native. My small yard is still a work in progress!
Ann H., Horticulture Committee
Horticulture Tips – February 2025
The Almost Foolproof Blooming Houseplant
I admit that I’m a neglectful houseplant mom. During the summer, I inspect my veggies, perennials, apple trees, and wildflowers diligently – sometimes daily. So it’s a mystery to me why I can walk past a shriveled, leaf-dropping houseplant for a week before I notice its distress. After years of countless houseplants giving up the ghost under my watch, I’ve finally narrowed my plant selection to two varieties that are foolproof (me being the fool): Christmas Cactus and Hoyas.
Most of us know about or own a Christmas Cactus or one of its holiday cousins, so I’m going to discuss Hoyas. I acquired my first Hoya when I admired my sister’s extravagantly flourishing Hoya carnosa. She snipped a piece off, tucked it in a plastic bag with a damp paper towel and packed it in my suitcase for its trip from Iowa to New Hampshire. It arrived apparently unfazed and quickly established a new home in a pot in my southeast facing window.
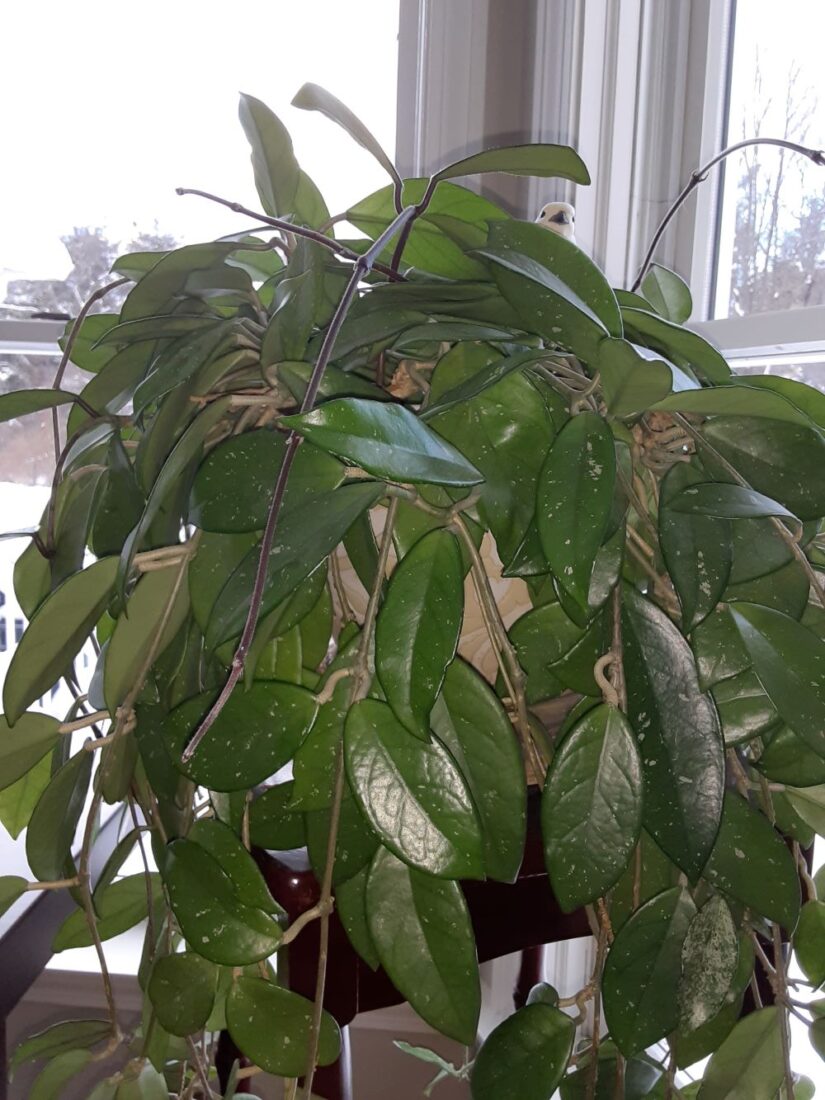
Over the next year, defying all odds, my hoya took over my entire window and bloomed almost continually. I was sold and went out to buy another. I managed to find an unusual variegated Hoya at Churchills and it also has prospered. So now I’m going to spread the word to the Hoya-uninitiated.
Hoyas are native to tropical and subtropical areas all around the world. They love to climb trees in their natural habitats, so they do best in a hanging pot or on a plant stand. Because there are 500 species, hoyas have a large range of foliage shapes and textures. A member of the dogbane family, Hoyas are cultivated for their aromatic blooms and unique foliage.
Most Hoya plants prefer to dry out almost completely between watering due to their semi-succulent nature, although some Hoyas do need more water than others. Most Hoyas do best in warm temperatures (60-90 degrees) and are well suited as indoor plants. They prefer bright indirect light and to be fertilized with a partially diluted houseplant fertilizer every other watering during the growing season. Hoyas are easy to propagate, and are sold as cuttings, either rooted or unrooted, or in pots. Because there are so many varieties, Hoyas can become addictive.
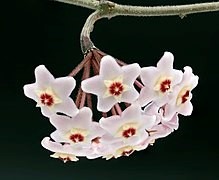
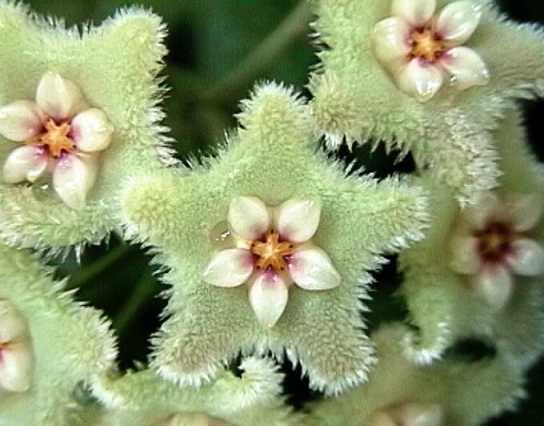
The Hoya blooms are clusters of small flowers, usually white or pink, and can be very fragrant. After the Hoya finishes flowering, it’s important to avoid damaging the base of the flowers. The plant uses these parts, called peduncles, to produce its next round of blooms. If a plant never flowers, check to see that it’s receiving a suitable amount of light, since this is usually the main reason that hoyas don’t flower.
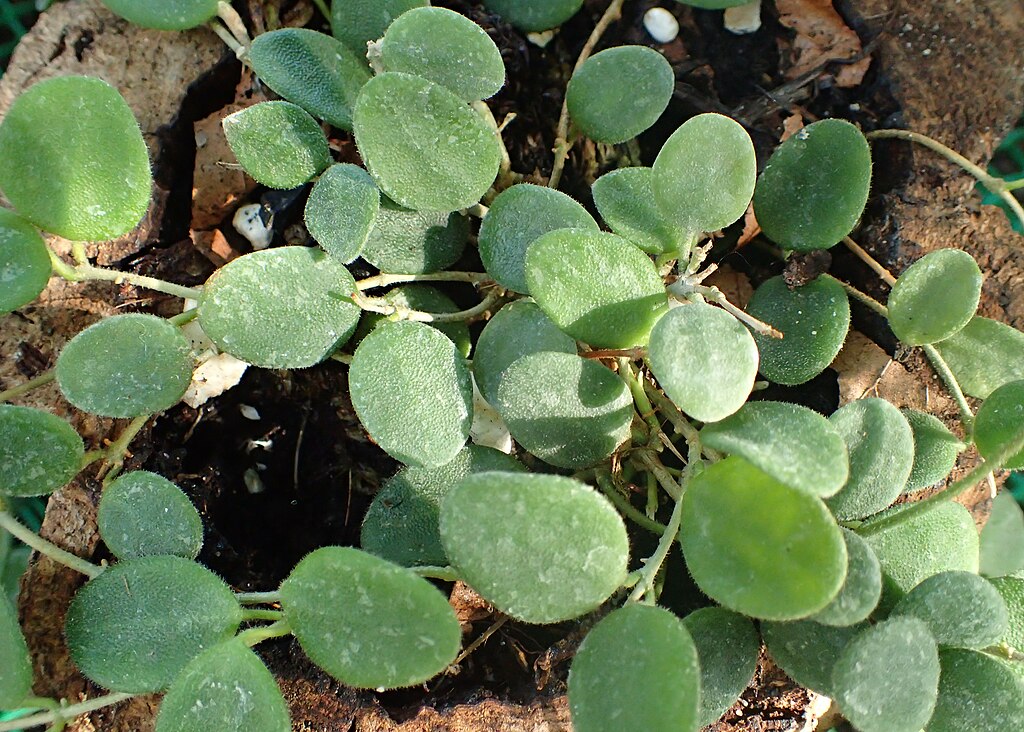
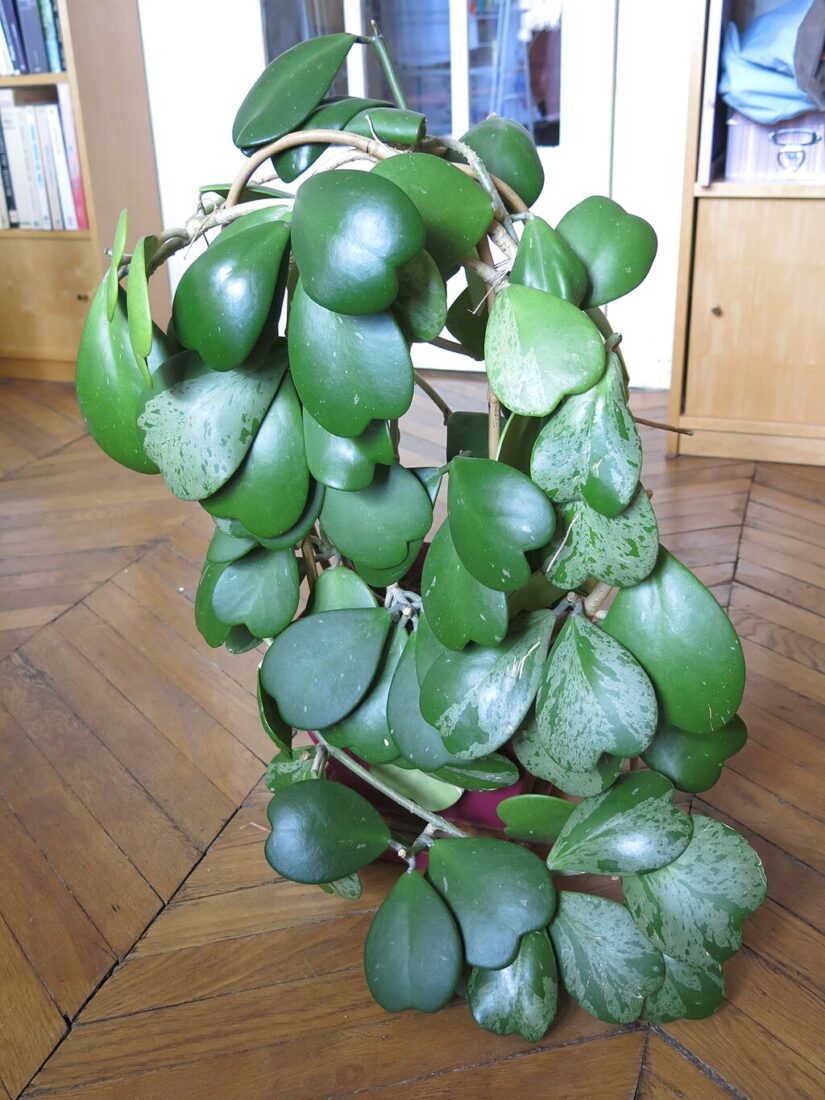
Although I’m sticking with my two Hoyas (not wanting to press my luck), here are a few of the other Hoya plants available for purchase:
All photos: Wikimedia Commom
LuAnn F., Horticulture Committee
Horticulture Tips – December 2024
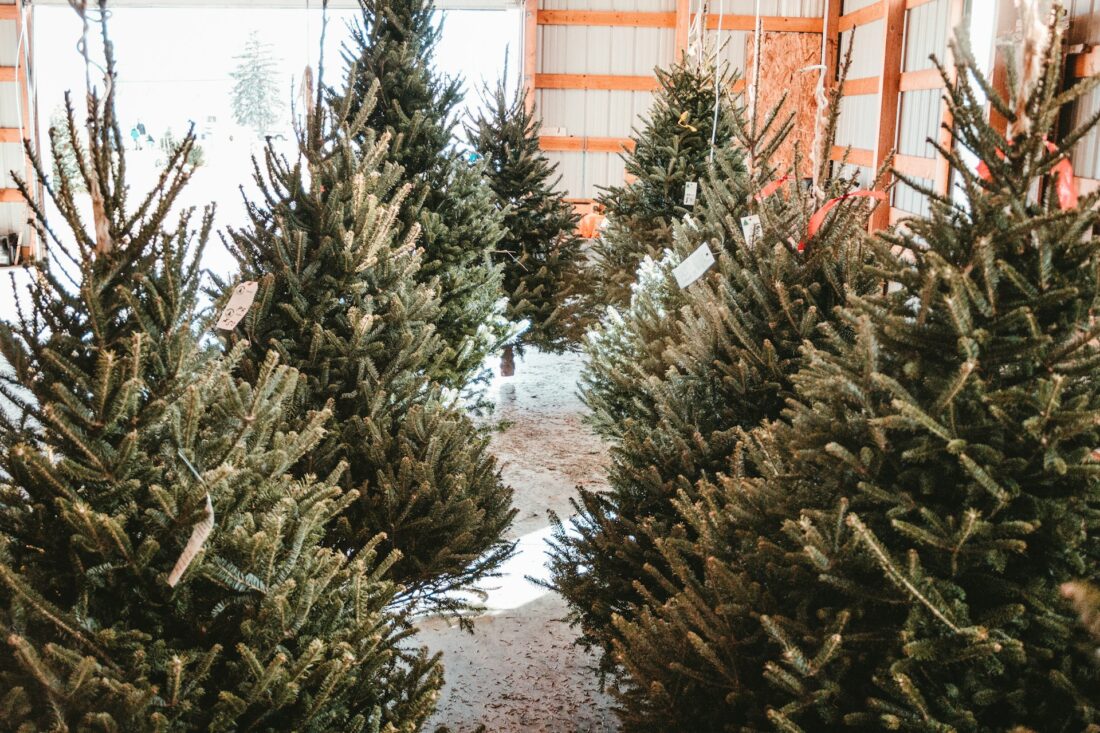
We just returned from Thanksgiving in NYC where my daughter and family bought a fresh baled Christmas tree at Whole Foods for $79, the best bargain in New York (as opposed to $225 for a fresh tree a block away), schlepped it back to their apartment on the scooter, and set it up, needles dripping, fresh cut nothwithstanding.
It made me think of the economics of Christmas trees – good or bad, benefits, drawbacks?
It can take a tree 10 years to grow to harvest size (12-14” per year). Approximately 30% of its cost is tied to its year-round care (see prices above!). And, as we know, it’s FARMING – with all the issues that entails! Weather, drought, flood, heat, field help, cost of fuel, etc. On average, over ½ of all trees planted are lost to one these threats. So, volume is important. Roughly 10,000 trees will cost $50,000 to plant. Do the math. Some farmers estimate a profit of 50%, some say 20%, per tree. Big difference.
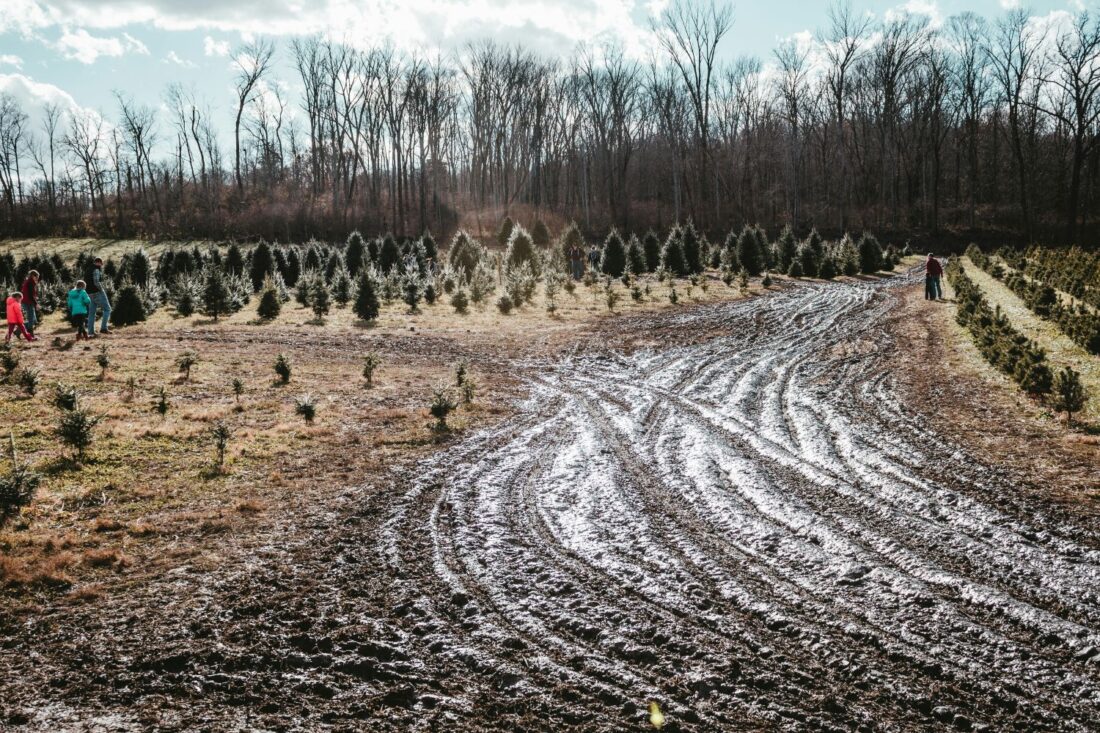
In 2017 there were 15,000 Christmas tree farms nationally. That number has stayed roughly the same. Oregon has the most, with over 4.7 million harvested annually. 25-30 million real trees are sold each year in the United States.
Some considerations: Are pesticides used? Might the tree carry allergens? How can we tell? Who makes the most profit (spoiler alert, not the farmer, wholesale tree cost is about $22)? Cost of fuel in transport? And then there is the cost – Balsam (most popular), Scotch pine (economical), Fraser fir (see prices above!), Douglas fir, Norway spruce (hard to find!)?
Benefits: Christmas tree farms offer sanctuary for many species of birds and insects – bobolinks, killdeers, waxwings, robins. Voles, mice live under the trees and provide food for coyotes, foxes. They are pulling carbon from the air. Once the season is over, the dead trees provide cover for animals, can be ground into compost, used for beach erosion or cover on garden beds!!

Now, some fun facts. Teddy Roosevelt banned Christmas trees in the White House, being an avowed conservationist (but his kids hid one in the sewing room). The most famous tree of course is in Rockefeller Center in NYC. Larger tree plantations use helicopters to move the cut trees to refrigerated trucks. A baler costs over $16,000. Fraser fir is the most popular tree. Two trees are usually planted for every one cut.
In summary – enjoy your tree, whatever type and Happy Holidays!!!
Kathryn J, Horticulture Chair
Horticulture Tips – October 2024
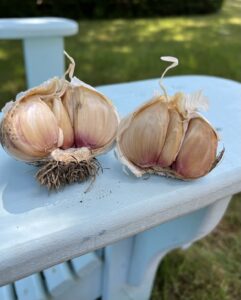
Garlic
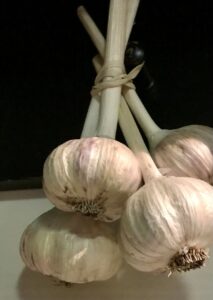
I wanted to revisit my past garlic article as I’ve since learned something very surprising about storing garlic and staying healthy. In my former article I spoke about how I became interested in growing it and the journey to get there. I grow about a hundred bulbs a year and ship some to friends and to a daughter in California. Hard neck garlic doesn’t grow in warmer climates because it likes to winter over. I plant it in October near Halloween and harvest in July or August. I let it grow until it looks died out. I’m growing some giant bulbs with this method.
You want to begin with an organic clove of garlic and plant in organic composted soil for best results. Start by breaking open the bulb and plant root down about two inches and cover it over. I then cover with organic straw and walk away until about April when the garlic has pushed through the soil and hay. I begin to water it a few times a week and feed it organic Neptune seaweed and fish fertilizer. They are in full sun. I pull away a circle of hay to let a bit of sun in and wait and water until mid-July. I don’t remove the hay.
Three of my family members removed the hay in spring and the rain destroyed the whole crop. The other family members grew very small bulbs. We are all growing the same garlic from my sister source. I gave them all replacement garlic to grow and a caution about leaving the hay on. You can grow it easily and have a large harvest if you’re interested in doing so.
I had so much garlic this year I didn’t know how to store it long term. The prior year we put it in organic olive oil and stored in the fridge. I read an article about why not to do that. I called UNH Extension Services about the article and asked Stephanie her opinion. She had not heard of the danger of doing that. She had to call a scientist in Georgia to get his opinion. A few days later the article was confirmed that storing garlic in olive oil in the fridge for more than three days can cause botulism. We were all pretty shocked by that and I felt the need to share.

I now store it in the freezer broken onto individual peeled cloves. I put those into a freezer zip lock and store that on a freezer safe box to avoid frost. It’s working out great.
I’m happy to answer any questions if any of you want to try planting some. I’ll mention here that a lot of the garlic in the supermarkets is from China. The roots are dug out of the bottom in order to ship here, and they are also bleached. If you don’t want to grow your own, you might consider the farmers’ markets.

Donna R., Horticulture Committee
All Photos: Donna R.
Horticulture Tips – September 2024
Columnar Basil
The standard sweet basil most of us use adds a distinct flavor to any dish. It is popular in Italian, Mediterranean, and Asian cooking. But did you know there are 17 different basil varieties, each having its own unique flavor, color, growth habit, and use? From green to purple, large or small leaves, sweet or spicy or citrus flavored, all basils have one thing in common: they grow in zones 8 -11. For gardeners here in NH, that means we can only plant basil outside in the warmth of the summer but need to bring it inside for the winter for it to survive.
Growing the standard sweet basil as an annual has challenges. Often after a few cuttings, and battling with the summer heat, basil has had enough. Leaves become tougher, flowers begin to form in the hopes of setting seeds, and the flavor can change to licorice or a bitter taste. The last thing on your mind is growing new basil in the middle of summer. But that’s when you want it because all of your tomatoes are beginning to produce and your mouth is watering for some good bruschetta, or a salad with fresh mozzarella, tomato, balsamic vinegar, and fresh basil!
Basil lovers, we are here to tell you there is a better way!

Columnar basil. Columnar basil, also known as Greek basil, is a hardy herb with the same sweet flavor you expect, just with smaller triangle leaves. It is unique because Columnar basil never flowers. And because it never flowers, it does not change flavor as the season progresses. It is very disease resistant and few insects seem to bother this plant. You are most likely asking yourself, where can I find this remarkable basil plant if I can’t grow it from seed? Columnar basil can only be grown from cuttings, so you need to either buy the plant from a nursery that offers it or have a good friend willing to provide a cutting.
We at the Exeter Area Garden Club have a good friend! And at the first meeting of the new 2024-25 season, we will discuss propagating this special plant and provide a cutting for EAGC members to take home. This is one of those plants that will root quickly without any extra effort. Simply take a cutting of about 3” long, keep leaves on top of the stem, and remove all other bottom leaves, then put it in good potting soil. Place the plant in a location that gets a good amount of morning sun but is shaded in the afternoon. The soil should be kept moist. Within a month, the plant will quickly begin to grow. When it is a larger plant, taking cuttings to eat or propagate will encourage the plant to branch out and become bushier. In warm weather, this plant can grow 2’ tall or more.
It will not like the cooler temperatures that fall evenings bring. If the temperatures dip below 55°F, bring the plant inside for the night. Once temperatures become consistently cooler in the daytime, it should be brought in to stay for the winter.

To keep it growing as a houseplant during the winter, you will want to give it as much light as possible by keeping it near a very sunny window or providing grow lights. You should keep the soil moist, which is sometimes a challenge in our dry winter months!) Do not fertilize the plant over the winter. Even if your plant doesn’t thrive, if you can keep it alive until the warm temperatures return, it WILL make a triumphant return once it is repotted and returned to the warm summer sun.
Patti E., Horticulture Committee
Horticulture Tips – August 2024
Transitions
Have you noticed the days are growing shorter? Yes, summer is slowly drawing to a close.
With enough precipitation last summer coupled with a mild winter, plump buds were waiting to burst this spring. Spring brought ample rainfall and cool temperatures giving us ‘the perfect storm’ for an explosion of growth and color in gardens everywhere. Early summer brought unusually vivid shades of deep blues and pinks in hydrangeas. Branches bolted across pathways and later I had fruit burst in abundance on plants.

Heavy fruit on my doublefile viburnum fed birds for weeks, and the plentiful berries on my two serviceberry trees caused limbs to actually sag as they lured feathered and furred visitors to dine on tasty treats.

Now August is upon us and I’m feeling the first whispers of fall in the garden. It a quieter garden. The exuberance of blooms and growth are gone, but there is still appeal in the landscape. A scattering of annuals, roses, salvia, ageratum, limelight hydrangea, and the limes leaves of coleus, heuchera, and aralia offer quiet beauty.
My chores are slower paced and I can think more about what worked and didn’t work in my first attempt at rewilding my garden. I’ll take advantage of late summer plant sales, order spring bulbs, and continue to fatten up my backyard birds before they begin their migration to warmer climes.
Happy Gardening!
Ann Hohenberger, Hort Committee
Horticulture Tips – July 2024
Much Ado About Mulch

Before moving to New Hampshire, we simply raked readily available pine needles as mulch. How beautiful the freshly fallen needles looked piled light and fluffy along the borders. Those of you who have traveled south have certainly seen both private and public gardens covered with lovely, tawny or amber shades of pine needle mulch.
In our NH neighborhood, the association supplies us hardwood mulch. Our borders are mulched for two years, then rest a year to minimize nitrogen deficiency as microorganisms complete the decomposition of old wood chips that are raked smooth over the soil. The hardwood mulch, like what is readily found in the marketplace, is dyed brown. It looks lovely when applied but, the color soon fades and after working in it, my hands or gloves are stained brown. Can there be a better option? Yes, I think I may have found it.
The garden center a mile from where I live is selling dried shredded leaf mulch. After learning about it, I rushed to check it out and I liked what I saw. It was dye-free and made locally just a couple of miles away. While paying for my order, two different landscape company employees were ordering bulk for their firms. Witnessing that gave me a little nod that perhaps I was making a good decision.

Once delivered, I found the mulch light and airy and easy to transport by bucket or wheelbarrow unlike the bulk heaviness of wood mulch. I did not apply it very heavy to borders since this was an “off year” for neighborhood mulch. I also feared the mulch might lock in too much moisture and perhaps develop fungal disease as it decomposes.
I have to report after several weeks that I wholeheartedly favor shredded leaf mulch over wood mulches. No fungal disease as I feared. The leaf bits are slowly decomposing and releasing nutrients into the soil, feeding earthworms, blocking weed growth, helping to control soil temperature. The mulch is fine enough that I was able to toss amounts on areas of the lawn where I thought the soil needed nutrients, and I added a quantity to my compost pile where it is speedily working to convert it to nutrient-rich soil. In my opinion, with leaf mulch I have added the closest thing to compost to my ornamental garden borders.

On a final note for our EAGC members, my very first clivia plant given to me by fellow member, Dianna, has finally bloomed after caring for it the last three years. It didn’t bloom during the winter months as I expected, but the wondering and guessing for 3 years as to what color blooms it would produce is over. Isn’t it glorious? ! Is anyone else’s in bloom this late?
Ann H., Horticulture Committee
Horticulture Tips – May 2024
Moss: Maligned and Misunderstood
Mosses are found on every continent. It has the ability to grow in the most severe environments on earth. No matter where you live, chances are it colonizes nearby, spreading across shady moist bare spots, in dense clumps over rocks, in sidewalk cracks, over bricks, and carpeting forest settings.
Seeing moss growing in the lawn or garden, homeowners may consider it a nuisance or a sign of unhealthy soil. While mosses may not be the most desirable plant for homeowners, removing it from our gardens and landscape may become a thing of the past. Scientists now know how mosses, over 12,000 species worldwide, do the most amazing things for the environment. They have been on the planet for millions of years, and as one of the first land plants, have seen some drastic climate change over time and have survived. Despite misunderstandings, moss continues to play a vital role in sustaining ecosystems.

Moss serves as a critical component of ecosystems, contributing to soil stability, moisture retention, and nutrient cycling. It acts as a natural filter, purifying water and absorbing pollutants, thereby improving water quality. It has the ability to soak up 20 times its weight in water like a big living sponge, which means it is able to cool the air as well as purify the air by taking out pollutants.
Without moss, our ecosystems would suffer. It contains a rich biodiversity, providing habitats for insects, amphibians, and other small organisms. It protects soil against erosion and it plays an important role in collecting vast amounts of carbon. Plants and soil actually benefit from moss. It can control harmful pathogens and decompose organic matter. After the volcanic eruption of Mt. St. Helens, it was the mosses that returned first creating healthy soils for the return of trees and other plants.
My misconceptions about moss changed after I visited the moss gardens of Norie Burnett in Richmond, Virginia. Norie emerged as a pioneer in showing the beauty and importance of moss through her moss gardens, shedding light on its significance while dispelling misconceptions. She has transformed her yard into an enchanting moss landscape, captivating visitors with the beauty and ecological significance. Burnett celebrates the diversity and resilience of different moss species as a living laboratory while educating the community about its importance and ecological functions. On my visit, she demonstrated its potential to reduce urban heat, improve air quality, and create biodiverse habitats.
Her gardens inspired for me a better appreciation for moss and when I encounter it in my garden today, I simply let it be and let it work.
Ann H., EAGC Horticulture Committee
Photo: Kate Stone
Horticulture Tips – April 2024
Do daffodils play well with other flowers – in arrangements?

Those lovely bright daffodils are definitely a sign that spring is here…. even if they endure a late snowfall. Despite every part of a daffodil being poisonous, many of us either have spent time religiously planting them in the fall for that spring reward or grab a bunch at the grocery store as we breeze through. A big bunch of daffies look so lovely in a vase on the counter, but it is probably not a good idea to put them in a vase with other cut flowers. Daffodils have a negative effect on other cut flowers causing premature wilting and a quick demise.
Much research has been done trying to discover the cause. As it turns out there are two factors, but both are a result of the mucilage, that thick, gooey material observed from the cut stem. There are compounds in this gooey drippy matter that cause the problems.
The first surprise is that there isn’t one sole reason, but two. Both come from mucilage, a thick, gooey substance secreted from daffodil stems when they are cut and then placed in water. Compounds in the mucilage are to blame for the effect daffodils have on other flowers, specifically the same alkaloids in the plant parts that make them poisonous to us.
This same alkaloid, narciclasine, in daffodil mucilage is not only poisonous to humans but can have a negative effect on some other cut flowers -especially tulips and roses. Iris on the other hand seem to benefit for the presence of this alkaloid.
Some other flowers, especially roses, are not affected by the alkaloidal properties of the mucilage but by the sugars and polysaccharides in the mucilage. These sugars and polysaccharides cause increased bacterial growth in vase water. These bacteria block water uptake through the xylem of the plant stem.
Not to be out smarted by these culprits- folks have found a way to get the daffodils to play nicely with other cut flowers in the same vase. So, if you’re set on having daffodils and other flowers in the same vase, is there nothing to be done? There are some chemical solutions but there is an easier way – a sort of conditioning process. Place your cut daffodils in a glass with clean water for 3-4 hours, they are then ready to share the vase with other flowers. DO NOT RECUT THE STEM – as the mucilage with flow again. Even using this method, the arrangement may have a shorter lifespan than without the daffodils.
Some helpful tips on harvesting daffodils
- If you have sensitive skin, you might want to wear gloves to avoid the mucilage
- Avoid cutting when the bloom is straight up in line with the stem – it will never fully open
- Pick when the color is visible and the head is perpendicular to the stem, doubles pick even later.
- Use your hands to harvest, reach down to the base of the stem and pull up. Yiou will get the longest stem and less mucilage.
Enjoy these happy signs of spring along with the bird song and the warming breezes!!

Pat N., Horticulture Committee
Photos by Pat N.
Horticulture Tips – March 2024
About Rabbits…
In the quiet of my winter garden as the sun filters through spent vegetation, there they are: the rabbits. There are two that call this garden home these frigid months but by summer there will be more. Last week, I watched from the window as they gnawed on the bare branches of my new Nitty Gritty roses reducing them to remnants. The frustration is real. It has become a battle of wills each year: me vs. the rabbits, both of us seeking what we want from our shared patch of earth.

As much as I curse their appetites or chase them away like Farmer McGregor shouting, “Stop thief,” I find myself torn between compassion and frustration. I am caught between the desire for a charming garden and the acceptance of untamed nature.
Slowly I’m learning the lessons of patience and empathy as well as choosing plants their little noses reject. Read on to enjoy the narrative of a fellow gardener’s humorous, yet heartfelt encounter with tiny rabbits in her garden.
Ann H.
A Bunny Tail
I was working in my Maryland garden one day with our German Shepherd, Amber and cat, Tigger, there to help. As we moved along the rows, I happened to see Amber take a step. As her foot hit the ground, a baby bunny went shooting into the air. Luckily, I was not too far off. Amber looked ready for a rollicking game of toss the bunny and Tigger seemed to think an easy lunch was being served! I was able to gently place my kid-size rake over the bunny before anyone else could make a move.
Then, with bunny in hand, I searched for the nest. I soon found five more little bunnies sleeping peacefully and placed the runaway back into the nest. I covered the nest with the rake and went to find a more secure covering. Amber and Tigger were ‘guarding’ the area when I returned with a piece of chicken wire. I covered and camouflaged the nest and then, with dog and cat in tow, went into the house to find out what to do.
It turns out, mother rabbits generally leave their young alone most of the day. They return to the nest sometime between dusk and dawn to nurse the babies. Knowing this, I waited until the next morning to see whether or not the mother had rejected the little ones. I called my neighbor over to see what had happened. When I uncovered the nest, we found 6 very hungry bunnies hopping around. We put them in a box and took them to a nearby animal rescue area.
We were told that the little guys were almost ready to be on their own and that they would care for them until then. As we started to leave, my neighbor blurted out, “But won’t the mother be heartbroken?”
The ranger assured her that momma bunny was probably out looking for a ‘good time’ already.
Karen W., Horticulture Committee
Photo: Ann H.
Horticulture Tips – February 2024
AVOCADOS – FRIEND OR FOE??
I love avocados. On toast, in salads, in a smoothie. They have monounsaturated fats (the good kind), Vitamins (B5, B6, K, C and E), minerals, fiber, antioxidants, 2 times the amount of potassium as bananas. And 3 grams of protein!
But there is a dark side. You’ve read how much water it takes to grow almonds? Well, hold on to your seat. One avocado takes 4 times the amount needed! Then there are the import and environmental concerns. Here we go………………………

First – avocado history. They grow abundantly in Central and South America in tropical climates. They need 40-50” of rain yearly plus moist soil. In 1914 a ban on imported avocados was placed by the US government. So, ours were grown in California and Florida. Until 1997. President Clinton removed the ban and allowed imports from Mexico. As a result, 90% of avocados now sold in the USA come from Mexico.
We have a huge hunger now for avocados. In the 90s and 00s, dietary emphasis was placed on low carbs and low fat. Avocados have neither. So, they were discouraged. As diets changed, they became more acceptable, even encouraged for their benefits noted above. Now, the USA eats 2 million tons of avocados annually – approximately 7 lbs per person per year! I can attest to that.
So, what’s the bad news? California grows most of their crop in 5 coastal counties – NOT tropical zones! Therefore, water is needed, especially since climate is changing and there is less rainfall. One tree in Southern California takes 91 liters daily per tree (about 74 gallons for 1 lb). Research claims anywhere from 50-84 gallons needed per avocado! Current practices (trying to reduce water consumption) are including soil monitoring, automated irrigation, higher density planting. But the water is pumped from underground aquifers. That is limited and decreasing.
Mexico – oh boy! Armed men are deforesting huge swaths of pine and oak forest in order to plant more crop. Criminal gangs. Corrupt landowners and officials – all involved in clearing forests to grow more avocados. Seizing land illegally. Depleting aquifers. Bribes paid. Gangland killings for the profit the crop offers. Fewer forests = reduced carbon storage, more climate-warming gasses, drained aquifers. Then there are transportation issues – fuel for trucks, greenhouse gas emissions, carbon emissions.
What is the solution? Perhaps moderation in eating avocados? Consider alternatives – coconut milk, edamame and fava beans, pesto, asparagus. I won’t give up my avocado toast, just maybe not eat it so often. What about you?
Kathryn J., Horticulture Committee
Horticulture Tips – January 2024
DO YOU HAVE PROBLEMS DRIVING AT NIGHT?
You are not alone!. Many insects, animals and plants are affected by the lights that are in their environments. What does that have to do with your gardens? Your landscape is all affected by the lights you have inside and outside your home. The Dark Skies that surrounded those of us growing up in the 1940s-1950s no longer exist. We remember going out to play kick the can at night and being surrounded by fire flies. We listened to the peepers and frogs. Today, we light up our yards and leave lights on all over the house that project throughout our yards. Few, if any, fire flies, not so many peepers or frogs.
What can we do to help? Dark Sky International suggests several things.
Inside your house or apartment:
• Keep light inside your residence by shutting curtains or blinds
• Turn off any unnecessary lights in each room
• Use dimmers or timers to reduce the use of light
Outside lighting – use downward facing lights when at all possible
• Use downward facing lights on patios or balconies
• Replace cool colored lights and reduce wattage, if possible
• Use dimmers and timers
• Avoid spot lights being left on
These changes will help reduce the number of insects drawn to your lights, thus reducing insect deaths. As we all know, insects are the main food for bats. They also serve as food sources for birds. Moths get fixated on light bulbs. This nearby light source disrupts their normal flight patterns which normally fix on a distant source of light, like the moon, to fly in a straight line. Other nocturnal animals living in our environs lose their sense of day/night and their circadian rhythms are disrupted, leading to physical, mental, and behavioral changes. Even our beloved plants and flowers try to adapt to this changing environment.
Here at Riverwoods there have been some efforts made to comply to these ideas. You will notice on the light post on the lower right that half of the light has a cover over it —this is to keep that light from disrupting residents whose apartments face the light. Similarly shading could be used around lights at your home to keep light from extending out into your yard while lighting your patio.

Linda V., Horticulture Committee
Horticulture Tips – December 2023
The 2023 USDA Plant Hardiness Map of New Hampshire
Gardeners really aren’t surprised at the newly released 2023 USDA Hardiness Zone Map. The updated map from the 2012 USDA map helps gardeners determine which plants will likely survive based on the average lowest temperatures in winter. The map divides the country into 13 hardiness zones, each zone a 10° difference in the lowest average temperature. The zones are then subdivided into an a and b that designate a 5° difference in lowest average temperature. About half of the country has shifted half a zone, a 5° difference warmer in winter. The 2012 map was based on 30-year averages of data from 7,983 weather stations. The updated 2023 map is based on 30-year averages (1991-2020) of data from 13,412 weather stations.

In New Hampshire, the hardiness zone map divides this state into seven zones: 3b, 4a, 4b, 5a, 5b, 6a and a new 6b. NHPR states that New Hampshire and Northern New England winters are among the fastest warming areas in the country since 1970, regardless of our occasional record lows or periods of extended cold. Some parts of the southern part of the state have warmed 5° and some zones have not changed at all. My location in Exeter NH, remains zone 6a, -10° to -5°. However, looking back to the 1990 Hardiness Zone Map, this location was labeled zone 5b, -15° to -10°, an average of 5° colder in winter. We are warming.

To access the new 2023 Plant Hardiness Zone map, go to HTTP://planthardiness.ars.usda.gov. Type in your zip code in the search box or simply click anywhere on the interactive map to bring up different areas of the country. There are several terrific new interactive widgets to isolate and zoom into your exact location. Using the layers you can choose to include roads, names of places, zone layers, adjust the layer transparency, and zoom right into your backyard in color.

As informative as, the USDA Plant Hardiness Zone map is, it is not a guarantee that a plant will survive the winter. The map is based on average extreme minimum temperatures to help determine which perennial plants will likely to thrive. Microclimates, wind, soil, moisture, humidity, pollution, snow, and winter sunshine can affect a plant’s survival. It’s always best to choose native species that are well adapted to specific growing areas and temperature extremes. Although we are 6a, when questioned about zones at Rolling Green Nursery, we advised buyers we are zone 6a but to think about extreme weather fluctuations and consider 5b conditions, especially if planting near the edge of a zone.
Ann H., EAGC Horticulture Committee
Horticulture Tips – November 2023
Indoor Gardening – Houseplants & Their Problems
Outdoor gardening is (mostly) wrapped up for this year. Now is the time to focus some of that gardening energy on our indoor gardens – our houseplants. Houseplants that basked in the fresh, humid air of summer and now adjusting to a new, drier environment indoors. Some may have even brought along stowaways from the outdoors. This is the perfect time to examine all resident houseplants for problems.

Photo by vadim kaipov on Unsplash
There are three categories of problems that plague houseplants: pests, disease, and abiotic (caused by nonliving agents, for example, environmental, physiological, or other non-biological factors.)
Common pests and their effects include:
Aphids Tiny green, brown, or black insect, located on the undersides of leaves. Symptoms – feeding damage causes stunted plant growth and curled or distorted foliage.
Mealybugs Scale insect with white cottony appearance on stems, undersides of foliage, and on nodes where the leaf or bud attaches to the plant’s stems. Symptoms – feeding damage causes stunted plant growth.
Mites Tiny, light-colored arachnids. Symptoms – webbing on foliage and stems. Feeding produces distorted yellowish foliage.
Scale Oval or round, brown insects on stems and leaves. Symptoms – Suck plant juices resulting in poor or stunted plant growth.

Scale on a leaf
Photo: Wikimedia Commons
Thrips Extremely tiny insects; adults are light tan to dark brown; appear white when young. Symptoms – Feed on foliage and flowers, causing them to become distorted and discolored.
Whitefly and Fungus Gnats Small, white or black gnat-like insect. Symptoms – Adults and young feed on leaves, causing the leaves to turn pale yellow or white. Gnat larvae feed on hair roots, stunting growth.
Non-chemical management of these insects includes using a stream of water to remove the insects, wiping the pest off, or picking pests off the plant by hand. Use yellow or blue sticky traps to detect flying insects like whiteflies, fungus gnats, winged aphids, and thrips. Larvae or eggs in the soil can be drenched with a solution of 1 part hydrogen peroxide and 4 parts water. If these methods fail, the plant can be treated with insecticidal soaps or pyrethrins. Be sure to isolate infected plants from healthy ones.
Diseases and Their Symptoms
Anthracnose Leaf tips turn yellow, then brown. Entire leaf may die. Remove infected leaves and avoid misting leaves.
Leaf Spot Leaf spots appear brown with a yellow halo; tiny black dots can be seen with a magnifying lens on the brown tissue; portions of or the entire leaf may die. Or leaf spots appear water soaked and may also have a yellow halo. Remove infected leaves, increase air circulation, avoid getting water on leaves.
Powdery Mildew White powdery growth on foliage. Leaf distortion: and leaf drop may result. Increase air circulation around plant; avoid saturated soils; remove severely infected foliage.
Root and Stem Rots Brown to black soft or punky roots; gridled soft stems with a brown or black ring near the soil line. Plants wilt and eventually die. Avoid overwatering; remove infected plants; where symptoms are infecting some but not all the roots, cut out infected roots, then repot plant using sterile potting mix and a clean pot.

Aphids
Photo Wikimedia Commons
Abiotic Problems
Abiotic problems are caused by environmental, physiological, or other non-biological factors. Not all problems are easy to diagnose and may be a combination of several factors.
Spindly plants – Not enough light or poor lighting conditions
Few flowers – Poor lighting conditions
Few flowers and excessive growth – Too much nitrogen fertilizer
Yellowing leaves – Overwatering; not enough light; relative humidity is too low,; soil drains poorly and remains wet for too long; injured by low temperatures resulting from a draft
Leaves scorched – Receiving direct sun
Brown leaf tips – Chemical burn from overapplication of pesticides or fertilizer; soft water; soil remains dry for extended periods of time; temperature is too low
Small leaves – Soil remains either too wet or too dry
Weak growth – Incorrect lighting; root system is damaged from being kept too wet
Wilting plant – Soil remains either too wet or too dry
General defoliation – Overwatering, poor lighting conditions, injured by low temperatures
LuAnn F., Horticulture Committee
Compiled from Penn State Extension
Horticulture Tips – October 2023
BAY LAUREL
(Sweet Bay, Bay Laurel, Laurus Nobilis)
Bay is a fragrant evergreen, large woody plant or tree with green smooth leaves that are used as seasoning in cooking and for health.


History
*Bay is the symbol of peace and victory. Ancients crowned heroes, poets, and wining athletes with wreaths of bay, hence the term, “Poet Laureate” that we use to honor poets today.
*Indigenous to Asia but quickly adapted to the Mediterranean climate.
*Homer mentioned bay laurel as an herb and medicine used by Ulysses in the Odyssey.
*Bedouins, nomads of the Sahara Desert, used the leaves to flavor coffee.
*It was believed that bay could keep you safe from thunder and lightning. In fact, during a storm, Emperor Tiberius could be found under his bed wearing a laurel wreath on his head.
*In 1575, English writer Thomas Lupton wrote that “one would never be ill, harmed by the devil, or injured” in a place where a bay tree existed.
*The death of a bay tree was considered an evil omen after an Italian plague in 1629 when all bay trees withered and died.
*In 1986, President Reagan was given 5 bay trees that were grown from cuttings in Belgium. The original trees are now grown in Longwood Gardens in Pennsylvania.
*During the Middle Ages, bay was used for snake bites, wasp and bee stings, colds, rheumatism, urinary problems, ear aches, bruises and scrapes. Bay was also used to promote menstruation and to induce abortions.


Culture
*Bay is an attractive and useful addition to the hardiness zone 8-10 garden. In the proper climate, bay will grow into a tree 25-60 feet tall. Plant in a well-drained and sunny location, well-mulched, and sheltered from cold, dry winds.
*In colder climates, plant in a container large enough to sustain growth for several years. If there is room, add small herbs around the edge, such as parsley thyme, or marjoram. Move the container indoors during the coldest part of the year.
*Best to buy young plants, as seeds are very slow to germinate. They can also be propagated from fresh green shoots.
*Leaves are best picked in the morning but can be harvested and dried throughout the year.
*Place boards on top of leaves to keep them from curling. Full drying takes about 15 days.
Health Benefits
*Bay is an astringent, diuretic, and has bacterial and fungicidal properties.
*Bay essential oil can be massaged into sprains , bruises, and skin rashes.
*Infused bay leaves added to bath water relieves muscle spasms and improves skin hydration.
Bay can:
*Relieve headaches
*Reduce flatulence
*Promote sweating at the first start of a cold or flu
Culinary
Bay has a balsamic aroma with notes of nutmeg and hints of lemon and almond. Fresh leaves have a stronger flavor than dried. Tie fresh leaves in a bundle and store in a dark place to dry in airtight containers to help retain flavor. However, leaves will lose flavor after 3 – 4 months.
Uses:
*Rub fresh leaves to release aromatic compounds.
*Always remove the dry leaves before serving food and never cut up dry leaves in a recipe. Use whole leaves as dried leaves are sharp and pieces can cause discomfort to the mouth and throat unless well ground.
*Mix with thyme and parsley to make bouquet garni.
*Add to soups, sauces, stews, shellfish, pickling brines, marinades, poultry, and fish.
*Add to cooking liquid for beans, lentils, carrots, and potatoes.
*Use with beef, chicken, lamb, pork, game, fish, chestnuts, tomatoes, rice, orange, lemon, plums, and figs.
*Infuse cream for custards and puddings.
*Add with wine to fruit compotes and autumn fruits poached in wine.
*Use the twigs for flavorful skewers for fish.
*Skewer fresh leaves between chunks of fish, meats, or vegetables.
Recipes:
SAGE, JUNIPER, AND BAY LEAF RUB FOR PORK
1 Tb. dried sage, crushed
1 t. juniper berries
2 bay leaves
2 stalks thyme
1 t. salt
1 clove garlic, crushed
1 t. finely grated orange zest
1 t. coarsely ground pepper
1 ½ oz. mascarpone cheese
(Fruity olive oil or butter)
Bay leaves
Mix all ingredients in a small bowl. Scatter the mixture over the pork and pat it in lightly. If roasting, sprinkle with a fruity olive oil or dot with butter. Scatter over a few bay leaves toward end of cooking.
HORSERADISH AND BAY LEAF COATING FOR BEEF
1 clove garlic
1 t. peppercorns
1 t. mustard seeds
2 t. freshly grated horseradish
2 bay leaves
1 Tb. chopped flat leaf parsley
1 Tb. mild olive oil
2 Tb. Soft butter
Sea salt
With a food processor using pulse mode or using a mortar and pestle, work the garlic and peppercorns until crushed. Add the mustard seed, horseradish, bay leaves, and parsley and pulse until well-mixed. Add the oil, butter, and pulse.
Coat beef, wrap in plastic wrap, and chill at least 30 minutes but preferably overnight. Lastly, uncover, season with salt and proceed with your favorite beef recipe.
Carol C., Horticulture Committee
Photos by Ann H.
Horticulture Tips – September 2023
My Blended Family
It’s my family of native/non-native plants that is becoming blended as I learn more about the many benefits native plants provide. They are a hedge against rapid global warming, will improve resilience to drought or the excessive rain as we’ve had this summer as well as reducing our carbon footprint. Most important to me, they have evolved along with insects and avian life and they provide them essential habitat and food, something I’ve always tried to provide for wildlife.
My pocket-sized garden is nurturing both native and non-native trees, shrubs, and perennials, but I’m working hard to move toward more native. Some of my non-native treasures moved from my mother’s garden to my garden, eventually following me out of state. I love my hydrangeas and my crabapple in bloom is spectacular. My colorful peonies are a spring tonic and my Japanese enkianthus shrubs that I moved from the south are favorites.
Non-Natives:


So instead of replacing my can’t-live-without non-native plants for a purely native garden, the bones of this small garden stay put. As I learn more about our local natives, I am slowly weaving them in here and there. Winterberry snuggles close to the enkianthus and a Chinese pearlbush that bursts in spring with tiny pearl-like blooms along the branches before opening wide. Nearby bushy baptisia forms a thick mass for privacy and native wild ginger provides the edge of border in another blended garden. Nitty-Gritty roses bloom inside a boxwood parterre beneath the boughs of a native serviceberry tree, and bright orange blooms of butterfly weed drape across the green of a boxwood walkway. It is a blended family that seems to be working so far.
Natives:


I am far from a native expert, but I am finding my own way, sourcing native plants, and gradually adapting and re-wilding my space. I am enjoying what a blended garden can be.
To find natives that will work best in your garden, visit the National Wildlife Federation website and enter your zip code. Plants are ranked by the number of butterflies and moths who use them as hosts.
Ann H., EAGC Horticulture Committee
All photos by Ann H.
Horticulture Tips – August 2023
When it rains, it pours…
What a saturated New Hampshire summer this has been after last summer’s dismal drought. We still have over a month to go in summer, but already June and July 2023 have seen a total of 15.06 inches of rain. Our state has endured flooding, heavy mosquito activity, increased tick activity, loss of crops, and contaminated waterways. In our own gardens, having a rainy growing season can both benefit and challenge a gardener. Increased rainfall provides ample water for your plants, but it brings with it potential harm and loss.
The Good in my Garden:
- Water Supply: The rainwater has really helped maintain consistent moisture levels in the soil reducing my need to regularly drag the hose from border to border or use the soaker.
- Lush Growth: Good thing I love the color green as the abundance of water has led to rapid and lush growth in just about all my plants. Not only are plants healthy-looking, everything is colossal this summer. My tomatoes have been spectacular and healthy and corn from farm stands is the sweetest that I can ever remember.

- Less Watering: With the natural rainfall, I am spending hardly any time watering plant containers. I have simply used a watering can to top off about a dozen pots of blooming plants that are grown high out of the reach of hungry rabbits.
- Reduced Watering Costs: And the best news is our water bill decreased drastically as compared with dry seasons.
Challenges I’m facing:
- Soil Drainage: Excessive rain can lead to waterlogged soil, which can suffocate plant roots and lead to root rot. Low sections of our lawn have endured ponding and some of the turf actually died. I’ve spent time leveling areas with topsoil, making sure I have better drainage for the future.
- Disease Spread: High humidity and wet conditions encourage the growth of bacterial and fungal diseases such as powdery mildew and other blights. I’ve pruned diseased and damaged plants selectively to cause less stress, however a sad casualty has been my clematis that I totally removed.
- Weed Growth: Along with healthy plants, weeds seemed to bolt and go to seed in record time this summer. I set aside time to pull weeds on a regular basis or it could be trouble. The most obnoxious one in my garden this summer has been an abundance of bittersweet. Best to find and pull that brute while small!
- Pest Problems: Pests, like slugs and snails, thrive in damp conditions. It’s never been an issue in my garden until this year. Rather than managing them with a pest control, I choose to remove critters when I see them or allow my birds, toads, frogs, or even the neighborhood opossum to do the work for me.

- Erosion and Soil Compaction: Heavy rainfall can lead to erosion and compaction, but thank goodness I have mulched well and have good ground cover to help maintain soil structure. This fall, I’ll use a garden fork to aerate compacted areas to allow air and water to penetrate better.
How has your garden fared this wet summer?
Ann H., EAGC Horticulture Committee
All photos by Ann H.
Horticulture Tips – June 2023
Topsoil Truths

It’s pretty much ‘Buyer Beware’ when it comes to purchasing topsoil. There is no legal definition of the product. Local definitions may vary depending on jurisdiction and context. Gardeners know topsoil is not a lifeless pile of earth. Topsoil refers to the uppermost layer of soil, typically the top 6 inches that contains the highest concentration of organic matter and nutrients. It is the layer of soil where most plants establish their roots and where biological and chemical processes take place.
Most of us have done it. On our way out of a garden center, we’ve picked up a plastic bag or two of inexpensive topsoil for a home improvement project or garden addition. There isn’t a universal requirement for labeling ingredients on these products, and when we open the bag at home, we find a mix of poorly composted wood chips, sawdust, stones, silt, and even plastic bits. It may contain other unsafe additions: herbicides, pesticides, fertilizers and fungicides depending on where the soil originated. What’s going to grow well in that? Not even my grass seed germinated.
In only a teaspoon of topsoil, there are about 50 billion microbes alone. Although unable to be seen by the naked eye, these microorganisms are vital to healthy soil. They colonize the soil and are essential to the decaying of plants and animals and restoring the materials used by the plants. Healthy topsoil allows plants to better grow on their own without adding all those extra additives that we buy. They are receiving most nutrients that they need directly from the soil.
Topsoil is vital in a way other than growing healthy plants. It becomes a weapon in the battle against climate change by reducing atmospheric carbon and locking it up in the soil. The YaleEnvironment360 has an article on how carbon has been leached from the earth and how it can be restored by repairing degraded soil.
To help with the buying process, the University of New Hampshire has a factsheet on the subject of buying topsoil. Written by Richard Uncles, Supervisor at the Bureau of Markets, New Hampshire Department of Food, Agriculture and Market and Tom Buob, Extension Educator Emeritus, the article begins by stating that it takes nature 500 years to make one inch of topsoil. Once only an interest of farmers, topsoil has become a “hot commodity, a multi-million-dollar industry from homeowners and businesses.” Their article expands with guidelines from experts on what to look for in good topsoil.
To read the UNH Topsoil Buying Factsheet, click HERE.
Ann H., Horticulture Committee
Horticulture Tips – May 2023
May is for Mulching
Ahhhhh…. It’s spring. Flowers are blooming, birds are singing, and the aroma of mulch is in the air. Landscape trucks loaded with rakes, wheelbarrows and tons of mulch pass by on the roads heading to homes and parking lots everywhere. We do love the look of a newly mulched yard. And mulch can be a good thing around plants and trees, conserving moisture and evaporation, enriching the soil as it decomposes, keeping the soil cooler, preventing weeds, and protecting trees from lawn mowers and string trimmers.
But you can have too much of a good thing. A quick drive to area grocery stores or big box stores, you may witness the odd practice of it being applied around trees in “volcanoes.” It’s a practice that involves piling a giant cone of mulch around the base of a tree, which sadly can cause significant damage and even death to the tree. If the trees died quickly, no one would be doing this, but the ill-effects are often undetectable and subtle.


Piling mulch against the trunk of a tree can cause a range of problems that can harm the health and well-being of the tree:
Moisture retention: Mulch piled up against the trunk can retain moisture, which can lead to the development of fungal diseases and other pathogens. This can weaken the tree and make it more susceptible to damage from pests and diseases.
Bark damage: When mulch is piled high against the trunk, it can rub against the bark and cause damage. This can make the tree more vulnerable to insect infestations and diseases.
Root suffocation: Mulch piled too high against the trunk can also suffocate the tree’s roots by preventing oxygen from reaching them. Trees respond by growing roots into the mulch. Roots can become exposed as the mulch further degrades causing root damage leading to the eventual death of the tree.
Rodent damage: Mulch piled up against the trunk can provide a safe haven for rodents such as mice and voles. These animals can chew on the bark and cause significant damage to the tree.
Excessive heat: Mulch piled up against the trunk can generate excessive heat, especially during hot weather. This can damage the bark and create an environment that is conducive to the growth of harmful microorganisms. Additionally, when the mulch dries out, it can become hydrophobic and actually repels water instead of feeding roots.
Properly applied organic mulches are beneficial for trees. Leaving a gap between the mulch and the tree trunk will allow air to circulate around the tree, help prevent moisture retention, and reduce the risk of damage from pests and diseases. The University of New Hampshire Extension advises spreading a layer of mulch 2- 4 inches thick around trees making sure that no mulch touches the trunks. For older trees, they advise following the “3–3–3 Rule,” spreading a 3-inch layer of mulch in a 3-ft. donut around the tree leaving 3-inches between the mulch and the tree bark.
To read more about the damage of volcano mulching, the link below will take you to the UNH Extension site: https://extension.unh.edu/blog/2020/04/volcanoes-kill-trees
Ann H., EAGC Horticulture Committee
Photos by Ann H.
Horticulture Tips – April 2023
CREEPY CRAWLIES, FLYING THINGS, AND ALL THOSE THINGS YOU WANT OUT OF YOUR GARDEN
You all are gardeners. You know that all those creatures are good, right? But what good are they? Are they all good? Are some really bad?
We all are trying to retrain ourselves to help the environment by encouraging pollinators to live in and around our yards. I have talked to people who want to do that but then they say… “I don’t want bees in my garden, they will bite me”.
First of all, bees rarely want to attack you. They want the pollen in your flowers for food. If you leave them alone; they will leave you alone. Bees are responsible for pollinating about 80% of our flowers and agricultural crops. Life would be very different without them. They love flat or tubular shaped flowers.

Spiders give many people creeps, but they help keep insects in balance by eating flies and other larvae. Fortunately, here, we do not have to worry about Black Widow spiders. I ran into one when I lived in Florida, that was a bit scary. Spiders here build beautiful webs to attract their meals…caterpillars, aphids, beetles, earwigs, moths, roaches, and mosquitoes.
Lady bugs are a great addition to your garden as each eats about 50 aphids a day. They also consume leaf hoppers, mites, and mealy bugs which suck on your plants. Lady bugs love to live amongst flowers and herbs.
Hover flies eat aphids, scales, and caterpillars. They also are important pollinators. So, when you see them lurking in your yard, let them be.

Ground beetles reduce your need to use pesticides as they help to control ants, maggots, grubs, etc. They live in the background, on logs, in clover, or in grassy areas.
Dragonflies are your friends if you do not want to be bitten by mosquitoes, gnats, or the dreaded mayflies. You have to work to attract them to your garden. They like to be around water or ponds.
Mantises help to keep the numbers of beetles, mosquitoes, leafhoppers, and caterpillars down and help your flowers and other plants in the condition you desire.
These are among a long list of critters that help keep the plants in your garden safe from harm. They help eliminate those who chew or suck leaves.

There are some insects that you do not want to welcome into your yard.
Snails chew leaves and fruits.
Wooly aphids suck sap from plants causing yellow leaves and poor plant health.
Stinging ants build colonies under plants, which can lead to plant death.
Thrips suck sap from leaves and flowers.
The main thing, as a gardener, is to recognize that we need insects in our gardens. They help pollinate our plants. We should not be using broad-based pesticides, which kill both the good and bad insects. Use your watering hose to spray aphids off your plants. Picking a few pesky insects off your roses is better than spraying your whole garden with a toxic spray.
If we are going to retrain ourselves as gardeners, we need to learn to live with some insects…they are not all bad.
Linda V., Horticulture Committee
Photos by Linda V.
Horticulture Tips – March 2023
Tarragon
Tarragon is a leafy green herb that is highly aromatic with a subtle licorice flavor. It adds a fresh, spring taste and a bit of elegance to a variety of recipes. The plant has long, light green leaves and can grow to be a few feet high. It’s easy to grow in a sunny or partially shaded spot in well-drained soil. It thrives in spring temperatures and doesn’t do well in overly hot climates. It’s drought-resistant and the best flavor is achieved when it’s planted in low-nutrient soil.

History and Lore
If the poet Ogden Nash is to be believed, Henry VIII divorced Catherine of Aragon because of her reckless use of tarragon. It’s native to the Caspian Sea area, southern Europe, southern Russia, and western Asia and quickly became popular in Asia and North America. The ancient kings of India had a favorite drink made with tarragon and fennel. The Tudor family in England introduced tarragon to the royal gardens in the late 1500’s.
Health and Medicine
The Roman scholar Pliny said tarragon could prevent fatigue. It was used by the Greeks to cure toothaches. In the Middle Ages it was used to ward off serpents and dragons. The Pilgrims put sprigs of tarragon in their shoes before long trips on foot. Tarragon has also been reputed to sooth snakebites, stimulate appetite, relieve flatulence and colic, and cure rheumatism. In addition to anti-fungal properties, it’s a source of iron, calcium, and vitamin A. Tarragon is used in perfumes, soaps, and cosmetics.
Culinary Uses
Tarragon is known for its subtle licorice tones. Very important in French cuisine, it’s called the “king of herbs” and the “queen of anise-scented herbs.” It is an important ingredient in “fines herbs” and Béarnaise sauce. In addition, tarragon vinegar is used in sauces and salad dressings. Fresh tarragon leaves can be added to salads and used sparingly with peaches, plums, raspberries, pears, nectarines, strawberries, oranges, and lemons.
Tarragon compliments eggs, chicken, beef, lamb, veal, pork, fish, and seafood and can be used on green beans, potatoes, tomatoes, beets, artichokes, asparagus, carrots, onions, leeks, mushrooms, cauliflower, and broccoli. It can also be added to rice, barley, herb butters, mustard, cream, mayonnaise, and pâtés. It compliments cheeses and goat cheese.
It is important to buy or grow French tarragon; Russian tarragon has an inferior flavor. Use your tarragon leaves from early spring until autumn. The sweetest anise taste is found in early spring leaves. Tarragon does not dry well. To preserve it, it is best to chop it and freeze in ice cube trays. Be sure to add it to your recipes near the end of cooking, to avoid bitterness.

Cultivation
Half-hardy perennial.
Plant in alkaline soil in sun or shade.
French tarragon rarely produces seeds; it propagates from underground runners.
Pick leaves before flowering.
Can easily be divided in early spring and can also propagate in summer from soft wood cuttings.
Divide at least every 3 years–old plants lose flavors.
Water during the day, not at night; it doesn’t like wet roots.
Limit feeding. Too much fertilizer causes it to lose flavor.
In winter, mulch and keep soil dry.
Can be grown in pots and brought inside for winter.
When buying, look for signs of rust.
If your plant develops rust, dig it up. Burn all infected leaves, wash plant.
Carol C., EAGC Horticulture Committee
Horticulture Tips – January 2023
The Backyard Bird Count
Although every month is important to bird life, I think of February as my Bird Month due to Audubon and Cornell Lab of Ornithology’s Backyard Bird Count. Not too long ago, I participated yearly in the annual Christmas Bird Count where a group of bird enthusiasts met at the crack of dawn on icy mornings to count the number of water and shore birds on the Chesapeake Bay tributaries during the morning, then spent the afternoon hours counting birds inland over specified mileage during the afternoon hours. We collapsed at dusk and gathered in warmth first to thaw, then count and compile the number of each species that we reported for the database.

The upcoming February Backyard Bird Count (BYBC) is a lot easier on the body but provides the same excitement for a bird lover. It’s an annual event that takes place over a four-day period in February. It is an important citizen science project that provides valuable data for ornithologists and other scientists to understand bird populations, their migration patterns, and overall health of bird species.
Participants count birds in their own backyards or local areas and then submit their observations, which are then compiled into a database. This data helps scientists track changes in bird populations, which can indicate environmental changes or other factors that affect bird populations. Additionally, BYBC helps raise awareness about the importance of birds and their habitats, and encourages people to take an active role in bird conservation. The February BYBC is an important event for bird enthusiasts and anyone interested in learning more about birds and the natural world.

This year the event will take place February 17-20, 2023. The event is easy and fun to do. Simply identify all the birds you see or hear in at least 15 minutes each time during the 4 days. Watch once a day or several times a day. If you are a novice at bird ID, there is a link on the BYBC website to help. When you submit your count on the website, you can see the map light up with submissions around the world where participants are doing the same. Sign up and become involved here: https://www.birdcount.org. Happy Birding!
Ann H., EAGC Hort Committee
Horticulture Tips – January 2023
Houseplants vs Those Pesky Fungal Gnats
Finally, the long promised Hort Tip on how to deal with those little acrobats that set up housekeeping in our houseplants and dare us to try to banish them. Fungal gnats are usually noticed a few weeks after we bring in our plants from their summer outing on the porch or in the garden. Fungal gnats have their role in the out-of-doors but inside that’s another story. They don’t bite but they are an annoyance and may be harmful to the houseplants health.
Fungal gnats are tiny like a fruit fly (but not) that hop and skitter near moist soil while feeding on the organic material, fungi, algae and dropped leaves.
It is difficult to eradicate them because of their overlapping generations, in the four part life-cycle that spans about four weeks.
• The adult stage lasts about 2 weeks. It is 1/8 to ¼ inches long with long legs, long thin body, antennae, and translucent wings – with a identifiable “Y” pattern. The female can lay a few clutches of 100 to 200 eggs.
• The egg stage lasts 3 to 6 days. Tiny white dots, often seen in clusters on or just below the surface of the soil.
• Larva stage lasts 4-5 days. This is the stage most damaging to the plants. After the eggs hatch into translucent “worms” about 1/8 inch long with a dark dot “head”, they burrow deeper in the soil and feed on organic material. With a severe infestation the larvae will begin to eat the root and root hairs. If you have young seedlings – they contribute to the “damping off”.
• Pupa stage is a very short stage, just a couple of days – before starting over with the adult pests harassing us once more.
Prevention is the best option … but they are sneaky critters.
• Avoid overwatering. It encourages fungal growth that provides the initial food source. Especially important when bringing to the indoor environment. Check to see that the top 1 to 2 inches is dry before watering. Indoor conditions vary greatly with changes in humidity, temperature and light – best to water when needed rather than “on a schedule”.
• Always check new purchases before buying. Perhaps quarantine a few weeks before placing among your plant collections.
• When placing plants – avoid unscreened windows.
• Clean plant debris from the soil surface.
• Keep your potting soils in sealed containers – especially if stored in a shed, garage or outside. The gnats could be homesteading there.
Is there an Infestation??
• There is a quick way to check soil for infestation. Cut a raw potato into a ¼ inch slice/wedge and insert into the soil. Wait at least 8 hours and inspect the underside. If infected, you should be able to see the larvae. This is only a way to monitor — definitely not a cure.
• The yellow sticky sheets or spikes will tell you what you already know – there are flying insects in your plants. For general purposes, they are a good monitoring tool – an early warning system.
Control and Management Options
There are many varied natural treatments, but the literature is fairly clear that most of them only manage – don’t eradicate. These treatments are natural and don’t harm the plant but require attention and time over a long period. Nurseries and greenhouses frequently use a product called Gnatrol for infestations. It is available to the home gardener and somewhat expensive – though best, it isn’t harmful to people, pets or plants.
Sand Cover the soil surface with ½ inch of sand; don’t leave any gaps. It should prevent the female from laying any eggs BUT she may find gaps, go to another plant – or even lay her eggs at the drainage hole. Perhaps more of a preventative effort than any type of control.
Cider Vinegar Traps The classic shallow bowl with half ACV and half water with a few drops of dish soap. Most of the articles say it isn’t worth the effort.
Chamomile Tea and Cinnamon The latter is a natural fungicide – so it reduces the food source but doesn’t eliminate it:
Brew 1 liter of strong tea, cool and mix with 3 liters of water. Use this solution to regularly water the plant and then sprinkle the soil surface with cinnamon. Continue for at least a month.
Hydrogen Peroxide This one has strong potential – though I haven’t tried it. Hydrogen peroxide should kill the eggs, larvae, and pupae on contact – disrupting the life cycle. Make a solution of 1 part 3% hydrogen peroxide and 3 or 4 parts of water (Don’t make more that you will use at a time as the H2O2 breaks down fairly rapidly.) Soil should be dry on top 1-2 inches, drench the soil – it will fizz for about 30 seconds. Wait and see – may have to repeat.
“Mosquito Dunks” or Bits. This sounds like another good option – though haven’t tried it yet. These donuts contain BTi (Bacillus thurngensis isrealensis) a beneficial bacteria that infects and kills the larvae of flying insects (mosquitos, fruit flies, and fungal gnats) – often used in water features in gardens. It is not harmful to people, pets, aquatic life, or honey bees. Make a “tea” by putting one donut in a gallon of water, let soak 12-24 hours, remove donut (remainder can be reused). Drench the soil. Use this tea for a month.
Diatomaceous Earth Food grade (not the type for pools and fountains), mineralized shards of silica that will cut the bodies of the larvae and pupa. Sprinkle on the soil and work into the topsoil. Wear a mask – the dust can be a respiratory health hazard.
Biological Control “entomopathogenic” Purchase insect parasitic nematodes, specifically Steinernema feltiae. They enter the larvae and emit a bacteria that digests the larvae’s internal contents. Effective – but more suited to a large scale operation.
Systemic Insecticide “imidacloprid” Kills the larvae and breaks the cycle. Comes in slow release granules. The spray is not effective on fungal gnats. Dose is on label, sprinkle on soil surface and work in – wear gloves.
Confession Time I have to be honest – I have about 40 plants that migrate from porch to house in the late summer – and not the patience to risk an infestation. In late August I usually give all the plants a good cleaning – either with Mother Nature’s steady rain, the hose, or a soft cloth to clear all the dust and pollen off the leaves, loosen up the topsoil (maybe add some more) and clean the outer pot and drain saucers. I then work in a half dose of the granules into the soil and drench. I repeat this in about 2 weeks.
Lessons Learned I am intrigued by the hydrogen peroxide treatment and really like the “Mosquito Donut Tea” method. I may try the latter on an area by my porch steps that is a haven for small pesky flying gnat like things that drive me crazy.


Submitted by Pat N., Horticulture Committee
Photos by Pat N.
Horticulture Tips – December 2022
The Pine That isn’t a Pine
The garden club I belong to in Virginia hosts a home and garden tour each spring and club members pride themselves on designing floral arrangements to compliment the interior of the homes on tour. Fellow members grow and share their tulips and daffodils, blooming ornamental tree branches, and garden greenery with the flower design teams.
One year, a flower designer and I were strolling through my garden snipping stems of poet’s laurel, dogwood, azalea, and daffodils. Buckets in hand, we were meandering down a path toward the cleyera shrubs with their glossy bronze and green spring leaves. As I led the way and leaned in to point out the lovely properties of cleyera, I realized my friend was no longer with me. She had stopped in her tracks beyond the bend, quite besotted by another plant.

“WHAT TREE IS THIS??” “Oh dear,” I said. “That’s my Japanese Umbrella Pine.” I could see that she was as hopelessly smitten with it, the first tree I literally put into the ground when I began to garden. My friend stood there, clippers in hand, looking from me to the tree and back. I could see her face fall, as I said, “No, I’m not sharing cuttings from that tree.”
The umbrella pine is not a pine at all. It’s unlike any other tree, the sole-surviving species that was once widespread throughout the northern hemisphere. The leaves form on the stem’s end in a whorl of dark green needles looking much like the ribs of an umbrella, thus the name.
Fast forward to our present location in New Hampshire, where our local garden club also designs floral arrangements for club events and for the community. But a big difference is that all our events have access to bountiful cuttings from a mature Japanese Umbrella Pine through the generosity of a fellow club member. Her umbrella pine tree is large and lovely and seems not to be bothered at all from regular trims. It’s still well-formed and healthy and a lovely specimen tree in her garden. How thankful we are for cuttings from this unusual tree. No matter what our club arranging project is, her umbrella pine cuttings appear, and someone seems always to asks, “WHAT TREE IS THIS??”
The Japanese Umbrella Pine (Sciadopitys verticillate) is a much underused evergreen in the garden landscape. Grown best in zones 5-8, it seemed to thrive in my Tidewater Virginia garden (7b) with high humidity and moisture, and it certainly thrives in my friend’s New England garden. It grows to about 90+ feet in height in native lands, but most umbrella pines here are generally less than 35 feet tall after several decades. Other than watering during dry spells, this slow growing tree is pest free and low-maintenance.
If you come across an umbrella pine at your local nursery, beware, for you will be dazzled by the unique Asian evergreen and will have difficulty resisting the urge to take it home.
Ann H., Horticulture Committee
Horticulture Tips – October 2022

Welcome to my first Hort Moment as a non garden owner. It is an adjustment. I was able to help a woman who temporarily was in the health center. I planted her raised bed garden and tended it until she could resume her weeding and watering. I have participated in a couple of meetings, the purpose of which was to investigate what plans might be made to change landscaping decisions in the future for the three campuses here at Riverwoods in Exeter. The head landscaper (a descendent of Luther Burbank) is looking to reduce the lawn footprint, currently 16.5 acres, by planting more drought resistant and native garden areas and perhaps some ground covers. I also assisted in setting up a couple of arboretum tours. As you can see, not much getting hands dirty.
Due to my move, I now have 4 houseplants. I never have had any, except an orchid. Previously I limited my ownership since I had to be working outside and also because so many plants are poisonous to cats. I actually purchased an artificial Ficus tree for my apartment since live ones are not cat friendly. In the process of moving, I got to thinking about how many of us are going through changes in our lives. Many are having smaller gardens. Others are moving to patio gardening in pots while others of us need to convert to house plants. I am wondering if there are any of you in EAGC who would be interested in participating/serving on a patio /container plant committee? It would be interesting to gather those interested to find out the areas you would like covered and how we could provide interesting information to the general membership.
Also due to both Covid and moving, I have spent time enjoying gardening shows on TV. The most recent one I have found appeared this summer on NHPBS – “GardenFit”. It played early weekday mornings but is no longer being aired on our channel. However, you may view the whole first season if you Google www.pbs.org. You will arrive at the PBS main window. Click on video on the top row. You then can search for GardenFit. You will have access to all 13 episodes.
The show tours gardens from around the U.S. while a gardening host and a physical trainer talk to the garden owner. As part of the show the trainer offers suggestions to help alleviate body aches we all have had as gardeners. One or two ideas each episode. I have found his exercises useful even though I am not in the garden. It is entertaining, fun to see gardens and pick up something that may extend your gardening capabilities for a few years.
Sorry, I have no wonderful species to share with you, but I will try to find items to interest you when it is my turn to supply Hort Moments.
Linda V, Horticulture Committee
Photo by Linda V
Horticulture Tips – September 2022
September in the Garden
Writing this on a wet and chilly day in Maine, I had trouble recalling my original intent to write about coping with drought and heat. This hot, dry summer that withered leaves and reduced flowering was a reminder that structure and texture from both plant forms and foliage as well hardscape elements can help to keep gardens attractive even when many plants are looking rather sad.
Weed Now or Regret Later
Recent rain makes weeding easier, and all you do now will make your life easier next year. In addition to tackling annual and perennial weeds look around for any seedling oaks, maples or pest trees. One trick I learned recently is to engulf any weeds that have gone to seed in a large plastic bag to minimize seeds dropping to the ground as you pull or dig out the roots. Dry cleaning bags work well for the tall or vining weeds. We all have weedy pet peeves. Mine is spotted spurge. In some alternate universe it might be considered ornamental but to me it is a pest that starts small but can form a large mat that roots along its stems, and if left to flower, will produce seeds by the thousands.

My nemesis spotted spurge
Gravel Gardens
Perhaps because of climate challenges I’ve been seeing more interest in gravel gardening. The famous English gardener Beth Chatto (d. 2018) really got the trend going when in 2000 she published a book describing the gravel garden she established on top of a former parking lot at her nursery. In the US, her ideas fell on fertile ground on the west coast but the gravel has been spreading. For instance search on-line for “Roy Diblik gravel garden” and you will find scores of inspiring articles, photos, and videos from this notable Wisconsin nurseryman.
I adopted some gravel gardening techniques when faced with a so-called lawn flattened by a couple of years of constructions vehicles and giant dumpsters. I also have sandy soil, no interest in an irrigation system, and am gone most of the summer. I designed a garden with lots of structure including raised beds, a quartet of spire-like arborvitae, and a large arbor as a focal point. The raised beds are set into wide paths of 6” deep gravel. In fact, the beds themselves were formed on top of the same deep layer of gravel. In May, many spring bulbs are happy in this environment. They are followed by Baptisia, Iris (Siberian, as well as dwarf and intermediate bearded types), Geraniums, Alliums, Salvias, Iberis, Eupatorium myrsinites, Nepeta, and Heuchera. Perennial herbs of the Mediterranean sort – think lavender, sage and thyme – thrive in dry, stony soils.
Autumn brings Calamintha, Sedums, ‘Sheffield Pink’ chrysanthemums, and self-sown Verbena bonariensis. Also outstanding in September and October is the ground covering Ceratostigma plumbaginoides with vivid blue flowers and color-changing foliage. Many foliage plants such as Stachys and Heuchera give structure to the gravel garden. Over the years many of my plants have escaped the confines of the raised beds, softening the overall effect. If you like the gravel garden idea try it in a small area – maybe along a driveway or an area that is difficult to mow.

Dianthus and pansies with golden hop vine on the arbor

Fragrant heirloom Iris ‘Gracchus’ with Nepeta and Siberian iris beyond

Late October with ‘Sheffield Pink’ Chrysanthemum
September Opportunities
I am trying to think of all the items on my “To Do” list as opportunities rather than chores. On top of the fun stuff like ordering bulbs and searching for bargains at nurseries, here are more autumnal opportunities:
Save Seeds.
Fertilize peonies and rhubarb.
Water deeply, and repeatedly, any recently planted trees and shrubs. I have been using buckets of kitchen rinse water on a young Japanese maple.
While you can comfortably work outside, repot house plants with fresh growing medium and a slightly larger pot if needed.
Plant bulbs – right up to finger freezing time.
Turn compost.
And in Other News
I may be the last to wake up to this, but I was surprised to discover that seacoast NH, formerly in USDA Plant Hardiness Zone 5b, is now solidly in 6a. Your garden may even have areas of 6b or even 7a.
Becky M., Horticulture Committee
Photos by Becky M.
Horticulture Tips – August 2022
Yuck! Milkweed!
“Yuck! It grows too tall and spreads erratically. I don’t want that plant growing in my garden!”
Yes, common milkweed (Asclepias syriaca) does grow pretty tall, and it does spread randomly. However, there are some other great species of milkweed that are beautiful, calm, and are still a host plant for monarchs in New Hampshire.
Last month the monarch butterfly joined the IUCN Red List of endangered species, due to habitat loss, climate change, and pesticides. The IUCN, the International Union for Conservation of Nature and Natural Resources, is an international organization headquartered in Switzerland. Scientists estimate that the monarch species’ population has dropped between 20% and 90% over the last several decades.
In 2014, the monarch butterfly was petitioned for listing under the federal Endangered Species Act. It was classified as Candidate species, however it has not yet been added to the federal Endangered list. But that proposal allowed people to better understand the monarch butterfly and it’s need for the milkweed plant to survive. Milkweed had been misunderstood for many years and was thought of as a weed, so there was an attempt to eradicate it everywhere. Once it was more understood that monarch’s life cycle must have milkweed to survive, efforts have increased to try to replant milkweed throughout North America.
Climate change is a fast-growing threat for the plant. Drought has impacted butterflies with temperature extremes that trigger earlier migrations, before milkweed is available. Since the life cycle of the monarch caterpillars must survive from milkweed, I’m listing 4 species of milkweed that are attractive in New Hampshire gardens, to help this insect just added to the IUNC Red List of Endangered Species..
Butterfly milkweed (Asclepias tuberosa)
Sometimes also called butterfly weed, this perennial is suggested for most people who want to plant milkweed but also want something attractive. Butterflies are attracted to the plant by its bright color and its copious production of nectar. It grows 1-2 feet high, has gorgeous orange or yellow flowers, and blooms until September. Plus, Iowa State University found that butterfly milkweed had the highest survival rates for monarch caterpillars that fed on it.
Poke milkweed (Asclepias exaltata)
Most other milkweeds love full sun, but poke milkweed does well in part shade, shade, and moist soil. Poke milkweed will grow 3-5 feet tall and has docile blooms that vary from creamy white to those with green or purple hints. One plant has a few to several clusters of flowers.
Purple Milkweed (Asclepias purpurascens)
It produces a beautiful, rounded cluster of vibrant purple flowers. The flowers are fragrant and attract various nectar-seeking insects, including Monarchs and many other butterflies.
Swamp milkweed (Asclepias incarnata)
Swamp milkweed loves wet fields, marshy land, and shoreline. It has beautiful pink and magenta blooms with cream-colored centers through September, and plants grow 1-4 feet tall. Swamp milkweed has also been found to thrive in heavy clay soil.

Female Monarch Feeding on Asclepias tuberosa in my garden.

She left me a single pearly egg about the size of a pinhead.

That very egg hatched this monarch caterpillar who is fattening up on milkweed, trying to survive to butterfly.
Ann H., Horticulture Chair
Photos by Ann H
Horticulture Tips – July 2022
All About Lilies
My interest in lilies started 12 years ago, when I moved to Exeter and discovered that my high school friend, world-respected expert on daffodils and lilies, Dianne Mrak, was living in Dover. After an invitation to view her spring and summer gardens, I was dazzled by their beauty and variety. She kindly gave me some of her personally cultivated lily hybrids, some of which are named after family members, and I established a lily garden of my own on a much lesser scale but perfect for me.
True lilies are in the genus Lilium, and they grow from true bulbs. Some other common plants, such as daylilies and canna lilies, may have the term “lily” in their common name, but they’re not actually lilies at all. They grow from tubers, not bulbs, and they’re in a different plant genus. Each true lily bulb is made of layered scales. The flower stalk is produced from the center of the bulb, and the roots emerge from a disk found on the bottom of the bulb.
Lilies have grown wild all across North America, Europe, and Asia for a very long time, and as civilizations grew, humans began to notice these beautiful flowers and started to cultivate them. As Europeans began to explore far-flung continents, new and exotic lily species were discovered and brought back from America, Asia, and Japan by plant collectors.
Wild lilies were conveniently ‘pre-packaged’ as bulbs which enabled easy transportation around the world. Unlike the orchid plants also being collected from the wild, lily bulbs were likely to arrive at their destination intact.
In the 1920s, the number of lily varieties available began to increase rapidly. A hard-working lily enthusiast in Oregon named Jan de Graaff put together an impressive breeding program. Jan de Graaff’s Oregon Bulb Farms were responsible for the birth of a vast array of popular hybrids. Many of those lilies are still around today. Florists soon realized that these new hybrids would make ideal cut flowers, and the popularity of the lily has grown ever since.
Lily bulbs are sourced from a number of places. Your favorite local garden center likely offers a few varieties, but online bulb specialty catalogs tend to offer more types of lilies than garden centers. The bulbs are stored and sold in a dormant state for spring planting. Purchase lily bulbs around the time of your last spring frost, and plant them soon after. There are 30 different types of lilies available; it can be overwhelming for the novice gardener so check out the photos on the web and choose your favorites.
When you plant lily bulbs, make sure the root disk is facing down and the stem end is up. All types of lilies are best planted in well-draining garden soil. Lily bulbs rot if their location is too water-logged. Choose a spot that receives at least 6 to 8 hours of full sun to keep lily stems tall and straight, regardless of which of the types of lilies you choose to grow. Plant the bulbs so their tops sit three inches beneath the surface of the soil. Water the bulbs in well, and add a one-inch-thick layer of shredded leaves or compost as a mulch, if you wish.
Once your lily plants begin to grow, they require very little care. If the plants flop, stake them with a lily support or a hardwood stake. After the blooms fade, cut off the top third of the plant to keep the seed pods from developing and robbing energy from the bulb. They need that energy to fuel the development of next year’s blooms.
Later in the growing season, it’s important to let all types of lilies naturally die back. Do not cut off the green leaves. They continue to photosynthesize throughout the growing season. In the autumn, after the stalks and leaves have turned brown, cut the lily plants down to the ground. If you’d like, toss a few handfuls of a bulb-specific fertilizer over the planting area. The lily bulbs use the nutrition to grow larger. They develop next year’s blooms inside the bulb when the plants are dormant.
Almost all types of lilies are winter hardy down to -30 degrees F, though some are even hardy at lower temperatures (the turk’s cap and Canadian lilies, for example). Lilies need a period of cold winter dormancy. Every spring when I see the first green shoots appearing out of the tangle of mulch, I have the happy reassurance that summer’s on its way and the garden will be bursting with exotic and beautifully colored flowers.
Dianne A., Horticulture Committee
Horticulture Tips – June 2022
Enkianthus
I remember thinking it was a funny name for a plant when I was a child and heard my mother talking about Enkianthus campanulatus in her garden. Now I have three Enkianthus campanulatus in my garden and I still think it’s a funny name…. but it’s fun to say! en-kee-AN-thus kam-pan-yoo-LAH-tus.
It’s a native of the Far East, growing in mountainous areas of Japan and China. The Enkianthus campanulatus or redvein enkianthus is a desirable woody plant for our zone 5b-6a but for some reason it seems to be a rather uncommon choice for gardens around here. It does best in full sun to partial shade in acidic, moist, organically rich, well-drained soil, the same requirements as rhododendron.
At the end of May or the first days of June, the plant shines with heavy clusters of small pendulous bell-shaped blooms, creamy with red veined streaks and varieties of deep pink. Pollinators of all kinds love them. In the summer, it’s a nice green backdrop for other blooming plants.

As glorious as it is in springtime, the shrub gives us an incredible leaf display in Autumn. Fall hues of coppery red and orange light up the border and bring you to a halt while walking through the yard. The fall foliage for me is more of a showstopper than the blooms of spring, a time when so much else is in color.

Enkianthus is a slow-growing plant but I hope to be around long enough to train the shrub into a small tree with layered branches to replace the Styrax japonicus, my Japanese snowbell tree that grew in this spot and died suddenly.
Ann H., Hort Chair
Photos by Ann H.
Horticulture Tips – April 2022
While spring seems to be taking its time getting here, I am happy to have the bulbs emerge slowly and hold their blossoms as long as possible. On top of that it gives us more time to get fit for the jobs ahead. Have you been working on all the good advice we got from Jeanne Davidson (DPT, OCS, York Hospital Rehabilitation Team)? I confess to violating some of her rules while shoveling snow, but I’m working on remembering to bend forward from the hips, to turn my whole body instead of twisting my spine, and stoop rather than bend over.
Coincidentally PBS has a new multipart show, Garden Fit, combining fitness lessons with garden tours. You do have to overlook the disgustingly fit looking hosts, but the advice is sound and the gardens lovely. https://www.pbs.org/show/gardenfit/
Not all of us have the time or space for a full-fledged vegetable garden but I do think it is very gratifying to have a few perennial edibles in the garden. My spring favorites are rhubarb and sorrel. I also harvest fiddleheads from my patch of ostrich ferns. I am looking forward to my tarragon plants emerging along with chives. Spring salads look great with some chive blossoms and Johnny Jump Ups (Violas). Global warming has not yet made it safe to leave a rosemary plant out all winter, but a talk from a herbologist convinced me years ago to get my rosemary plants out of pots and into the ground for the summer. A good-sized rosemary, along with a sage bush or two, adds structure and scent to a perennial garden, along with attracting pollinators. Take a look at this for more perennial edibles:
https://www.gardenfundamentals.com/perennial-vegetables-cold-climates/
A recent article in Horticulture reminded me of sedges (Carex species), a hardy group of underutilized plants. They make a good ground cover in areas that are not suitable for turf – too small or difficult to mow or not hospitable for lawn grasses. I also think sedges look great combined with ornamental grasses that often look unanchored in a bed. Sedges also would look great instead of, or combined with, Hostas around trees. Speaking of which, please make those beds elliptical or kidney shaped with the tree placed off center. It is probably too late for this year, but it is possible to order trays of Carex plugs to get your planting off to a good start.
So far my favorite sedge is the versatile native Carex pensylvanica. It thrives in less than ideal soils, tolerates moist locations that are sunny and even dry shade. Horticulture suggests that by mixing sedges “with ferns to create woodland meadows or subbing them for non-native groundcovers, the gardener can help repair and connect pockets of natural habitat and provide host plants for pollinators. Carex pensylvanica alone can host 36 types of butterflies.”

Back in 2014, Mimi B. and I visited the gorgeous Beauport (the Sleeper-McCann House) in Gloucester MA and were really smitten by the mass use of C. pensylvanica in the handsome plantings at the entrance to the house.
Becky M., Horticulture Committee
Horticulture Tips – March 2022
Garlic
I get excited about growing garlic..
I started six years ago when my sister gifted me some of her Maine grown garlic tied up with twine to hang in my kitchen. I was fascinated by it, and that she grew it.
She educated me on how to plant it and off I went to the Wagon Hill Garden we belong to in Durham. The first two years we put a few in and grew an average amount of garlic. The third year on my way to planting I noticed that having broken the bulb open to separate into the cloves, some of the white cover came off. I called my sister and told her what happened and ask if it was ok to plant and would it still grow? She said it would. What I thought I heard was to peel it all before you plant it. My husband and I stood in the shed peeling all fifty of our cloves before we put them in the ground. We were wondering why she never told us to do that before. It was freezing out and I thought if I knew this before I left the house, I would have peeled before I got to the garden. I called her when I got back from planting and told her what a job it was to peel before planting. Of course, she didn’t know what I was talking about. She didn’t know if it would root not having the white cover on it. Oh great, I thought!! I went back into my garlic stash and pulled out twenty five more to go plant because I was sure that if I didn’t, I would have no garlic to harvest. That’s how I ended up with seventy five garlic bulbs! Yes, they will grow with or without the skin.
The first year was such an education. We planted it around Halloween and harvested it in July. To make all that magic happen, here is my journey…
The last three years have been our best harvest. We keep garlic from our previous year and break the bulbs open for planting cloves. We use organic soil, compost, and collect seaweed from Odiorne State Park. When we get it home we wash the sand off and run it over with the lawn mower to shred it down to work into the soil when we close the garden for winter. Then it gets covered in organic hay that is provided by Wagon Hill.
The last week of October, around Halloween, we open the garden to plant the garlic. We break down the bulbs into cloves and put them in root down about three inches into the soil and cover. We then put the hay back over and walk away until spring. In April the greens have grown up through the soil and hay and we start to water them. They grow for about three more months. During that time we feed them twice with Neptune fish and seaweed food. As they get bigger they start to form scapes. These are round green scapes with a small white bulb on the end. As they grow bigger they begin to curl and that’s when you go in-deep and cut them off. We do that to force the growth down into the garlic bulb The scapes taste like garlic and can be used as garlic in dishes. We get so many we freeze them and use them to cook with. By July, the plant is about eighteen inches or higher and the tips of the plant greens start to turn brown like the plant is dying off. We let it go until it looks like the plant is dead and then we harvest. This year we planted fifty. In the last two years the garlic is the size of a tangerine. My sister and my two nieces, growing the same hard neck garlic gifted from my sister, are all amazed at the size of the ones we produce. We are also. It’s so fun to dig it up and see how they are so perfectly formed and in all different sizes. It’s like opening a Christmas present. Every time I pull one I get so excited.
We store garlic in a dark area of the garage to dry it out for a few weeks. I then remove the skins and wrap together and hang in kitchen. I made a mistake this year by leaving them in a basket laying down to dry. Some of them got rot on the bottom. I think the moisture settled in them there. I have always hung them in the garage upside down to dry out. Lesson learned, and shared. I also send them to my daughter in California who loves to receive garlic from home, my dentist, and hygienist who want to also learn how to grow garlic. It’s so fun. I can’t wait until they get on their journey, and see what they harvest from the garlic my sister gave me six years ago.
Garlic has many health benefits. It contains strong antibiotic, anti-fungal, anti-cancer, and anti-viral properties. It’s one of the world’s oldest medicines. It contains vitamins and minerals including vitamin C and B-6, selenium, calcium, and iron. There are numerous benefits of garlic that deserve their own write up.
Garlic also contains “allicin” compound which has been shown to lower cholesterol and blood pressure by blocking an enzyme in the liver cells and blocking platelet clot formation.
Allicin will be released only at the time you initially cut it open. There is where you will receive the full benefits from the garlic. If you buy garlic already cut in a jar there are no health benefits because the allicin has been released.
When you purchase garlic from a grocery store, you don’t know what you are getting. You don’t know how it was grown. Was it grown in organic soil? It probably is unlikely unless it is specifically marked that way.
Now’s the time to talk, unfortunately, about the garlic that comes from China. When you see it, you’ll know it because it’s bleached… yes, bleached. It also has no root system on the bottom because they can’t ship it to the United States with the roots on it so they scoop it off. You’ll see the scoop on the bottom.
Try growing your own. It’s so easy.
Photos by Donna R.
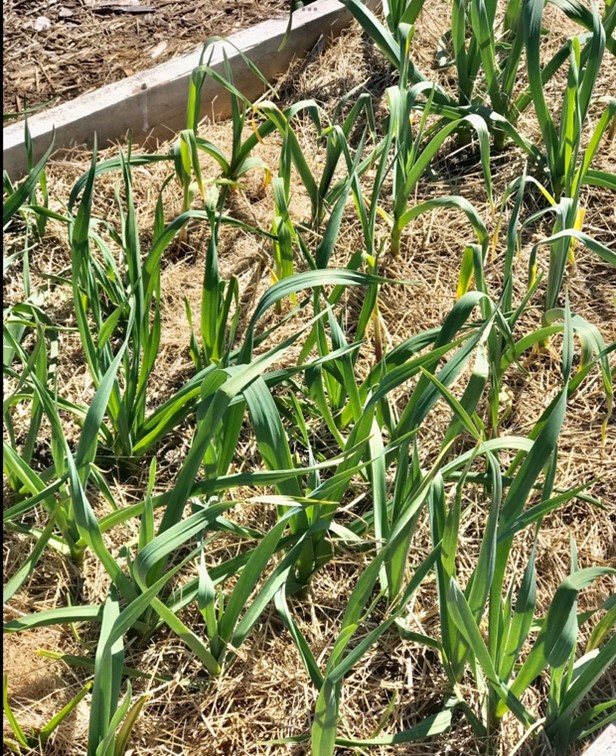
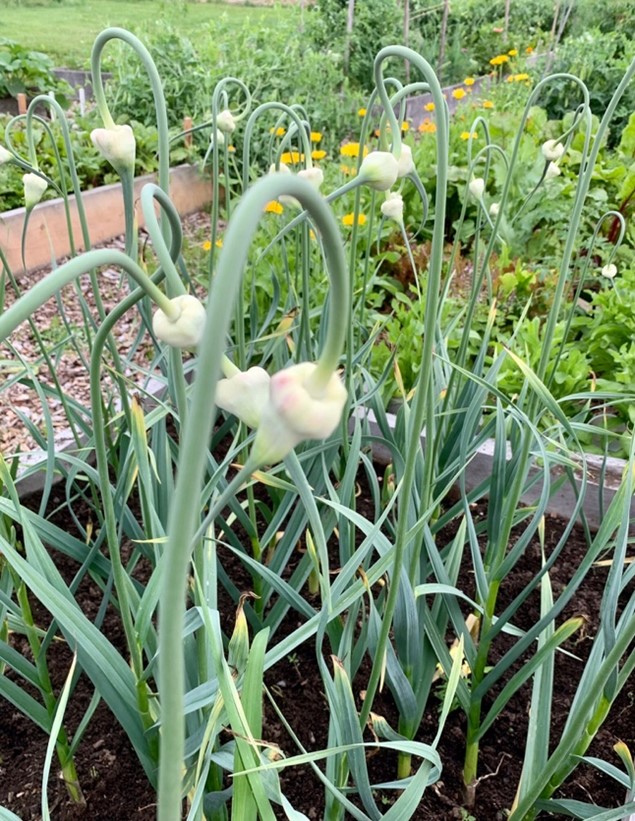


Donna R., Horticulture Committee
Horticulture Tips – January 2022
Tips for gardening in January in New Hampshire are few and far between. So let’s look at early spring: it may be too wet & chilly to dig in the dirt, but it’s a great time to prepare for the return of our winged friends from their warm-weather homes. Whether you’ve put up man-made nest boxes or are depending on nature to provide nesting sites, returning birds will be on the lookout for appropriate materials to make their new homes comfortable for hatching the next generation.

Over the past ten years or so, there’s been research done on the safety of nesting materials we humans have traditionally been providing. Many that were encouraged at one time are definite no-no’s now. Those include anything synthetic or possibly contaminated with chemicals. For instance:
• Yarn or string – it’s often man-made material (acrylic or nylon) and even a short piece can entangle a nestling’s leg and trap it in its nest.
• Human hair – it’s strong and can wrap around a bird’s leg or wing.
• Pet hair – although it’s natural, there’s evidence that flea and tick treatments can linger in the hair follicles even after shampoos.
• Dryer lint – birds like to stuff this in their nests, but it dissolves in rain and contains microplastics and chemicals from fabrics and detergents.
 Photo by Mauriciooliveira109 from Pexels

What can a homeowner provide, then, to help birds in their nest building? Go natural, according to bird researchers. Try to mimic what birds would use in nature. Here are some suggestions:
• Twigs – twigs can be left where they fall or stacked in a tidy pile if you choose.
• Moss – Allow moss to grow in a corner of your yard or stuff some into a crevice of a tree or shrub.
• Dried grass clippings – but only if the grass has not been treated with chemicals.
• Dead leaves – set aside a spot in your garden for leaves & twigs to accumulate.
• Plant fluff – the white down from cottonwood trees or cattails is a valuable soft material for nests.
• Straw – stuff short pieces of straw in a wire suet feeder.
• Pine needles – Dried needles are among the bluebird’s preferred nesting materials.
• Mud – barn and cliff swallows, phoebes, and robins use mud to construct their nests. Consider creating or keeping a muddy puddle in your garden for them.
• Snakeskin and spider webs (if you’re a fearless gardener) – birds occasionally use snakeskin and spider silk (especially used by small birds, including hummingbirds). The latter holds the other nesting materials together while making a tiny nest stretchy enough to accommodate growing nestlings.
Photo by Tom Mann from Pexels

Let the birds do the work. Adding nesting material to birdhouses is not usually a good idea. Birds that want to use the house may remove any additions before they begin nest construction. This makes more work for the birds and makes the birdhouse less attractive overall.
Sources: Cornell Lab of Ornithology, Audubon.org, AllAboutBirds.org
LuAnn F., Horticulture Committee
Horticulture Tips – December 2021
GARDEN GIFTS TO CONSIDER THIS CHRISTMAS
During the pandemic, gardening has experienced a boom in popularity and has developed into a passion for many. While our New England gardens lay barren during our long winter, we’re dreaming about spring and next year’s garden. With Christmas approaching, it’s a perfect time to gift a committed gardener in your life. I’ve put together a list of my favorite garden items to consider for your gift giving.

Garden Gloves: I’ve worn different brands of garden gloves, but years ago I settled on Atlas Nitrile coated gloves. They are lightweight but tough as nails, provide a super grip, yet thin enough to allow flexibility. Throw them in the washing machine or wash by hand and lay them in the sun as I have done above. If you want gloves that fit like a second skin, check them out at your local garden center.
Hori-Hori Knife: This is my most versatile garden tool. It is described as a gardener’s ‘best friend’ and a ‘must-have’ tool. The Japanese name translates as ‘Dig Dig,’ and dig it certainly will. Its sharp point will penetrate the toughest soil for planting bulbs or seeds, transplanting or weeding. One side is serrated for cutting through roots and the other side is straight and sharp. Having measurements for bulb planting is a bonus. The Hori-Hori can truly be the gardener’s best friend.

Japanese Hand Sickle: This is another Japanese garden hand tool that gets a workout in my garden. The edge is very sharp and easily slices through both shallow rooted spring weeds and tough summer weeds. The small size makes it simple to maneuver around the base of plants.

Garden Debris Bag: I’ve owned this heavy-duty polypropylene coated woven fabric bag for years. You can find all sizes of these durable bags online, but my favorite is the wide mouth bag that holds 63-gallons of debris, including good size branches. The bag is sturdy enough to stand on its own, yet folds neatly away for storage. I’ve given them as gifts for a multitude of uses from family heading to the lake for the weekend to family moving from apt. to apt.

Chicken Wire Cloches: I’ve finally accepted rabbits as a new way of life in my neighborhood. These attractive cloches from Gardens Supply Company protect the spring lettuce and young tenders that would be eaten to the ground otherwise. With extensions to raise the cloches taller, I’m also able to protect small shrubs with new spring growth. A number of companies make similar products and there are DIY instructions online to make your own.

Ratchet Pruners, Rotating Hand Pruners: Lastly, I can’t say enough about two hand pruners that I use regularly. Pruners with an internal ratchet give me the added kick needed for cutting larger stems, and the Rotating Handle Pruner is a much-used part of my pruning arsenal. As you squeeze, your fingers naturally move as the handle rotates reducing cutting effort. Both pruners are sold under different brands at garden stores everywhere.
Ann H., Horticulture Committee
Photos Ann H.
Horticulture Tips – November 2021
All the News about Peat Bogs and Climate Change – And What We Can Do About It
Peat bogs/peatland is an important factor in combating climate change. They store twice as much carbon dioxide (CO2) as forests. Every continent has peat bogs of one sort or another, and they grow at only 1 mm thickness per year. Undisturbed bogs may be as old as the last ice age. Peat bogs act as a carbon sinkhole. Once the bog is disturbed, as in cutting or harvesting the peat, the stored CO2 is released into the air. This adds to global warming.
Kitty Kielland – Study of a Peat Bog on Jæren – National Museum of Art, Architecture and Design

Peat has been harvested for centuries in the UK, especially in Ireland, for heating fuel. Its second largest use is in agriculture, as it is a key ingredient in horticultural compost and potting mixtures due to its ability to retain moisture. Both the UK and European Union are committed to eliminating the use of peat products by 2030. The Royal Botanical Gardens in England has already reduced its usage of peat products by 97%.
In the United States, our primary source of harvested peat comes from Canadian bogs. Since the sphagnum moss which forms the top layer of peat bogs only grows at 1 mm per year, this is not environmentally sustainable. We should do what we can as individual gardeners to reduce or eliminate the use of peat and sphagnum moss in our garden products.
There are several companies in the US which produce peat free soil, compost, and potting mixtures. Peat-less mixtures and compost are available online. Locally, they are said to be available at Landscapers Depot in Kingston, Dodge’s Agway in Hampton Falls, and Wentworth Greenhouses in Rollingsford, Lowe’s, Home Depot, and Walmart also list these products on their websites.
If you would like to make your own mixtures, there are recipes available on the University of Minnesota extension website. They have recipes for starting seedlings, ornamental plants, and edibles.
This could present each of us with the opportunity, and challenge, to help combat climate change. It may seem like this would be a minute step in the fight; but by beginning to plant pollinator friendly gardens a few years ago several of us now have monarchs and other butterflies in our gardens. We can make a difference. Hope you take the challenge.
Linda V., Horticulture Committee
Primary source of information was a segment on “Gardeners’ World” with Monty Don which airs on Prime Video. The segment is part of the Season 53 Episode 9 show. FYI, this is a very interesting show and it’s fun to view gardening from a new perspective.
Horticulture Tips – September 2021
What Gardeners Know
Having a garden invites the owner outside all hours of the day. My garden calls to me mostly in the morning. I’m an early riser, often waking before the first light of dawn. I’ll step outside, coffee in hand, and greet the softness of early morning. This time of year is especially tranquil. Dew covers the garden, jeweled spider webs adorn every shrub and branch, and the only sounds are the quiet chirps of birds awakening, Taking stock of the work accomplished from yesterday, and seeing a glimpse of nature in the peacefulness of morning is therapeutic. The morning light soon follows as the day’s garden tools are being readied for use.

Having moved here from acres of gardens, woods, pond, and sea in a southern garden to what I jokingly describe as several feet of garden space, has allowed me to be more attuned to nature, by noticing and enjoying early morning wildlife sharing this yard. Everything is up close and personal now. I watch a rafter of turkeys foraging through the yard, fox leaping through the cutting garden hunting rabbits or voles, porcupines ambling down the sidewalk, owls perching overhead calling, ‘Who cooks for you?’ and an occasional skunk or two. There are snapping turtles hatchings to help across the road and other water turtles passing through and hawks enjoying a meal a few feet from our window… and the birds that nest here or pass through are amazing. No longer must I grab binoculars to identify a faraway bird or animal. Having wildlife choose this small garden to set up a home or a regular routine is an honor.

During the pandemic, a multitude of new gardeners, both ornamental gardeners and those who prefer ‘Victory Gardens,’ have discovered what seasoned gardeners already know. Getting your hands dirty simply makes you feel better. Coupled with the enjoyment of nature, the rhythm of the garden can be a stabilizing force during times that are uncertain. Whether your garden summons you in the morning or later, the good vibes of gardening is something our garden club members already know.
Ann H., Horticulture Committee
Horticulture Tips – August 2021
Ode to August
August has arrived. I think of June as the rainy month, July as the vacation month, but how about August? Climate-wise, it can be a part of summer but August is a month where you sense a change. The sun is a bit lower in the sky and days are becoming noticeably shorter. Crickets and katydids begin their nightly chorus, migrating birds and butterflies prepare for their journey, and back-to-school items line the store shelves.

When August rolls around, I’m reminded of a book that my children read years ago, “Tuck Everlasting” by Natalie Babbitt. It’s the first paragraph of that book that I thought captured the month of August:
“The first week of August hangs at the very top of summer, the top of the live-long year, like the highest seat of a Ferris wheel when it pauses in its turning. The weeks that come before are only a climb from balmy spring, and those that follow a drop to the chill of autumn, but the first week of August is motionless, and hot. It is curiously silent, too, with blank white dawns and glaring noons, and sunsets smeared with too much color.”

August is a transition month but it’s a very good month. Vegetables are in full production. Tomatoes. Corn. Potatoes. Squash. Ornamental gardens have reached their peak of glory in New England. Vegetable growers are planting their fall crops now and many are collecting seeds from flowers and herbs. For me, it’s all about my cutting garden. I deadhead and tidy and add compost, but I can ease up a bit in garden maintenance. This month I take photos of the borders to help me plan for next year. That way I’ll remember better in the spring what I liked and didn’t, what needs to be divided, what needs to be moved, what annuals worked and what didn’t, and what the rabbits ate and what they left alone.

Photos by Ann H
The less hurried month of August brings a little more time to sit outside with a cold drink, a good book, and enjoy the aerial hummingbird battles and bumblebees hovering over garlic chives.
Ann H., Horticulture Committee
Horticulture Tips – July 2021
Gardening has not been easy as Spring headed to Summer. Drought with days of searing heat stressed us and our plants. Nevertheless, we head into July with gratitude for our gardens and determination to do right by them. We are in the season of preening and pruning.
Weeding is first up on the chore list. Do not let weeds steal valuable moisture, nutrients, or space from your valued plants. I am continually amazed at how much weeding I can get done if I just begin. If your time and energy are severely limited perhaps the top priority just now should be to keep weeds from flowering and spreading their seeds. Even if you can’t pull out all that bittersweet at least you can stop it from making berries!
If you face big patches of weeds, it is not too late to smother them. There are a variety of ways to go about that – from solarization to layers of newspapers or cardboard. Years ago I had good luck with newspapers and cardboard topped with woodchips – I got any tree service I heard in the neighborhood to drop their load of chips in my driveway! Leaves and grass clippings (from those neighbors or lawn services who bag their clippings!) are also good topping materials. (https://awaytogarden.com/reducing-weeds-a-101-on-soil-solarization-with-sonja-birthisel/) Weeding is a good time to look around and take note of plants that might need dividing or relocating.
Deadheading and Deadleafing can be seen as either tedious or exciting. I get excited to see my garden shift and look refreshed when I remove spent blooms and damaged or yellowed leaves. The various iris species are a good example – their used up flower stalks can be a real eyesore. The leaves of bearded iris that have been attacked by borers can, and should, be removed. If your Siberian or Japanese iris leaves are sprawling it is ok to cut them back to make a tidier plant. Many perennials will regrow fresh leaves when you remove any unsightly ones – Hostas, Daylilies, Lady’s Mantle, and Lamb’s Ears for example.
Pruning various early blooming clumping plants may reward you with some reblooming or at the very least fresher looking foliage. Examples from my garden that I shear off in fistfull include Cottage Pinks (Dianthus), Catmint (Nepeta), and Candytuft (Iberis). When pruning or deadheading branching plants like Peonies, Yarrows, and Astilbes be sure to make a cut down to a leaf node. You may get a new flower stalk, and you certainly don’t want any obvious cut stalks poking up.
Also in the pruning department is removing water sprouts and suckers from shrubs and small trees. For instance look at your Crabapples and remove any suckers coming up from the base of the trunk and any spindly suckers on branches or the upper trunk. If this type of growth is still tender try to rub or gently pull it off. Otherwise use clean pruning shears. At this time of year I also try to remove any new weirdly vertical or inward growth on my small trees such as Cornus mas or Syringa reticulata (Japanese Lilac).
Staking and training is certainly on your chore list if you have a vegetable garden. Elsewhere vines might need some directing. I have a hop vine that always needs some help to properly drape over the arbor. Similarly some self-sown Morning Glories need a hand. Sometimes tall or heavy blossoms need staking. Try to anticipate that need early so your staking can be as unobtrusive as possible.
A few words on bulbs: Your fading narcissus foliage may be cut off any time after the 4th of July. By this time most other bulb foliage just pulls free of the underground bulb and the soil. It is also a good idea to fertilize bulb colonies. When I think of it I sprinkle on some of Espoma’s Bulb Tone. Also now is the time to think about your Fall bulb orders. Here, in no particular order, are some suppliers I have used: John Scheepers/Van Engelen; Brent & Becky’s Bulbs (Narcissus specialists); McClure & Zimmerman; and Old House Gardens (good for heritage plants). Some growers/importers give reductions for early orders.
Plants in Pots: Before I leave for the summer in Maine I try to shift the display in a large pot central to my garden. This year I retired the pansies and yellow snapdragon and replaced them with a center spire of white Cleome surrounded by some transplanted hardy Chrysanthemum ‘Sheffield Pink’ that will eventually spill over the sides and bloom in late September into October. In these two photos you can see the late Spring look and how it looked last week when my husband sent me the second photo. I mention all this to encourage you to use foliage rather than just flowers and to deploy perennials strategically. You could even grow some perennials in nursery pots to make them easier to slip into your display when they are in their prime. For inspiration on using succulents in containers check out the website of Avant Gardens in Dartmouth, MA.

The center of my garden in May. The focus is on a succession of blooms.

In early July the Dianthus have been sheared, the Euphorbias deadheaded, and Pansies retired. The focus now is on foliage color and form. When that top Cleome bloom fades it will be deadheaded to encourage branching.
Becky M., Horticulture Committee
Photos by Becky M.
Horticulture Tips – June 2021
All Hail to the ‘Sun King’

This winter during the pandemic, the Exeter Area Garden Club members enjoyed garden webinars via Zoom by Kerry Mendez, a nationally known horticultural educator. One plant she talked about that interested our members was the aralia ‘Sun King,’ a plant that looks like a shrub but is not. It’s an herbaceous perennial that dies back in the fall and re-emerges each spring. Members thought this perennial would be perfect beneath a roof line where falling roof snow can crush shrubbery. How nice to have a plant that disappears in the winter and reappears each spring and within a few weeks in warmer weather will reach full size again.
While caring for the perennial plants at Rolling Green Nursery several years ago, this same Golden Japanese Spikenard ‘Sun King’ with foliage of brilliant gold dazzled me as I watered it each morning at work. Often was I tempted to take one home to my small garden, but I resisted until one day… I didn’t.
The tag said 3’ tall and 3’ wide. I had just enough space for this small bundle of gold in my shady foundation border. How perfect it was, a show stopper for passersby, and a pollinator magnet in the late summer when few flowers were in bloom. I was in love with this mighty ‘king’ of the garden.
But then, due to an unfortunate felling of a neighbor’s tree that shaded this garden from the intense afternoon sun, the aralia began to show signs of stress. I had to water it way too often and the leaves on the sun side began to crisp and turn brown on the edges. More than that, you can’t always trust a plant label. Instead of 3’ x 3’, this royal plant grew well over 5’ tall. I was forced to prune which meant losing several tall panicles of blooming umbels at the top. So last year, I waited until it died back, then began the arduous task of digging the massive root ball and transplanting it to a border with good compost in filtered light.
I’m happy to report the ‘king’ survived the transplant operation. This fast-growing plant has almost reached full size today. The leaves that were brighter yellow in the sun seem to be a more of a rich chartreuse in the dappled shade but it still shines, an anchor among the ferns, hellebores, hostas and astilbes. How divine!
Ann H., Horticulture Chair
Horticulture Tips – May 2021
Thoughts for Spring Gardening
In April, I read an article about Bradford Pear Trees. Did you know that no insects nor caterpillars can live in these trees? Bradford Pears are very popular non native trees; however, they are wildlife deserts. The flowers are pretty, but the trees themselves are invasive and not long lived. I used to have some planted outside my Hampton Meadows home.

The article got me thinking about decisions we make, especially in the spring, about what and how to plant. So, I revisited two books by Doug Tallamy, Bringing Nature Home and Nature’s Best Hope. We all talk about wanting to help the pollinators, but do we make choices that will really help them survive?
• Do we buy mostly non-native trees, shrubs, and perennials because they are the newest varieties or we think they are pretty without realizing that our native insect population cannot digest their leaves? Thus, insects do not live in our gardens. No insects, no birds or small critters.
• Do we think that planting one or two plants of a variety will sustain the wildlife we want to attract? You really need to plant patches of a plant species to provide enough for insects to forage effectively. It is better to have fewer varieties with staggered bloom times.
• Did you know that about 70% of our native bees nest underground? Using weed cloth and/or applying a deep layer of mulch discourages the bees from nesting…thus not being available in your garden to pollinate.
There are two useful links to information on the EAGC website.
1. Go to Garden Talk /E&C Trees/The Oak — Ann H. gives a complete description of how vital Oak Trees are to our wildlife. These trees supply homes to over 500 species of caterpillars and hundreds of species of insects. These all provide food for the songbirds we would like to visit our gardens. Oak trees also provide nesting spaces for birds and other small animals. Their acorns feed turkeys, squirrels, mice and (yes) deer. So much more ecologically useful than the Bradford Pear.
2. Go to the Horticulture Tips section to see a complete list of Doug Tallamy’s Native Plants with Wildlife Value. You may find a species to add to your garden.
If you haven’t read either of Doug Tallamy’s books, I strongly recommend them to you. The information is easily read but staggering.
• 96% of migratory songbirds rely on caterpillars and insects as their main source of food. No insects – no birds.
• Baby birds cannot digest sunflower seeds.
• A pair of Carolina Chickadees requires 6,000-9,000 caterpillars to successfully raise a brood of young. How many chickadees do you have in your yard?
So, as you think about planting new trees, shrubs and perennials this year, please take some time to pick ones that will help promote and encourage wildlife diversity while beautifying your garden.
P.S. I discovered why I have so many Goldfinches. They are almost entirely vegan. They love sunflower seeds.
Linda V., Horticulture Committee
Horticulture Tips – April 2021
Before I begin, I want to give credit and a big thanks to Doug Cygan, Invasive Species Coordinator, UNH Dept. of Agriculture, for permission to use his photographs shown in this diatribe against
Black Swallow Wort

#1 Weed on My Garden Hit List
There are two major frustrations with gardening in our yard – even more than the bunnies and voles. They are the gazillion Norway Maple helicopter winged seeds (and their saplings that eluded us) and Black Swallow Wort. As for the annual Maple issues there isn’t much we can do besides raking and pulling until our neighbor cuts down the 10 Norway Maples growing in a row along our northern lot line. On the other hand, Black Swallow Wort has become a neighborhood problem. It has more than earned its place on the NH list of Invasive Species.
If you don’t have any in your yard or neighborhood consider yourself lucky. Prepare yourself though – learn to recognize it so that you can initiate damage control immediately. Unlike when we purchased our home 22 years ago, we left it where it didn’t bother us and dug it up when it was in our way. We didn’t know what it was – but quickly learned that trying to remove its root system nearly gave both of us carpal tunnel syndrome. As I said we didn’t know its name, nor did any of our neighbors. We were too naïve/ignorant to contact the Extension Service. It is known by other names: dog-strangle weed, and a few botanical names, Cynanchum nigrum, Cynanchum louisea and Vincetoxicum nigrum – but we dubbed it DEVIL WEED.
According to multiple sources, Black Swallow Wort escaped from a botanical garden in the Boston area in the mid-nineteenth century. It is now is found throughout New England and is moving into much of the Midwest. In NH it has become an endemic, nasty, invasive plant, usually inhabiting the border between streets or lawns and surrounding woods. Because swallowwort is indistinguishable from milkweed to the Monarch, she lays her eggs on swallowwort leaves, which offer no nutritional value to the caterpillars. The Monarch caterpillar dies. Even though this weed has been mingling in field for over 100 years – the Monarchs have not evolved to recognize the difference between the life-giving milkweed and deadly swallow wort. Some studies have shown that the Black Swallow Wort roots give off a toxin that inhibits the growth of nearby milkweed.
Learning to recognize the enemy…
Black Swallow Wort is a perennial herbaceous non-branching twining vine that can grow more than 6 feet long. Its dark green, shiny simple leaves are opposite and ovate, 2 to 4 inches long and ½ to 2 ½ inches wide. It grows in zones 4-8 and is not terribly particular about soil conditions or sun exposures. It is not usually found near standing water. It dies back to the ground in the winter and will begin sprouting in late April into May. In April, you can still see the husks and skeletons of last year’s plants tangled in shrubs, hedges and fences. These are areas to be on the lookout for new growth from last year’s crown and from new seedlings.
The flowers begin to appear in June and can occur through September depending on the sun exposure. The flower is small and not always noticeable if growing in a vegetative site. The flowers are ½ inch across with 5 petals, purplish brown in color.

Photo by Doug Cygan
The Black Swallow Wort’s fruit is an elliptical fleshy green pod similar to milkweed though narrower. This is where the mamma Monarch makes her fatal mistake.
Photo by Doug Cygan

The mature pod turns brown and splits in half releasing hundreds of flat brown seeds with fluffy white wings. They disperse with the wind. They look like milkweed seeds – but these are just trouble waiting to happen.

B.S.W. Survivalist’s Reproduction Gets an A+
In my mind, this plant may survive with the rats and cockroaches – long after we have gone. Any part of this plant is capable of producing another plant. The seeds, which can stay viable for up to 5 years, are the obvious source of new weeds but any part of the crown or some areas of the stems can root new plants. Once you have this weed in your yard, the rhizome roots seem to be the plants guarantee to survive. Any fragment of the fleshy white root can product a new plant. The seeds and vegetative plant parts can grow and take over any undisturbed site and even out-compete the natives. Stands have been known to cover several acres.
Control (not hopeful enough to say eradication)
Control is very difficult once the wort has established itself. The hope is to deprive the plant of enough nourishment that it will weaken and die … or at least become less aggressive. We have neighboring properties whose owners do nothing about this obnoxious predatory weed. We have researched, asked questions of the experts and experimented (legally, so far). We just keep up the battle to make our property safer for the Monarchs and not a haven for the black swallow wort. Observation, perseverance/stubbornness, physical and chemical removal seem to be the only tools we have found to stay in the battle with this weed.
Before beginning any type of removal or treatment effort, be aware of the plant’s reproductive abilities, your town’s yard waste/invasive waste disposal rules and any government regulations about chemical use.
(WARNING – the saps can cause a rash – so best to wear gloves when dealing with this pest.)
Physical Removal:
– If a large infestation in a large area, mowing is an option, keep it mowed so that the weed does not flower or produce seed pods. Long term the plant should weaken and die.
– Hand pulling or cutting to deprive plant of photosynthesis … no flowers or seeds
– Definitely remove any seed pods you find. (I even do this when I walk the dog around town.)
– Carefully digging to remove crown and roots. This is usually very tedious since the rhizomes forma a thick “broom-like” claw under the crown sending “runner threads” off in multiple directions. In well worked soil this is less difficult than in undisturbed areas where the soil is more compacted. Remember any part of that root can grow another plant …multiple fragments occur easily.
– Make note of or physically mark the areas where you have known growth this year – so you can monitor those sites for spring emergence next year.

My sketch of the Devil Weed’s strengths
Note: We have many lilacs, boxwoods, various mature shrubs, evergreens, the neighbor’s hedge line on the south property line, and a chain link fence across the back of the lot. The seeds germinate in the bases of all of these. It is impossible to get the crown and root out intact – so we are constantly cutting back the wort and pulling out the twining vines. Yet sadly, we still get seed pod development. So be especially vigilant in these relatively undisturbed areas for initial invasion.
Disposal of Black Swallow Wort material:
– Burning is not advised unless you are absolutely certain there are no seed pods.
– Do not compost or take to your town’s “compost” site – the temps are not high enough to kill.
– Most effective method is to place all BSW debris in a black plastic bag, seal it, lay it in full sun for a few weeks – then put sealed bag in the trash.
Chemical Attack:
– Systemic herbicides, Glyphosate and Tricolpyr, can be used to eradicate some infestations but it can take years. The use is complicated if the wort is enmeshed in other plants. Use of the herbicides is, of course, following regulations and proper product use.
– These herbicides should be applied when plants are actively growing, after flowering has begun and before pods begin to form. Don’t spray too soon. Spray both sides of leaves – but avoid “dripping”. Post spraying, the wort may look “sick” but don’t expect it to die.
We prefer the following method – the “cut stem “method, when using herbicide. It decreases the risk of any effects on other plants and fauna.
– Cut stem treatment: Use this method in areas where plants are established within or around non-target plants or where vines have grown into the canopy. Cut the live stem about 2 inches above ground level (between the lowest nodes). Immediately apply a 50 to 100% solution of glyphosate. The wort is trying to draw down all the energy it can for winter — so hopefully a big gulp of poison will do some damage to that natural process.
We haven’t seen any Black Swallow Wort sprouts yet — but we know they will appear soon. So we are preparing to begin the battle once more. It is actually not an unattractive vine – but it is toxic to those beautiful Monarch (cows and horses too). It can ruin the biodiversity of an area quickly and still has no biological predator. I couldn’t find anything positive about it in the literature – a sad situation for a living thing.
The best strategy is early identification and intervention. If you have never met this frustrating menace and would like a true visual experience – give me a call — I will give you a personal viewing!
Submitted by,
Pat N
Resources:
http://agriculture.nh.gov/divisions/plant-industry/invasive-plants.htm
http://www.nps.gov/plants/alien/fact/cylo1.htm
https://concordma.gov/773/Black-Swallow-wort-Cynanchum-Louiseae
monarchs@monarchjointventure.org
To view a HUGE gallery of Black Swallow Wort photos – go to “Google Images” and type in “Black Swallow Wort”.
Horticulture Tips – March 2021
Confessions of an Embarrassed Gardener — A Cautionary Tale
Have you ever discovered a mystery sprout, newly emerged in your springtime garden, that was so interesting or attractive that you decide to nurture it along – just to see what you’ve got? No? Well then, you’re a smarter gardener than I am.
For two seasons I’ve watched a vining plant struggle to stay alive under the shade of a rose mallow, tucked up against the front of my house. Each year it sent up scraggly vines that tried in vain to grab hold of a nearby downspout. Since this house is relatively new to me and I’ve been discovering surprise plants each spring (mostly Asian Bittersweet and Multi Flora Rose, sadly) I thought I might have stumbled across some ornamental vine planted in the wrong place by a previous gardener.
So I carefully dug up the vine last spring and moved it to a prominent, sunny spot in my back bed. I transplanted a low-growing ground cover to its base, something I’d read was appreciated by Clematis, which I was convinced I had found. I even made a decorative trellis to show off what I hoped would be summer blooms.
My salvaged “Clematis” thrived in its new home, vines spiraling above and beyond my homemade trellis. I have to admit I was proud of myself for saving a plant life and giving it a happy new home. If that plant bloomed that summer, it must have produced very tiny flowers because I didn’t notice them. But what did catch my eye in the fall were loads of 2-inch green seed pods. Curious, I peeled one open and watched thousands of delicate white seeds burst out of the pod and drift away with the wind to every corner of my garden bed.
I finally realized it was time to do some Google research. It didn’t take long for me to figure out that I had been nurturing Black Swallowwort all summer. After reading about what an aggressive, invasive & nasty weed I’d adopted, I scrambled to pick every little winged seed I could find, sealed them up in a plastic bag song with every bit of the rest of the plant, and pushed them to the bottom of my trash can. Of course if I found 100 seeds, there were 99,900 more lodged in all corners of my yard. So this spring I will be on high alert for Black Swallowwort seedlings, with fingers crossed that I didn’t introduce this invasive species to my corner of Hampton Falls.

This is what remains of my “Clematis” this spring. I’ll be watching it carefully for any sign of green!
Learn from my mistake. Don’t let this nasty plant move into your garden. Here’s what to look for:
Swallowwort is an invasive plant in the milkweed family. Two species are found in New Hampshire: Black Swallowwort and Pale Swallowwort. Both are climbing vines and die to the ground in winter. They have opposite leaves on twining green stems and can grow to a height of six feet. They have tiny dark purple or pink flowers and mostly propagate by seed, which disperse from pointed pods in late summer.
And here’s the really bad news:
Both plants are highly invasive with severe environmental consequences. Swallowwort is difficult to control and is very hardy. It can’t be pulled; it breaks off at the ground and the roots quickly sprout again. It has no native enemies; virtually nothing feeds on it successfully. It disperses its seeds by wind. It grows in both shade and full sun and can crowd out native plants. In addition, Swallowwort’s roots release compounds that can suppress the growth of other plants. There is also concern that monarch butterflies will mistake Swallowwort for native milkweeds and lay their eggs on them, only to have their caterpillars starve.
Compiled from https://extension.unh.edu/blog/invasive-spotlight-swallow-wort, where you’ll find lots of photos of Swallowwort.
If this article helps eliminate at least one Swallowwort plant, it will be worth the embarrassment.
LuAnn F, Horticulture Committee
Horticulture Tips – February 2021
Calamintha: Perennial Plant of the Year

Here we are with the ground finally cloaked in snow, thinking of winter as a quiet time for gardeners. But it also the time for plant awards. One of this year’s winners is a perennial that is a pillar of my terrace garden, a geometric arrangement of raised beds separated by gravel paths. I never tire of singing the praises of Calamintha nepeta subspecies nepeta, the Perennial Plant Association’s 2021 Perennial Plant of the Year.
Calamintha (the name is said to derive from Greek for good and, more obviously, mint) is native to Great Britain and Southern Europe and it seems to me rather Mediterranean in its appearance and habits. Here in North America it is hardy in Zones 5 to 7, and sometimes goes under the name Calamintha nepetoides (the oides suffix, loosely translated, means “looks sort of like”). Here’s why I love Calamintha: it tolerates neglect and drought; is not attractive to pests, diseases, or deer; blooms like crazy from late summer through fall; and has a delightful minty fragrance when you brush against it. Though you might want to avoid brushing against Calamintha since its flowers attract a wide assortment of bees. The tiny blossoms are usually described as white but they often have a slight tint of blue or lavender, and I suspect that nursery people are working to develop strains that enhance that tendency.

Photo: https://perennialplant.org/page/2021PPOY
Calamintha is also a very versatile plant design-wise. In maturity it forms a bushy, rounded mass about 18” in height and width. Calamintha never tries to be the star of the show; it is content to be a perfect foil for more eye-catching perennials and grasses. In my garden I like it on the edge of my raised beds contrasted with the velvety leaves of Stachys ‘Helen von Stein,’ the globular blooms of Allium ‘Millenium’ (2018 Perennial Plant of the Year), and the earlier blooming Geranium ‘Biokovo’ (2015 PPOY). If I were into a wilder, prairie look in my garden I would pair Calamintha with almost any grass or sedge, and I suspect it would look terrific supporting a cast of all the daisy-like plants – Rudbeckia, Leucanthemum, Echinacea etc.

Photo: https://www.midwestgroundcovers.com/page/Plant-Partners-Combinations
When Calamintha ages it tends, like many perennials, to fade a bit at its center. That is the time to divide it, preferably in spring. The mature plant is rather woody so don’t hesitate to use a sharp knife to make your divisions. As always, be sure to give your newly planted divisions a little extra water and care. This year I am going to experiment with pruning some of my Calaminthas to delay blooming – maybe even leaving some branches unpruned in hopes of having varied bloom times on a single plant. If you are not familiar with pruning perennial plants get ahold of Tracy DiSabato-Aust’s The Well-Tended Perennial Garden. It is a great book even though she neglects to mention Calamintha.
When shopping for perennials this spring look for Calamintha. I doubt it will be attracting a lot of casual gardeners but you can feel content with knowing you are taking home a winner.
Becky M, Horticulture Committee
Horticulture Tips – January 2021
MEALYBUG -VS- MEALWORM
DO YOU KNOW THE DIFFERENCE?
Some EAGC members have been having discussions recently about the best feeder to use for providing treats to bluebirds. Sometimes mealybug and mealworm have both been used to describe this food item. I have been guilty myself…so we will sort things out here.
Mealybugs
These are plant-sucking wingless insects. The adults can grow up to 1/4” in size. You will recognize them by their waxy white appearance on your houseplants.

If left untreated, these insects will suck the sap out of leaves, causing them to yellow. If the infestation is large enough it may kill a plant. As they suck the sap a honeydew forms which in turn encourages sooty molds to grow. It is best to cut out affected areas of the plant. On indoor plants, you can control mealybugs by applying rubbing alcohol with a swab. Outdoors, you can spray with water. Attracting natural predators, such as ladybugs, will also help to rid you of this pest. A large infestation can be handled with Safer Insecticide Soap or Neem.
Mealworms
Mealworms are another kind of pest. They are the larvae of darkling beetles (Tenebrio molitor). Maybe you remember when you were young that sometimes your mother would find small worms in the flour bin. The larvae love to feed on grains. The larvae turn into beetles after about a month.

Public Domain/By KKPCW – Own work, CC BY-SA 4.0

However, the larvae make terrific snacks for the birds you are feeding during the winter
and as food for newly hatched birds in the spring. Most baby birds need the protein
provided by insects to grow. When they only are fed seeds, they often will die. They are
unable to digest the seeds properly. Most of our song birds love these protein giants.
Now we have sorted out the differences between mealybugs and mealworms; we can get back to the original question asked about birdfeeder types. There are many kinds available. Tray feeders and wooden feeders with a feeding station may not be the best. The mealworms quickly mold if they get wet, and birds will not eat moldy worms. I have tried a couple of versions and found the one shown below to be a great feeder. It keeps the larvae dry, unless there is a strong cross wind during a rainstorm. The birds can enter the feeder and be safe while eating. (This is becoming an issue at my home as we now have resident hawks.) Squirrels can not climb into the feeder.

Linda V, Horticulture Committee
Horticulture Tips – December 2020
Choosing the Right Tree for Your Holiday
Holiday decorations are appearing earlier this year – possibly because the tedium of coronavirus restrictions has caused people to look for ways to brighten their days and their homes. So here is a run-down on how to choose the best Christmas tree for your home. Whether you’re a fan of live, artificial, or potted trees, there are tips here for you.
Choosing a Live Tree

Whether you’ll be cutting your own tree or choosing one from a tree lot, step number one is measure your space. Measure the height of your ceiling, remembering to subtract the height of your stand and your tree topper. Then clear the space where you’ll put the tree and measure how deep it is. Finally, measure the opening of your tree stand. You want your tree to fit – trimming the diameter of the tree to fit it into a too-small opening will strip it of its cambium layer, which is how it absorbs water.
For the freshest and healthiest tree, you should buy at an established tree farm or a lot that brings in trees from local farms, if possible. Most Christmas trees are cut about 3 to 4 weeks before they arrive on the lot—usually the weekend after Thanksgiving, according to Clarke Gernon, chairman of the National Christmas Tree Association.
Although there are more than 35 species of Christmas trees sold throughout the U.S., the trees typically grown as Christmas trees in our region are balsam fir, blue spruce, concolor fir, Fraser fir and white spruce.

Here are the positive and negative characteristics.
• Balsam Fir – The classic and least expensive in the Northeast. It has deep green color, excellent needle retention, and is one of the most aromatic.
• Douglas Fir – Pyramidal shape and bluish-green color, long-lasting and holds its needles well. It’s wider in shape, a paler green color, and has soft needles. Its limbs are less sturdy and will bend under heavy ornaments.
• Fraser Fir – Very fragrant, needles are deep green on top, silvery-white below. More cone-shaped so it fits well in a tight space. Very sturdy branches.
• Concolor fir- Long, blue, soft needles, giving it a unique, coarse appearance. This species also has a distinctive scent, often described as citrusy or orange-like. Sturdy branches; good needle retention.
• Scotch Pine – Conical shape, piney scent, excellent needle retention. Soft dark green needles stay on the branches even if the tree gets dry. Stiff branches that won’t buckle under heavy lights and ornaments.
• Blue spruce – A rounded pyramid shape, very full appearance. Fragrant but sharp needles, and a silvery or bluish color. Excellent needle retention.
• Norway Spruce – Pretty tree, with poor needle retention. Must be kept watered. Branches are sturdy enough to hold heavy ornaments.
** And for those with allergies who usually avoid live trees:
• Leyland Spruce –Grayish-green, soft needles with very little scent, no sap, and no pollen. Few needles are dropped until long after the holiday season.
• White Pine – Will retain their blue-green needles throughout the holiday season. Very full tree. Little to no fragrance.
Artificial Trees

Maybe you’re done with dropped needles and constant watering. You’ve decided it’s time for an artificial tree (or a new one if yours is looking a little tired.) These are a few tips to make your shopping easier.
Artificial Christmas trees are an investment. A high quality Christmas tree can last for more than 20 years. Spending a few extra dollars can end up saving you money in the long run.
Choose the material that works for you. These trees are almost always made of PVC or PE. PVC trees’ color will not fade. PVC is fire resistant, making it significantly safer than a real tree, or even one made from PE. However, PVC needles are usually wired to branches, which can make the tree more obviously fake. Trees made from PE have needles that are formed integral with the tree and are better sculpted to look more authentic. There are also trees available that combine PVC and PE, providing some of the advantages of both.
Branches on artificial trees are usually one of two types: hinged or hooked. Hinged branches are permanently attached to the tree and can be folded when the tree is stored. Hooked branches are not attached and are hooked on when setting up and taking down. Hinged branches are found on higher-quality trees.
Hook-in branches are much more fiddly and take longer to put together. They also can’t be pre-lit. However, they are usually less expensive.
The number of ‘attached tips’ is one of the primary indicators of quality. The higher the number of tips, generally the higher the quality of the tree.
Look for a sturdy metal stand and center branch.
And just as with a live tree – measure your space. Not only the space where you’ll be setting the tree up, but also the space you’ll be storing it in off-season.
Live, Potted Trees

For those who want to enjoy their tree for years to come, head to a nursery and reserve a rooted tree. Not only will you be adding a valuable plant to your landscape, you’ll be nurturing a tree that will get busy sucking CO2 out of the atmosphere. Going the potted tree route requires some preparation.
• Visit a nursery and choose a tree that will thrive in the spot you’ve chosen for it. It’s important to select one that grows naturally in your region so that once it’s replanted it will survive. In the Northeast, a variety of pines and firs like Balsam fir, Fraser fir and white pine grow naturally.
• A 6-footer with its root ball can weigh up to 250 pounds, so choose your tree with weight in mind.
• Shortly before Christmas, bring your tree home. If its roots are wrapped in burlap, you’ll need a container that’s waterproof, or fitted with a liner to prevent leaks, and that’s just slightly larger than the root ball – a snug fit will help maintain proper moisture levels.
• Bring your tree indoors for the holiday. Make sure it gets enough water (but not too much), and don’t leave it indoors more than 10 days. (Fewer days is preferable.) The longer you leave a tree inside, the more acclimated it will become to the warm temperature and might no longer be hardy enough to plant outside. Keep the room as cool as possible and use small LED lights and minimal ornaments so that you don’t put too much added stress on the tree.
• After 10 – or fewer – days, it’s time move your tree outdoors to plant in a prepared hole. If you don’t have a prepared spot and the ground is frozen, place it outside in a sheltered area and heavily mulch the container to protect the roots. The tree can also be held in an unheated garage until it can be planted in the spring. Make sure to periodically check the moisture levels and water as needed.
LuAnn F., Horticulture Committee
Horticulture Tips – November 2020
When I have been out in my garden tending to seasonal chores I often had a mental conversation going on with all you gardening friends. Then when I get inside those thoughts disappear in the face of all the indoor work to be done. So here, better late than never I hope, are a few of those conversations.
One November chore is to deal with plants your have had outdoors in pots. Some can find a place indoors or you may want to take some cuttings to root. It is always a good idea to give those plants a brisk shower to remove any pests and you might even want to do a bit of root pruning and cutting back. I was horrified to find some teeny gross-looking thing all over my grandmother’s Hoya that had spent the summer in Maine. After a thorough cleaning and fresh potting soil it appears to have settled in its winter home.

Perennial but non-hardy plants like rosemary and scented geranium put on their best growth spending their summers in a garden bed but have to be potted before frost. Rosemary can take some freezing temps, and that helps them to flower, but be sure to get them in when the low temp falls below about 28.
Amaryllis plants also benefit from spending the summer out of their pots and in a cozy garden bed. Carefully dig them up, let them dry for a month or so, and then treat them like a bulb you just bought bare root. The photo below shows how big one of my bulbs was when dug early this month. This is a full size garden fork.

The Haddonstone jardinière that sits in the center of my garden featured Sedum ‘October Daphne,’ nicely draping over one side. As much as I hated to see them go, the planter and plant had to go to their winter homes – the garage and a raised bed, respectively. Daphne was well watered in and, if I remember, may get a light blanket of mulch after the ground is well frozen.
Soon the grey plastic replacement planter will be filled will a few armloads of greens and sprays of twinkly lights. Thank you, Target.

I hope all of you have gotten past the notion of fall “clean up.” Gardens are living systems not living rooms. Yes, there will be leaves to rake but try to make a pile or two that can rot into leaf mold that is like tonic for your garden, though it may take a couple of years to fully break down. Shred them if you can and get a wire bin or two to help them compost. If you have a mate who does not buy into this, I volunteer to come and give the talk.
Most of all, though, don’t forget to see the beauty in plants as they move toward winter.

Golden Siberian Iris foliage with dusty greens of Chrysanthemum ‘Sheffield Pink,’ Euphorbia myrsinites (in the gravel), Dianthus, various thymes, and Stachys ‘Helene von Stein.’

Becky M., Horticulture Committee
Horticulture Tips – October 2020

Forcing Tulips – My Winter Covid Project
Now I am an inconsistent gardener – gardening is still teaching me to be patient … as opposed to my default settings of indecisive or impulsive. I have set this project impulsively – now comes the planning and patience. I am open to your thoughts and advice from anyone who has done this.
Winter is coming … I know this because I had my first sighting of a pick-up with its snow plow this past week. Fall clean-up tasks are in process, but I need a gardening project for the winter. I want winter colorful blooms in February!!!
Of course, I have several pots of blooming cacti and have grown/forced amaryllis and paperwhites for winter indoor blooming…even had a few amaryllis re-bloom. This crazy Covid year demands a bigger challenge – forcing pots of red tulips for Valentine’s Day bloom.
Tulips, daffodils, hyacinths, crocus bulbs all require 12-14 weeks of chilling to bloom. For us in the northern climates – that works well with our winter season. The bulbs we can purchase now and plant in the ground will bloom in the spring. Folks who live in warmer climates can grow these same types of bulbs but have to find sources of “pre-chilled” bulbs — where a supplier has put flats of bulbs in a controlled refrigerated “winter chill”. These bulbs are then ready for “southern gardeners” to plant in December or January for their seasonal spring bloom. We could order pre-chilled bulbs in January … but what is the fun in that?
There are a number of ways to pre-chill tulip bulbs. Planning, patience and luck are required for all of them …. none of these are my strengths. So it will be a personal challenge, through the next few months of Covid isolation, to have pots of bright red tulips on my kitchen table on a cold snowy February day.
Getting Prepared

Keep a Journal/Calendar
…this 12-16 week experiment/challenge needs tracking and reminders. Decide when you want the blooms …or series of blooms. Mark that date on the calendar and work backwards 12 to 16 weeks to establish your initial chill. The process may need to be remembered for the future (— or as a reminder why not to try this again).
Estimated planning schedule: 12-14 weeks of chilling …2 weeks of cool with low light ….2 weeks warmer with indirect bright light … 2 weeks of indirect light –BLOOMS!
Find the location — One requirement of this task is to find an appropriate spot where I can control and monitor light, moisture and, most importantly, temperature.
– Refrigerator
– Basement/garage/bulkhead
– In a trench in the ground – a site accessible during the winter
Buy your bulbs …just regular fall planting bulbs. You want firm and healthy looking bulbs. I noticed supplies are a little slimmer this year – or folks just shopped earlier than me!
Containers
– Pots – on the shallow side 4- 6” is deep enough with drain holes
– Small paper bag or perforated opaque plastic bag for loose bulbs.
– Protection and insulation. Besides temp control, think protection from critters. If outside – some chicken wire. Since I plan to use my bulkhead once the temps get below 45 — thinking of using one of those large Styrofoam boxes that food is shipped in.
Soil and water … maybe a little bulb food if you hope to replant in the spring. The soil should be evenly moist. They shouldn’t need much watering during this process, but the surface can be sprayed if it feels dry.
Thermometer – to monitor temp, shouldn’t go below 35 or above 45 for any prolonged period.
PLANTING
Safely chilling the bulbs is the challenge, along with trying to avoid spoilage and critters for 12 -14 weeks. The bulbs need to be held somewhere between 35 and 45 degrees in a dark place. Above 50 for prolonged periods may affect the bloom development.
Outdoors: If you have an accessible area where you can set your pots into the ground – you would need to dig a 24 inch deep trench large enough for your pots, deep enough below the freeze line, have some type of chicken wire to protect them from mice and have some insulator — salt marsh hay. Depending on how early in winter you want your blooms – you may have to do some “chilling” in the fridge for a few weeks. After 12-14 weeks, remove them from the trench and follow directions below. My planting areas can end up un-accessible if we have heavy snows –so this plan doesn’t work for me.
Fridge / crisper drawer: If you happen to have a second fridge, this would work for much of the chilling time. If you have enough space in that fridge – you pot the bulbs up and keep them there — this method would probably give you the best results. That won’t work for me… only one fridge. The loose bulbs, or potted bulbs, need to be in an opaque bag that has air exchange. Do not keep apples or other ethylene gas producers in the fridge – it can affect the bulbs ability to produce flowers. You may need to use this method in combination with the garage/basement/bulkhead method to get your timing right.

In the garage, basement/bulkhead:
The site needs to be dark and cool. If you have temps in this area consistently less than 50 degrees – and above 30 degrees – things should go smoothly.
Once potted and placed you will need to be aware of any swings in temperature … either move pots to colder spot or provide some additional insulation factor

Check at least weekly…mark off the calendar…cross your fingers.
Potting


Choose a pot deep enough for root development – 4-6 inches. Clean soil.
Plant the bulbs close together but not touching. Plant so that the tip of the bulb is at the surface or just below. Water so that soil is evenly moist – you should not need to water during chilling – but assess weekly. You can spritz the surface to keep from drying out, if needed. Put the pots in your dark and cold space.
If the weather is still too warm in the basement or garage — you can chill the bulbs for a few weeks in the fridge and then pot them – make sure your soil is “cold” before planting (to avoid reversing the pre-chilling you’ve already done). If you prefer to pot up at the latest possible time — plan for 2-4 weeks in the pots, allowing for the roots to get established.
Whatever method or combination of methods … once you have reached the 12 week mark you can bring the potted bulbs out of the dark but keep them in a cool low light area for another 2-4 weeks. When there is 1-2 inches of green emerging – bring it into a warmer area with bright indirect light for another 2 weeks. Back off to indirect light, blooms should appear in 2-4 weeks.
Hope for success …but I know there is a Plan B. I can still have those blooms …it will just require a trip to the floral department.

P.S. If you hate how paperwhites get TOO tall and floppy – google “growing paperwhites in alcohol” for some great hints – especially the Cornell site.
Pat N., Horticulture Committee
Horticulture Tips – September 2020
Gardening Through a Severe Drought, a Pandemic, and rabbits
Although there are spectacular late flowering perennials, most gardens are at their best during the flush of new growth during spring and summer. Asters, fall-blooming anemones, monarda, rudbeckia, helenium, ornamental grasses, and the glorious broccoli-like blooms of ‘Autumn Joy‘ sedum all enliven the fall flower borders.
Flora in my fall perennial border need a little deadheading and weeding, but annuals are absent this year due to several factors: drought, pandemic, and rabbits. In lockdown this summer, I made no onsite plant shopping for new annuals. Seeds were ordered and sowed in the midst of water restrictions and rabbit proliferation.
I found out the hard way that, among other things, rabbits adore perennials and annuals: allium millenium, artemisia, coneflowers, liriope, snapdragons, verbena, zinnia, petunias, to name a few. They’re not fond of blanket flower or sneezeweed or Russian sage or sedum so I do have some color left in the cutting garden. A shelf in my garage is devoted to deterrents, homemade and bought. I’m convinced there is no rabbit solution for the garden aside from predators and careful plant choices. Next year’s blooms will be in tall containers!
In addition to rabbits, we were inundated with voles this summer (caught 6) and a first ever deer visit to the hosta salad bar that prompted me to remove several bunches of hosta, pack them into our large wheelbarrow twice, and send a neighborhood email offer of FREE HOSTA. All plants were gone the next day. The hosta I kept are sporting a chunk of English Spring soap like square green blooms speared atop their spent scapes.

On the bright side, there is one beloved woody plant whose spectacular blooms have taken me from the heat of late summer to the shorter days of autumn. No deadheading needed. No pruning. No weeding. Low maintenance. A little supplemental drip irrigation on my designated watering night kept them happy during the hottest part of summer. They’re my ‘Little Lime’ hydrangea that bloom in late summer, first with lime green blooms, turning white, pink in September, and finally a deeper ruby to end the season. The fall display gives me as much joy as the summer bloom. I have them growing hedge-like in a circular border surrounding my avian garden where I provide bird food and a water bath. The birds and I have been enjoying them for weeks with more weeks to go.

Ann H., Hort Chair
Horticulture Tips – August 2020
Daylily Proliferations
A fellow garden club member recently shared an article from Oakes Daylilies in Tennessee.
We all know that daylilies can be propagated by seed and division but did you know about proliferations?
On a number of daylily varieties a small leafy proliferation will form at nodes or bracts on the flower scapes. And unlike daylily seeds that aren’t identical to parent plants, the leafy proliferations are exact clones of the mother. Root division gives you an exact replica of the plant, but it’s exciting to know a second way to have an exact copy.
Here’s what Oakes Daylilies says to do: Carefully cut the proliferation from the scape above and below the new plant. If there are roots, be careful not to damage them. Either plant it directly in your garden or in a container of potting soil until it’s larger, then transplant it into your garden. Their advice is to keep it well-watered for a couple of weeks…. and their secret is to trim the foliage a bit so the plant can concentrate on root development.
Oakes Daylilies has made a good YouTube video on the subject: https://youtu.be/iXML8Z73I_Y
I’ve never grown many daylilies in my gardens. However, there is one that I can’t seem to live without. It’s the Hyperion daylily, a mid-season daylily that produces flower scapes that grow over 36” tall. It’s planted on a slight incline in my garden so when I approach them, I am actually face level with these gorgeous lemony blooms.
After reading about proliferations, I visited my Hyperion daylilies with fingers crossed. Alas, not a one was found on my Hyperion scapes. I must depend on root division or a good daylily company like Oakes Daylilies for more Hyperion daylilies.
Ann H., Horticulture Committee Chair
Horticulture Tips – July 2020
July in a Seacoast New Hampshire Garden
It’s been a hot and sticky July so far on the Seacoast of New Hampshire, 2020. And to make matters worse, we’re experiencing a moderate drought. It’s been dry for weeks and the town of Exeter has issued restrictions for water use in the landscape. We had some recent dousing of rainfall but much less than we need for our gardens. I don’t have a rain barrel but every container that holds water has been put into use here. So far, I’ve collected enough rainwater to make sure our garden containers stay well-watered, and I water the rest of the garden on our designated days.
In spite of weather conditions, there are summer chores that should be done. Here are a few basic tasks that keep me in the garden on a regular basis:
Deadhead:
Removing spent flowers helps plants put more energy into flowering again.
If you leave flowers to die, many will turn to seed-making rather than producing more flowers. Deadheading is time consuming and tedious, but if you clip off even a few dead stems every day, it is amazing how many more flowers you will have. I’m beginning to wind down fertilizing perennials but will continue to fertilize my few annuals until the first frost nips them.
Insect Pests:
As I work through my garden, I watch for signs of insect pests. I have noticed a few of the hungry Oriental beetles (below) have emerged from the soil and are seen around the garden. They aren’t as colorful as their cousins, the Japanese beetles, and, unlike the Japanese beetles, these beetles are nocturnal flyers and easy to overlook. We should see the emergence of Japanese beetles in another week or two.

Weeding:
If you were vigilant in the spring about weeding and mulching, then your mulch should help suppress new weeds, and your ornamentals and vegetables should be shading out any new weed growth. You can slow down on weeding but don’t stop. One weed that goes to seed will cause you much more weeding in the future!
Photography:
Mid-summer is the best time to assess your garden. Do you need to replace a plant, or divide a plant? Do you think a plant would work better in a different spot? Maybe a different variety of flower might work better in this border. Would you like more containers in the garden next summer? Take a few photos of your garden now so you will remember exactly where every plant is, like the Helenium below. I had forgotten all about it until it bloomed. It’s also a great time to add a pop of color with a few annuals. It’s not too late!

Tomatoes:
We’re insane about summer tomatoes and thrilled to have two tomato plants (below), one an heirloom and the other an indeterminate variety that may eventually block the view from our window! I have no idea what varieties they are as a generous person dropped off tiny plants while we were self-isolating. We are watching daily for disease and pests. Last summer we saw hornworms reduce a plant to nothing overnight and I’m 100% sure they’ll be back. We are watching for fungus and/or virus, too. Nothing worse than losing a beautiful tomato plant to disease.

Birdbaths:
Plants aren’t the ones that suffer in a drought. Help the birds by keeping your birdbaths full and clean. Right now, water in the garden can be more effective in attracting birds than bird food. We have a few different water containers, one on a pedestal, and a couple more tucked into the borders on the ground where the water stays cool.

Watersprouts and Suckers:
We have several plants that grow watersprouts and/or suckers: a crabapple, serviceberry trees, viburnum, to name some. Not only do these growths mar the appearance, removing them will divert the plant’s energy back to the vegetative areas of the plant. I just snip them off as soon as they appear.
Pollinators:
When I saw holes in the end of every hydrangea stems on 5 Little Lime hydrangeas that I’d pruned in early spring, I panicked… but I should not have. I cut one stem off and found the culprit, a gentle, solitary mason bee that UNH helped to ID. Advice from UNH? Protect them, not kill them. Mr. gardener immediately built a mason bee house from a UNH link. It is a wonderful success story that would make UNH proud. The busy bees are working day and night in their new home that is hung on a trellis in the middle of clematis and honeysuckle vines. Sometimes I pull a chair over and just sit and watch them at work sealing the entry to their nurseries.

Hope all is going well in your July garden! Remember to enjoy the time you spend outdoors. Winter always comes too soon.
Ann H., EAGC Horticulture Chair
♦ ♦ ♦ ♦ ♦
Horticulture Tips – June 2020
Baptisia australis:

Commonly called false indigo, it’s a native perennial that I have grown for many years. It is a low maintenance upright plant that will expand to 2-3 ft. wide and about 4 ft. tall. Although my garden is small, I have room for three of these favorites. I just plant them and forget them. I never water or fertilize the plants and have never seen any pest damage. Before the plant reaches full height, I add a half circle metal support that will prop up any leaning spikes that may rest atop the peonies or the daylilies. These hoops become invisible as the plants grow. The pea-like flowers line tall spires that extend over the bright trifoliate leaflets. The varieties I have in this garden are the common blue, however in a zone 7b garden I grew the blue, the white, a pale yellow, and a vari-color.
 I have grown for many years. It is a low maintenance upright plant that will expand to 2-3 ft. wide and about 4 ft. tall. Although my garden is small, I have room for three of these favorites. I just plant them and forget them. I never water or fertilize the plants and have never seen any pest damage. Before the plant reaches full height, I add a half circle metal support that will prop up any leaning spikes that may rest atop the peonies or the daylilies. These hoops become invisible as the plants grow. The pea-like flowers line tall spires that extend over the bright trifoliate leaflets. The varieties I have in this garden are the common blue, however in a zone 7b garden I grew the blue, the white, a pale yellow, and a vari-color.
Once planted, it’s best to leave the plant in place. The tap roots are numerous and can extend 2-ft. into the soil. I once successfully divided a baptisia plant. Both the plant and I survived the arduous task but just barely. Never again! Once the flowers fade, gardens then benefit from the abundant bush-like greenery as a backdrop. At season’s end the flowers are followed by enlarged seed pods. When breezes move through the garden, the pods rattle with the loose seeds inside. Before they spill seeds, I cut them off to keep the plant looking neater. The pods are either discarded or I often use them in flower arrangements. In the fall when the leaves blacken, I prune the plant down.
 roots are numerous and can extend 2-ft. into the soil. I once successfully divided a baptisia plant. Both the plant and I survived the arduous task but just barely. Never again! Once the flowers fade, gardens then benefit from the abundant bush-like greenery as a backdrop. At season’s end the flowers are followed by enlarged seed pods. When breezes move through the garden, the pods rattle with the loose seeds inside. Before they spill seeds, I cut them off to keep the plant looking neater. The pods are either discarded or I often use them in flower arrangements. In the fall when the leaves blacken, I prune the plant down.
Baptisia would be interesting as a single specimen or in a grouping. Both in a naturalized garden I designed in Virginia and in my more formal mini-garden in Exeter, this native plant is a winner!
Ann H., Horticulture Chair
♦ ♦ ♦ ♦ ♦
Horticulture Tips – May 2020
Our Aging Lilacs-The Lovely Ladies
May is the month that our wonderful New Hampshire lilacs to go into bloom. These plants originated in western Asia and migrated across Europe. The early settlers brought them to our shores – the lilacs on the Governor Wentworth estate in Portsmouth are said to have been planted around 1750.
Lilacs are special to me. When growing up, our yard was my Grandpa’s domain – from the grass to the vegetable garden and flower beds. His favorite was his “lovely ladies”, the lilacs, including a 60-foot hedge and this massive shrub that was the focal point of the backyard. I was his constant shadow and loved to be with him in the yard. So when we purchased our home in Hampton 20 years ago – the row of 13 aging lilacs that graced the south side of the property was one of those intangible omens that said – this was the place for us.
We knew that these lilacs had not received any TLC for many years but we were up for the challenge. The lilacs were at least fifty years old with many limbs covered with lichens, the bases were crowded with weeds and vines, dead branches and loads of suckers and worst of all, large areas were littered with the last owner’s construction debris from interior improvement projects So reclaiming this area of the property and rejuvenating these lovely ladies was our first big project.
The blooms had gone-by before we moved in. We didn’t know what to expect in terms of quantity/quality of blooms so decided to phase our attack over a few years. All the experts say that a three-year plan, taking out 1/3 of the old limbs/year for three years is the standard for rejuvenating old lilacs. Just clearing the debris was a major effort. The grass and undergrowth was daunting – especially when we discovered Black Swallow Wort (we call it “Devil Weed” and it is still our nemesis). We were only moderately aggressive in pruning – we took out all the dead, damaged and crossing limbs amended the soil with some compost and lime and watered them in the drier days of summer. We learned to appreciate the convenience of a “town dump” early on in this effort.
After the first winter it was obvious that four of the lilacs were too stressed to be salvaged. They were the ones most affected by the construction debris. Our first spring came and we had a fair amount of blossoms. Most of the bushes are common lilacs though two are of some unknown to me varieties. All of ours are lavender in color. There are seven official colors of lilac blooms – white, violet, blue, lavender, pink, magenta and purple, with many hues in each grouping. The shrub size can range from dwarf bushes to 20-foot-tall common lilacs and even 30-foot tree styles. The flower head can vary in size and shape and the individual blossoms can be single or double.
After doing some research and talking to folks at the local nurseries – we decided to hire an arborist to do the next pruning. Although the best time to do heavy pruning would have been late March or early April we had opted to see the blooms this first spring and were willing to sacrifice some in the second spring. He took out another 1/3 of the limbs to the ground and most of the suckers. I am still not sure his pruning was much better than our first-year efforts, but we felt more confident that we were doing the best we could for the old girls. The arborist agreed that one more year of heavy pruning would be the best shot at rejuvenation. The best part of this hire was that he hauled away all the trimmings!

Figure 1 Looking west, most of construction debris removed

Figure 2 Looking east 5 years later. The tall growth in background is tree beyond where the lilacs are situated.
Our side yard was now very neat and tidy. Our neighbor’s privet hedge, a nice green grass 4-foot walking path and our wide row of happy and relatively healthy lilacs neatly mulched. The area near the back of the row, where we lost three of the lilacs, now had raised vegetable beds with brick walkways. The lilacs still have some areas of lichen, which isn’t a bad thing; it can be a sign of slow old growth or possibly problems with the roots. Actually, lichens only grow where the air quality is good – so I won’t complain. There are some summers when powdery mildew is a problem – mostly aesthetic – so just get more diligent in cleaning up the leaves in the fall. Basically, mission accomplished, all is well — but then why leave a good thing alone. We added two new lilacs, a Moscow White and a “donation” common lilac from the NH Lilac organization. Life is good.
Now this is where I get myself into trouble. Over the years, as our parents downsized and then passed on, we (rather I) gathered many perennials from their yards to incorporate into ours. So I have surrounded most lilacs with green and white trimmed hostas plus I have used a large gap between two of the lilacs as my perennial “nursery bed”. Also, we put in a narrow perennial flower border on the other side of the lilacs. This translates into digging near the bushes routinely – especially when splitting the hostas. Unfortunately, I had forgotten that lilacs can be picky about having the soil around them disturbed as their feeder roots run near the surface. Also with all this extra plant material – I have lessened the airflow in the area. The bottom line – I have now put new stress on these lovely old lilacs that we worked so hard to rejuvenate. Aaargghhh!
So twenty years later we are dealing with making the “lovely ladies” happy once again. This spring I have been carefully pulling out all the hostas. There are lots of the basic green and the green with white edges … lately there are bags of them at the end of our driveway. If you would like some – just let me know! I do love the look of the hosta and lilac together — so I will be putting some back — just further away. The nursery bed is being retired and the perennial border narrowed. The lilacs will get a good layer of compost and an apology.
As I am writing this – those lilacs are just coming into bloom and their perfume fills the air. Life is good.
Just some basics of lilac culture..
Light – Lots of full sun. 6 hours of full sun is the minimum if you want a healthy blooming shrub.
Soil – They are tolerant of a wide range with a neutral ph. They don’t do well in wet soil or heavily compacted soil.
Water – Once established lilacs are mostly drought tolerant. If the hot spell goes too long they appreciate watering. Be careful not to get the leaves wet in the heat and humidity as it encourages powdery mildew.
Feeding – Lilacs don’t usually need to be fertilized. An annual layer of compost or well- rotted manure and mulch will usually keep them happy.
Spacing – the size of the variety and how you keep it shaped will dictate this – leave plenty of space so that the airflow through the limbs is good… again to prevent mildew issues. Look for a variety that fits your space needs.
Pruning – Heavy pruning is done before the buds come out in the early spring. Routine pruning an undesirable sucker, weak or crossing limbs can be done after blooms are done and when you are deadheading. Next year’s blooms will be on old wood – so the deadheading should be done by the end of June. NB – if your lilac is a grafted variety – don’t prune below the scion. “Tipping off” is a method to aid in shaping, similar to deadheading. On a healthy shoot that is too tall – cut back to a pair of side shoots.
“Tipping Off”
Problems and Pests:
Powdery Mildew – An unsightly silver-white dust on the leaves and branches seen in humid conditions or if the sprinkler gets the leaves wet and they don’t dry. Providing good airflow through the limbs is the best prevention Also, clean up the leaves in the fall to prevent the spores wintering over in the soil under the plant. A fungicide can be used but usually not needed. You can find DIY remedies on line using baking soda or a milk base.

https://extension.unh.edu/blog/what-should-i-do-about-powdery-mildew-my-lilacs
Oyster Shell Scales – The image is enlarged, the active pale yellow juveniles are only about 1/10th of an inch. The adult is in its hardened shell and does not move and is impermeable to treatment other than manual scrubbing with and insecticidal soap or attacking each individual with a q-tip and isopropyl alcohol. If the infestation is new, the juveniles are active in June – this is the only time a cidal agent can be used effectively. The best and easiest action is to remove the limb.

https://extension.unh.edu/resource/scale-insects-fact-sheet
Lilac Borer – The small white larvae bores into the heartwood of the limb eventually weakening and even killing it. Sawdust can be seen on the bark at entry site. You can try putting a long thin wire into the hole to kill the larvae. The best prevention is to remove the old wood since the borer doesn’t attack new limbs.

https://davesgarden.com/guides
Lichen – This is not really a problem as the lichen doesn’t harm the plant. It is not parasitic. It is usually seen on things that don’t “move” or grow – so on older limbs. It is mostly an aesthetic issue – some folks even like the appearance – especially in the winter.
Submitted by Pat N., Horticulture Committee
♦ ♦ ♦ ♦ ♦
Horticulture Tips – April 2020
Gardening in a Time of Uncertainty
If there ever was a time that we, and the world in general, needed help reducing stress and anxiety, it’s right now. The fact that gardening is just what the doctor ordered in these troubling times comes as no surprise to those of us who have been “playing in the dirt” for years.
In case you haven’t heard, there’s been a major rush to buy seeds and plants by both new and seasoned gardeners looking to take advantage of their free time and the spring season. (If you haven’t bought your seeds by now, do it soon!) Fortunately for us, garden centers are an “essential” business and some are taking orders by phone.
A surprising number of newbie gardeners are starting “Crisis Gardens” or “Preparation Gardens.” These are the folks who, alarmed at the bare shelves in the grocery stores, have decided to grow their own in case food supplies grow scarce. Although this may help to relieve some of their stress, these gardeners aren’t really getting the mental health benefits that gardening can actually provide.
Psychology Today lists the ten therapeutic benefits of gardening. How many of these can you identify with?
Practicing Acceptance. That plant that refuses to thrive no matter how many times we move it or how carefully we tend it? It’s teaching us to stop trying to control things that we can’t.
Moving Beyond Perfectionism. Have our beds and gardens EVER been completely free of weeds? And does that matter in the end?
Developing a Growth Mindset. What could better teach us about growth than that lettuce seed we dropped into the cool spring soil or the spindly pansy we tucked into a planter?
Connecting with Others. This is a tricky one right now. But even if we can’t share our experiences face to face, there are photos, blogs, emails, texts, Facebook – all kinds of ways to connect.
Connecting to Your World. Consider what we learn when we garden – about our climate, our food, the cycle of the seasons, the insect world. The list goes on.
Bathing in Green. More and more research links being in green, or even looking out on a green landscape, with less anxiety and depression, better stress management, and many other positive effects.
Being Present. Most of us can identify a particular “Zen Moment” in the garden – the warmth of the sun, a gentle breeze, hands in the dirt – when all is right with the world at that moment in time.
Physical Exercise. This one needs no explanation!
Reducing Stress. In the garden, it doesn’t matter what’s on our schedules for tomorrow or what pressing problems lurk in the future. What matters is the task at hand and the pleasure and process of doing it. The rest can wait.
Eating Healthy. A major benefit for veggie gardeners – and all the friends and neighbors who get those extra zucchinis and tomatoes!
One final mood-enhancing suggestion for gardeners: don’t forget to spend time simply being in your garden. There’s always the next weed to pull or the next plant to deadhead, so be sure to take time to step away from activity and experience what’s around you.
LuAnn, Horticulture Committee
♦ ♦ ♦ ♦ ♦
Horticulture Tips – March 2020
A Plant Worth Knowing: The Twig Dogwood Shrubs
March in New Hampshire can be fickle. A gardener can be teased outdoors with balmy temperatures one day and be shoveling snow the next. Although I see very early signs of spring, our New Hampshire ground is still too frozen to work outside. This gives me the opportunity to spend time observing the landscape from windows and what better time to make mental notes on garden design changes I’d like to make.
In March we still have patches of snow, the browns of deciduous trees with their bare canopies, and the greens of hemlock and white pine. On the ground, our evergreen foundation shrubs mixed with dormant deciduous shrubbery provide winter interest in shape, form, texture, and some color… but I decided it’s time for a landscape tune-up. One design idea I have is to add a little more color to the evergreen borders.
To achieve more color, a deciduous twig dogwood, a member of the Cornus genus, would be ideal. The plant’s red-twig stems are one of the most popular decorations sold at most nurseries at Christmas. The red-twig dogwood shrub (Cornus sericea) is a native and often seen spreading along river banks where the soil is damp. This thicket-forming habit of the native can be a deterrent for an ornamental border but may be a suitable choice for a hedge option or along the borders of a large property. Fortunately for me and my smaller garden, several twig dogwood cultivars have been bred to be smaller and brighter and lack the stoloniferous, spreading habit of the native.
The smaller cultivars of twig dogwood can intensify the winter landscape with their deep red branches. Adding the bright yellow of the yellow-twig dogwood, a cultivar relative of the red, can provide an incredible sight for the eye. This red/yellow combination filled a section of my Virginia garden and took center stage all winter.
Maintenance is easy. For the most intense color, plant the cultivar in the sun. Cut back one-third to one-half of the stems to ground level in late March or early April since the youngest stems have the brightest color. The plant will respond with vigorous growth during the growing season and the summer and fall foliage provides interest as well.
Happy gardening!
Ann H., Horticulture Chair
♦ ♦ ♦ ♦ ♦
Horticulture Tips – February 2020

While this winter has been relatively mild we still have had our share of dreary, cold days and nothing cheers up a gardener like an amaryllis (Hippeastrum) bulb (or two, or three…) blooming after all the holiday décor has been dismantled. Some of you are old hands at this while others may have received your first amaryllis bulb as a present.
Getting started: Plant your bulb in regular potting soil using a pot whose upper circumference is only about an inch or two greater than the circumference of the bulb. Plant it so that the top 1/3 of the bulb is above the soil line. Water thoroughly. I suggest watering from the top but also from the bottom by putting the pot in a bowl or pan filled with an inch or two of water. The idea is to water thoroughly and then let the excess drain out. One speaker we had years ago advised applying bottom heat but that does not seem to make a big difference in my experience. At this point the pot need not be in a sunny location but it should be kept fairly warm, preferably above 65F.
Be patient: Unless you bought a bulb with a flowering shoot already poking through the neck, your next chore is to be patient and wait for that little tip of green to appear. When growth has begun, move the pot to a bright location. I also like to rotate the pot every few days so the flower stalk will end up straighter. Keep the soil moist but don’t overdo it. Typically flower stalks emerge before leaves so I like to put some other plants around to soften the appearance of that tall skinny stalk.
Reward: Sometimes it seems like your amaryllis buds will burst into bloom overnight. Put it where you can enjoy it. This winter I had a couple of my bulbs send up two flower stalks almost simultaneously. The flowers were were touching so I could not clearly see the blooming stalks in their individual glory. I cut one stalk, put it in a sturdy vase with a fairly narrow neck, and it lasted an amazingly long time – longer that the blooms left on the plant. Include your cut stalk in an arrangement with greens and other flowers, much like a lily, or enjoy it as a single specimen.
What next: Recently Horticulture magazine shared some tips for keeping your amaryllis to bloom another season. The advice is to move your bulb (finished blooming but putting out leaves) into a pot with a diameter at least 4 inches greater than the diameter of your bulb. Feed it every two weeks with a half-strength liquid fertilizer. The idea is to develop strong roots that will feed the bulb during the ensuing months. Ultimately your bulb will be spending the summer in a pot at least 11-12” in diameter. Do not allow the soil to dry out and keep feeding through the middle of August. To me these instructions seem to be designed for someone with a greenhouse. My practice has been to plant my bulbs out in a garden bed in June. I put some SoilMoist granules and time-release fertilizer in each hole, water in well, and go away for the summer. Just remember that your goal is to encourage root and leaf growth that in turn feeds the bulb and next season’s flowers.
In their book Bulbs: Four Season of Beautiful Blooms, Lewis and Nancy Hill report good luck with inducing dormancy by withholding water in early summer and storing the bulbs dry and in their pots in a cool cellar – no food or water.

Starting over: Whether in pots or planted in the garden make friends again with your bulbs around the end of September. My usual procedure is to dig them up after the first frost touches the leaves. I cut the leaves back to the neck of the bulb, wash the soil off, and let the bulb and roots dry. If you keep the bulb in its pot put it in a cool, dark space and let the leaves wilt. Cut them off and let the plant take a nap. Then about 6-8 weeks before you want flowers, start the whole process over again. Don’t be alarmed if it takes a month or so before any new growth appears.
Making babies: Reportedly it is possible to take the little bulblets that may appear around the parent bulb. It will take two or three years to reach blooming size. Has anyone tried this? I have neither the space nor patience to nurse non-performing plants along.
And remember it is not a sin to simply thank your bulb(s), say goodbye, and start over. No judging here. Hip, Hip, Hooray for Hippeastrum!
Becky M., Horticulture Committee
♦ ♦ ♦ ♦ ♦
Horticulture Tips – January 2020
January is the month to be planning, according to all the gardening books you read. The seed catalogues start arriving in the mail, enticing you to buy new varieties or rethink your gardens.
I love looking at the possibilities but now that my gardens are full, I need to rein in my desire to get bigger or tear out all I have done. So, I am rethinking my January and February planning process this year. I have a two step plan. First, I am going to find movies and books that stimulate my gardening thoughts. Second, I am looking ahead to summer and hoping to come up with some 1-2 days trips to enjoy the work that others have done to design and construct beautiful gardens. If you would like, join me in my journey.
The Journey Begins – Part 1: Movies and Books
I have just discovered a fabulous movie, “The Biggest Little Farm” (2018). It tells the true story of John and Molly Chester who started Apricot Lane Farms in Moorpark, California. They desired to have a diverse enterprise that grows crops in communion with nature. All does not go well, but the story and process make for good viewing. The photography is phenomenal. It truly is a must see. I have just ordered a copy that I will make available to members.
I started thinking about gardens or other panoramas I have enjoyed on film. Two immediately stood out——many more are out there.
“You’ve Got Mail” – I know it is not the main part of the movie, but I love the gardens at the end of the movie where Joe Fox and Kathleen finally come together. It is Riverside Park. I have never been there, and it probably is smaller in reality than I imagine on screen, but it is colorful and a lovely place to end the movie. Of course, that reminded me that one of the best parks is Central Park in NYC. I have been there and read about how it was designed. Some very forward thinking people brought it together.
“Field of Dreams” – Yes, it is not a flower garden, but what a beautiful stand of corn! It is the elephant in the closet throughout the movie and cannot be ignored.
Want to travel to Europe? Check out “Enchanted April” or “Howard’s End” for lovely views of Italy and England. I have never watched the 1993 version of “A Secret Garden”, but I understand that the gardens are wonderful. I also plan to find “Greenfingers” (2000) which is based on a true story of an English prison inmate.
Have you found Monty Don? He is an English gardener who has a show on Netflix called “Big Dreams, Small Spaces”. I will not tell you more, because Susan C. and I will be hosting an afternoon with Monty Don (for our club members only) to benefit the Promise Tree on Friday January 31st. Look for the signup sheet at the January meeting.
The Journey Continues – Part 2: Trips and Journeys
Our last speaker, Jana Milbocker, has inspired me to do some traveling in New England. I purchased her book, The Garden Tourist and have enjoyed thinking about touring the gardens she listed. She has a new book, The Garden Tourist New England which has 140 gardens and nurseries described. I will be planning to cover many of them this summer. Anyone interested in traveling to Vermont or up to the NE Botanical Gardens for an overnight? Let me know.
So January can be a month for making plans of all sorts and a time to relax and enjoy the view while we relax in front of the television.
Linda V., Horticulture Committee
♦ ♦ ♦ ♦ ♦
Horticulture Tips – December 2019
It’s the time of the year to enjoy our HOLLY!

Even as a young child I loved the look of holly in a yard or in holiday decorating. Over the years, and many military moves, I have planted a holly shrub in nearly every yard that didn’t already have one … the current yard has 12, including three winterberry, one variegated, four Japanese, and four blue hollies. I may have gone overboard in this yard but still love the look of them all year – especially on cold snowy winter days.
I thought it might be interesting to learn a little more about these favored plants and share with you. Beware – I might ramble a bit.
The origin of holly/Ilex can be traced back nearly 50 million years. Though those ancient plants are now extinct there are now over 400 descendants out there. Most species grow in the tropic and sub-tropic regions of the Americas and Southeast Asia, in zones 7 or higher. In Europe basically one species grows, Ilex aquiliforium/English holly. There are only a few that can tolerate our NH winters, the evergreen “blue hollies” Miservae series (hybridized in the 1950’s), some of the Japanese hollies, and our native deciduous Winterberry holly/Ilex vericillata.
In NH most of the hollies are grown as shrubs reaching up to 15 feet. In the higher zones, hollies can be trees reaching 60+ feet. With rare exception, hollies are dioecious, meaning there must be a male plant within 300 feet of a female plant in order for pollination to occur. In my readings, they report that one male shrub is required for four to six females ( — hmmm, no comment on that one). Also, the male and female need to be of the same cultivar to make sure they have the same bloom time. Both the male and female plants have small white flowers with four petals at the base of the leaf. Only the female will produce fruit/berries/drupes.
Most hollies have alternating shiny green or blue green leaves with prickly edges. Others have smooth edges. The berries/drupes are usually red or red orange, but some have yellow, orange, black or green ones. Most are evergreen types but there are the deciduous types e.g. Winterberry.
Hollies prefer a sunny location for the best berry production, though will tolerate partly sunny. They prefer slightly acidic, well drained soil – with the exception of the Winterberry who thrives in wet soil conditions. Feed only in the spring. Mulching is a good practice.
Read the plant information on growth/size and choose your planting site wisely– as hollies are fast growers and can easily get unshapely or overgrown without regular pruning. Judicious cutting for holiday decorations won’t hurt the plant. Prune off winter damage. Do your regular pruning before the flowers are set (on old wood) otherwise you will decrease the berry production that year. If the evergreen holly gets “overgrown” you can prune more aggressively taking out up to a third of growth each year while tip pruning to reshape. Japanese hollies and winterberry can be pruned fairly aggressively to reshape.
We love these plants for their winter show – but need to choose the location to protect them from the drying winds. The wind can actually cause the prickly edges of one leaf to bruise or pierce surrounding leaves You can construct a burlap wind barrier or put in a perimeter of stakes and wrap with burlap. Even though holly is said to be deer resistant – someone forgot to tell the deer – so take precautions! It is also a good idea to spray the leaves with and anti-transpirant (like Wilt-Pruf). Read the instructions to use under the proper conditions for best results.
A consideration before putting a holly into your landscape is the toxicity of the leaves but especially the berries. Young children may be attracted to the bright red berries. Vomiting and diarrhea are the usual effects, but consuming 20 berries could be fatal to a small child or pet. As an aside, there is a holly grown in South America for its leaves – they make Yerba Mate, a caffeine beverage with some claimed medicinal benefits.
Besides being an attractive addition to the landscape, hollies provide for the wildlife. The berries are a favorite of cardinals, mourning doves, finches, robins, cedar waxwings, thrushes, blackbirds …even wild turkeys. In early winter the berries are hard and bitter – as the winter progresses with the freezing and thawing the berries soften and become milder. One article said that the birds will eat the evergreen berries first … leaving the “lower fat” winterberries for last. In stormy weather birds will seek shelter in a holly shrub —the dense branching protects them from the elements and predators and the berries provide nourishment without much effort.
Another aspect of holly that I found interesting is their cultural history. Back in the Iron Age, the Celtic druids believed that holly would protect them from evil spirits The druids would wear wreaths on their heads and hang boughs over the doors. The old Irish folktales say that the fairies lived in the holly bushes. Wicca tales tell of the battle between the Holly King vs the Oak King (summer vs winter). The Romans gave holly wreaths as good luck gifts during the celebration of Saturnalia. In old Christian tradition the holly symbolized Christ’s crown of thorns. Old Europeans incorporated holly into heraldry as a symbol of Truth.
Though we no longer have the superstitions about holly – we have made it a symbol of the Christmas season in our music and decorations.
That being said … Did you know that Harry Potter’s wand was made of holly wood?
Pat N., Horticulture Committee
♦ ♦ ♦ ♦ ♦
Horticulture Tips – November 2019
Going Away This Winter? Inexpensive Ways To Keep Your Houseplants Happy
Those of us lucky enough to escape the cold winter weather need to figure out how to keep our houseplants hydrated & healthy for what can often be weeks. One method is to convince a trusted friend or neighbor to take over the responsibility – either by home visit or by taking the plants into their own home. This is very effective solution, if you’re fortunate to have such a friend/neighbor. For the rest of us, there are some DIY methods that may also work, depending on the plant and the length of the vacation.
Some preparation is needed before any of these techniques are attempted. The first step should be determining the watering needs of each of your plants. Keep track of how often they need watering and how much water is needed. Shortly before you leave, trim your plants so they’ll require less water during your absence.
Spread a thin layer of mulch on top of the potting soil to slow evaporation. Try moss, coconut coir, stones, or pebbles. And move your plants away from sunny windows, which will also help slow evaporation. Some plants, especially those requiring less moisture, may be temporarily moved to a cool basement or garage, so long as there’s enough light for them there.
And finally, on the day you leave be sure to soak the plants thoroughly so that they’re draining from the bottom. Then it’s time to set up one of these automatic watering systems. (It’s a very good idea do a test run of any watering system before leaving for your vacation.)
Wicking Method
The most elementary of watering systems, you’re using a wick to draw water from a reservoir into your plant’s soil. Depending on the size of the pot and how long you’ll be gone, the reservoir can be anything from a small bowl to a milk jug. Choose a natural fiber wick – cotton, twine, something that readily absorbs water.
Then place your reservoir of water next to and higher than the plant. Cut a piece of wick to put inside the reservoir, touching the bottom, with just enough remaining outside to reach the pot’s soil. Place the remaining end of the wick inside your pot so it’s laying on the soil. The water will travel through the wick and into the soil as needed. Be sure the wick is wet and relaying moisture to the plant before you leave. You can also cover the reservoir to slow down evaporation.
As an alternative method, you can place the pot over the reservoir and poke the wick up through the drainage hole in the pot – this reduces evaporation and helps to keep the soil at the base of the plant moist.
Another simple variation of the wicking system uses a resealable plastic bag full of water with a wick in it to pull the water out at steady rate. Thread a fine needle with cotton thread and tie the two ends in a large knot. Push the needle through the bag near the bottom, centered, but not on a seam. Be sure not to accidentally poke extra holes in the bag.
Now fill the bag with water, which will start wicking out of the needle-hole and dripping down the thread. Lay the bag on the soil surface, with the thread spread over the soil. This is what’s going to water your plant. Two warnings: test ahead of time to make sure your needle hole allows the right amount of wicking for your plant’s needs; and not all plants will be happy with this method of watering, which keeps the soil continuously damp.
Drip System
DIY drip systems are also very easy to set up using nothing more than plastic or glass bottles. For a smaller plant, clean out a small plastic bottle and poke or drill a few small holes either at the top of the bottle itself or in the cap. Then fill the bottle with water, put the cap back on, quickly flip it and push it into the just-watered soil. Be sure to push it far enough in that the holes are covered by the soil.
For a larger plant, use a wine bottle. Fill it, hold your thumb over the top, flip it and quickly push it into the soil.
These bottles work great for a shorter vacation or with regular monitoring, but simply increasing the number of bottles per plant, thinking that you will be providing water over a longer period of time, will only increase the rate of water dispersion and possibly drown your plant.
Water Bath
This watering solution involves filling a sink or tub with several inches of water and setting your watered potted plants in it. You may want to place a towel or newspapers in your tub to soak up water and slow the evaporation. But keep in mind that the pots need to have drainage holes for this to work. The water bath technique may be a great option for smaller houseplants, but it’s not for large plants that are difficult to lift. It also won’t work if the tub is in a location where there’s not enough light for the plants.
Mini Greenhouse

To create a mini greenhouse, you’ll need a clear plastic bag that is big enough to fit comfortably over the plant. You also may need sticks or stakes to hold the bag up and away from the plant.
Place a damp towel in the bottom of the plastic bag. Put the well-watered plant on the towel and tie the bag shut, trapping as much air as possible inside. Avoid having the bag cling to or push against your plant – use stakes if necessary. And no matter how much your plant likes bright light, make sure the plastic-covered plant is not exposed to direct sunlight – heat will build up inside and cook your poor plant to death!
Capillary Mat
You can find capillary mats at gardening centers, but it’s simple enough to make your own. You’ll need:
Large tray
Section of 1-inch-thick styrofoam cut to fit inside the tray, leaving about 1 inch from the edge of the tray on all sides
Section of absorbent fabric such as wool, felt, or cotton cut to fit the styrofoam so it hangs down and touches the tray on two ends
Put the styrofoam in the tray, fill the tray with water, and place the saturated fabric on top of the styrofoam and hanging down into the tray. Then place your just-watered potted plants on top. The fabric will serve as a wick, watering the plants from the bottom.
LuAnn, Horticulture Committee
♦ ♦ ♦ ♦ ♦
Horticulture Tips – October 2019
Winter Invaders
October is a month of transition in New Hampshire. Summer is not quite over but autumn is pushing its way into our lives. Time to cut back the garden and get your yard and house ready for the upcoming winter. Why do we spend time caulking and making our homes so weather tight? It is not just to keep the cold out and the heat in. We want to keep pests from moving into the house.
Who are the pests that want to move into our homes this month? Some are familiar and some are new to our area. Are they harmful? They are not, neither to us or our pets. They will not damage our homes, but they can be a nuisance.
The familiar ones are:

• The Cluster Fly – They look like large houseflies but are slower and tend to gather around the windows, especially in attics or upper stories of your home. They are the last of several generations to have hatched during the summer. This generation just wants a warm place to spend the winter. They are easily eliminated with a fly swatter. They do no harm.

• Spotted Lady Bugs – The red ladies with brown spots are native to NH. They are about ¼” long and tend to be a bit oval. Some may try to enter your home, but not in the numbers that the pesky multicolored Asian ladybugs do. Our native ladies are harmless and do not bite. They are beneficial in the garden as they eat aphids.

• Common Brown Stinkbug – These bugs are harmless. They do not bite or destroy your belongings. They just emit a horrible smell when crushed or threatened. They are easily vacuumed up. I prefer to capture them under a glass and release them back outside where they have to deal with the cold. The photos shown after the Brown Marmorated Stinkbug show the differences between species.
The newer and perhaps unfamiliar pests invading our state and our homes are:

• Brown Marmorated Stinkbug – These guys are new to the state arriving in 2010. At that time there was a huge influx of them in Portsmouth. They tend to mass on buildings the first 3 weeks of September. Although the building color doesn’t seem to matter, the proximity to trees does. The adult is about ½” long. They are attracted to crevices especially on cars, trailers, RVs etc. Distinguishing markings include, dark and light banding on the antennae as well as along the rear edge of the body. Like other stink bugs, they do not bite, but they smell bad when handled.

• The Multi Colored Asian Ladybug – These ladies first appeared in NH in 1994 and have proliferated since that time. They are attracted to light colored buildings with lots of nearby trees. They look very different from the Spotted Lady Bugs. Most of them have a white body segment behind the head with a black M shaped marking. They vary in how many spots they have and are smaller than the normal ladybug. They work their way into your home through very small spaces and you can find them anywhere. Although usually harmless they can bite when handled.
• Boxelder Bug – This is the newest pest to arrive in NH. It is still uncommon, but will be found when boxelder maples are planted in an area. They do not usually eat other species of maples. Like the stinkbugs they start massing on buildings in September. They too are attracted to crevices on vehicles. They do not bite. The best way to not have these guys around is to avoid planting Boxelder Maples.
• Western Conifer Seed Bug – These bugs arrived in NH in the late 1990s. The adults are about ¾” long. They feed on pines, white spruce, and hemlocks. Like stinkbugs, they smell when handled. They are easily distinguished from stinkbugs.
The best way to keep these critters from sharing your home is to seal up your house. They can crawl into tiny spaces between shingles, around air conditioners, and windows. Once they are in, you can vacuum them up and toss the bag or relocate them back outdoors.
Just know that they won’t destroy your household belongings or pose a threat to you. They are just critters trying to find a way to survive the winter. That said, they can be annoying.
Linda V., Horticulture Committee
♦ ♦ ♦ ♦ ♦
Horticulture Tips – September 2019
Off With Their Heads!
One of my most reliable garden flowers is the Shasta daisy, Leucanthemum x superbum ‘Becky.’ Large white, petal-like florets surround a yellow center of densely packed florets, making the daisy ideal for a sunny garden. In my small cutting garden full of stronger colors, the clump of 3-ft. tall Becky daisies provides a bit of neutral relief for the eye during the summer months. The flowers are long-blooming, reliable, drought tolerant, and, as a bonus, they provide a fine cut flower with a long vase life.

Daisies require so little effort from the gardener, asking only for sunshine, good soil, and a little watering during dry spells. However, there is one chore that I personally find enjoyable: deadheading or removing the spent blooms during the growing season. Deadheading isn’t something that is done all at once. I deadhead the daisies one by one as they fade or turn brown and am rewarded with a second blooming of white all summer and a border full of appreciative pollinators.

Deadheading not only makes the daisies more attractive, their energy is redirected to the second bloom, a lateral flower lower on the plant. It’s important not to just deadhead the fading flower head. I follow the stem down to a healthy lateral flower bud and cut the stem of the faded flower just above the bud. The second flush of daisy blooms will produce smaller and shorter flowers, but just as lovely.

It’s mid-September now and my Becky daisy blooms are few and the foliage is looking a bit tattered. Soon there will be no more flowers. When that time arrives, I will sheer the entire clump back to the basal leaves of the plant. Flowers will be gone but, instead of bare ground, I will be left with a mass of green foliage that will persist through the fall season. How nice all that green will look surrounded by colorful perennials and annuals still in bloom.
Ann H., EAGC Horticulture Committee
♦ ♦ ♦ ♦ ♦
Horticulture Tips – August 2019
August is the last full month of summer. It’s always bittersweet to say goodbye to the growing season, but this is a month that I really enjoy being outdoors working around the ornamentals and few vegetables I grow. The sedum should be in bloom, ripening tomatoes should be heavy on the vine, and hydrangea shrubs should be strutting their stuff. The hot colors of my echinacea, rudbeckia, blanket flowers, and coreopsis dancing among the tall Becky daisies is all the thrill I need during this last full month of summer.
Our temperatures will fluctuate these weeks but the heavy humidity of July has lifted and that makes all the difference. It’s a time of lighter chores in the ornamental garden, mainly deadheading and spot cleaning up both annuals and perennials, perhaps adding a bit more mulch to beds, and maybe re-edging the borders. As bare areas open up in the garden, it is fun to add a few pots of annuals to round out the color.
Right now is a good time to start looking for those perfect hydrangea blooms for drying. I look for blooms that are starting to fade or change color but the tiny flowers on top are just beginning to open.
August is when we can divide our clumps of bearded iris and we can divide daylilies when they complete their blooming cycle. And with lawn care, it’s time to raise the heigh of the mower blades, mow less often, and stop watering to allow the grass to go dormant. Have you noticed all the heavy dew covering the landscape in the morning? Take advantage of that moisture by sprinkling a little grass seed in bare spots.
Time to stop feeding your woody shrubs, trees and perennial flowers to prevent new growth that won’t survive the cold of winter. These plants need to put energy into toughing up to survive the upcoming winter season. The annuals can continue to be fertilized as their life cycle will naturally end with freezing weather.
And now, the most rewarding part of gardening is to start thinking about and planning for the upcoming growing season. I look forward to perusing the many colorful bulb catalogs arriving in the mail, companies that will ship bulbs to me when the temperature is perfect for our climate.
Happy Gardening!
Ann H.
♦ ♦ ♦ ♦ ♦
Horticulture Tips – June 2019
Which fertilizer should I use? Feed the soil instead, says Lee Reich
This article is excerpted from the website, AWayToGarden.com. Margaret Roach is interviewing Lee Reich.
WHAT FERTILIZER should I feed my (fill-in-the-blank) plant? A lot of you ask that question, about things ranging from magnolias to tomatoes. Soil fertility, and how to best achieve it, is today’s topic, with long-time organic gardener and author Lee Reich who, among his three postgraduate degrees, has one in—you guessed it—soil science.
All those different fertilizer formulas in the garden center, labeled for particular kinds of plants, seem to imply that we need to add something, no matter what. But is that always the case? Lee, the author most recently of “The Ever Curious Gardener: Using a Little Natural Science for a Much Better Garden,” talked with me about building healthy soil and growing healthy plants.
Margaret: So I’m asked, as I said in the introduction, I’m asked about this a lot—the “What fertilizer to I need on my fill-in-the-blank?” Are you asked that a lot too by people?
Lee: Yes. And marketing goes a long way to having them think they know what fertilizer they need.
Margaret: Right. So what’s Lee’s basic fertilizer philosophy? And you do cover this in the book, “The Ever Curious Gardener,” but tell us what’s sort of the basic idea? How do you think about fertilization?
Lee: So my basic philosophy with fertilization is very simple. And first of all, it is organic. And there’s a reason it’s organic. And I could tell you the reasons, but organic fertilization is better than non-organic fertilization. And then it becomes a question of what exactly is organic fertilization?

Lee: So organic fertilization means, really, the organic in organic gardening comes from organic materials, which are bulky materials, like straw, wood chips, compost, anything that was, or is, living. So the whole thing is that this is really the best way to nourish plants. And there are certain situations where you might have to do it non-organically, very specific situations. But generally organic fertilization’s best, because this is how plants have evolved to feed best, and also it’s simpler.
So my go-to fertilizer, and it can’t really be termed as a fertilizer, because you have to have a certain level of nutrients in something for it to be called a fertilizer. And my go-to fertilizer, except it’s not a fertilizer, is compost. And compost is not legally a fertilizer, because it’s not high enough in nutrients. It’s not concentrated enough in nutrients, but this is exactly what I’m looking for. Something that’s not concentrated in nutrients. Something has all this bulk material associated with it that really benefits the soil in so many other ways.
You know, it’s analogous to, people used to think, like in the ’60s, probably people came up with this idea, just take a pill, you won’t have to eat, you’ll just take a pill, and it will provide all your nutrition. And then they began to realize the benefits of fiber in the diet. So organic materials are to a plant diet, what fiber is to a human diet. It doesn’t provide a high concentration of nutrients, but it provides many of the benefits and also, at the same time, adequate nutrients. [Above, Lee’s compost bin system.]
Margaret: Right. And so, in a way, when you said a minute ago, something about like you’re following the way that plants have sort of evolved being fed, I think of the forest, right? And I think of trees dropping their leaves beneath them. And even herbaceous plants, you know, withering at frost, or whatever. And all that bulk, organic, fibrous material falling and eventually degrading into the soil. In a forest, that would be the duff layer. I think of that as like high fiber, organic, bulky fertilization, even though it’s not technically fertilization. Is that what you’re saying is the inspiration?
Lee: Yes, exactly that. There is one difference, though. So I grow a lot of fruits and vegetables.
Lee: Especially with vegetables, which really take up a lot of nutrients in the soil, you can’t just keep removing vegetables and not add more than just their leaves as they fall to the soil, or even digging them back in. So you have to add something extra. So that’s why I actually make compost, or people can buy compost also. There’s a lot of good places to buy compost nowadays. And I just add extra compost to the soil. Basically, that’s the only thing. I have very intensively grown vegetables, and that’s the sole way that I feed them.
♦ ♦ ♦ ♦ ♦
Horticulture Tips – April 2019
OH DEER, FOLLOWUP
(AKA PROTECTING SHRUBS IN WINTER)
It has been a long and difficult winter here on Pine Rd. As I told you in my Hort Moment in October, I tried a variety of methods to deter the deer this winter. There was varied success.
The deer still visit. I took this photo on March 22nd.

Hands down, the best success I had was with the plant covers. All the shrubs stayed intact and green since they were completely protected from wind, snow, ice, and deer.
The shrubs wrapped in burlap did not fair so well. This was partly due to the way my contractor wrapped them. I believe burlap works best on vertical specimens. Mine are mostly horizontal in nature, azaleas, etc. They suffered from snow load and deer. I cleaned them off after each storm, but the snow weighed them down. Ice was worse in that it was harder to remove.

As you can see from the photo, once the tips of the plants worked their way through the burlap, the deer followed right behind, nibbling the tops of the branches. Another azalea has suffered, maybe from bugs, I am not sure. I am hoping it will recover.

When using burlap, YOU NEED TO STAKE AROUND THE SHRUBS before wrapping the burlap. I think I would put in tall stakes, wrap the burlap and leave the top open so the snow, etc. can dissipate naturally.
The final method I used was to surround some of the shrubs with old cat cage panels. This has worked well in previous years. In fact, I was tempted to buy more of them. However, I feel I may have lost one of my azaleas this year. In fairness to the cages, it probably was weather related. Maybe too much ice and wind along with all the rain in November, followed by cold temps may have frozen it. I am holding out hope, but a look at the leaves isn’t promising.

The constant change in temperature and multiple storms of mixed precipitation was just hard on everything. Last week I was watching TV in the evening and heard what sounded like cardboard being ripped up. The cats were asleep, so it was not them. The next day I discovered that the bark on my 8 ft tree stump had all disintegrated and was in a heap at the base of the tree. Unfortunately, it is where I had planted a climbing Hydrangea a couple of years ago and it was all set to spread horizontally this year.
I screwed the section of bark that attached to the plant in the ground back onto the stump. Many branches had been detached in the fall, so I have spread them around the base of the stump buried in soil and mulch. Hoping they will survive and send up more shoots. However, the dreamed of climbing flower spectacle will not happen for a couple more years.
All is not gloom and doom. Most of my plants are beginning to peek their heads out of the ground. The goldfinches are turning color and I believe I have a pair of nesting bluebirds in a house.
This ends the saga of protecting plants from deer. I am going to find more plant covers. I have discovered they are available in sizes up to 52” square, which will cover most of my guys.
Have a Happy Spring!
Linda V., EAGC Horticulture Committee
♦ ♦ ♦ ♦ ♦
March 2019 Horticulture Tips
The Rhododendron yakushimanum was found only 50 years ago on an island outside of Japan and it immediately became accepted as the most beautiful rhododendron in the world. That’s what I thought the first time I saw one, and am still in awe of its beauty each spring.
It is a small plant, 3-4 feet high and it likes woodland conditions of filtered shade. It needs acid soil, moist and rich, likes about 3” of mulch (pine needles are good), and needs to be watered once every 2 weeks in a dry season. It grows well in zones 5 & 6. Planted in the right place it needs little care and is easy to accommodate in the garden because of its small size, however, planting the shrub around a foundation should be avoided because of the runoff of lime from cement or brick home foundations.
The glossy, leather-like leaves resemble suede or velvet underneath the leaves. It blooms in our New England gardens in April, starting with deep rose-colored buds that slowly turn to lighter and lighter shades of pink, until opening nearly pure white. It should be placed where you can walk by it every day in bloom.
It has a habit I love about all rhododendrons. In the winter, you don’t need to check with the weatherman. If it is freezing or below, it turns its leaves into pencil thin tubes and you need only glance out the window to know it’s very cold outside.
The Rhododendron yakushimanum, or just Yacu, is also called Yacu Princess. The name rhododendron comes from the Greek ‘Rhodo’ (rose) and dendron (tree).
Connie, EAGC Horticulture Committee
♦ ♦ ♦ ♦ ♦
February 2019 Horticulture Tips
Thoughts on that winter white stuff…
Most of us live in New England because we like to experience the rhythmic changes of the seasons …. even the challenges of winter. Winter is one of my favorite times of the year. I even like shoveling snow (mind you, not the icy, sleety variety). I like seeing those neat lines of cleared walks and drives. When the work is done, I do so enjoy looking out the windows at the mantle of snow in the yard from my warm and cozy home. I started to think about how the snow really affects our yards and gardens …

We all know the negative aspects of the snow. That snowstorm that drops that heavy wet snow – too much and too quickly – that weighs down and splays the branches of our shrubs. I find the best way to prevent damage is to deal with the snow as it accumulates, often working my way around the yard gently shaking the snow off the branches – often several times during the snow event. If the snow load “freezes” before I can get to them, I end up leaving them be and hoping for the best. … and promising to get serious about using more burlap wraps next year!
Unfortunately, the snow cover provides protection for those plant predator rodent critters. The mice and voles get a win-win. The snow protects them from the weather while munching on the plant roots and tender branches and giving them cover from their predators. Additionally, the bunnies can now have a higher reach on the plantings. As for the deer, they are a challenge no matter what the weather throws at us.
On the positive side, snow is a natural insulator (think of it as having an “R Value”), especially if it comes early and stays. Under that snowy mantle, the soil temperature is moderated. The plant roots may still be growing at a slow rate while anchoring the plant in place. The earthworms and microbes are still down there improving our soil. Contrast that to the effects of winter on the bare ground. The constant freezing and thawing cause the soil to heave, breaking the root structures and sometimes lifting a plant right out of the ground. Snow also protects the low-growing ground covers and evergreen plantings from the drying winter winds.
This insulating factor also discourages our spring bulbs and early perennials from popping up on a warm sunny day in late winter only to be zapped by the next freeze. The snow layer helps with the propagation of seeds. It gently presses the seeds in contact with the soil while providing that cool moist environment that most of our native plants require to germinate.
Snow melt adds to our aquifers percolating down slowly rather than the high potential for storm drain run-off with rain. Snow has long been called “poor man’s fertilizer.” Even though our air is composed of 78% nitrogen, it is in an inert stable form that is not accessible to plants. But as the snowflakes pass through the atmosphere some of the nitrogen manages to attaches to each flake then soaks into the soil. Weird Fact: The NADP – National Atmospheric Deposition Program (they measure all the stuff that falls out of the sky) reports that the nitrous oxides from vehicles and coal burning power plants have increased the fertilizing effect of snow. Good for the plants – not so good for the people!
A prior Hort Moment spoke to the changes snow brings to the appearance of our landscaping efforts. Our use of hardscape and plants gives us an entirely different view of our garden world. Plus the snow gives us a better opportunity to view our feathered friends.
Snow seemed an appropriate topic for a February “Hort Moment” – even though Mother Nature has not provided the Seacoast with its wintery blanket. Amazingly, north of the lake district, they have had ground snow since Thanksgiving. In fact, for us it is one of those awful years of frequent spells of “freeze and thaw.” It should be a bumper crop of frost heaves come spring! It is futile to think we can beat Mother Nature. We need to learn from our plants and adapt.
With the changing weather patterns, since snow cover isn’t dependable, we as gardeners may need to become more vigilant in our planning. We may need to reconsider our plant choices and locations. We may need to be more diligent hydrating our trees and shrubs in the fall and make better use of mulches. The winter dry winds may call for using more plant covers/burlap wrappings and applying anti-desiccant sprays.
Weather in New England is what it is … so grumble if you must, enjoy it the best you can … a hot drink and a cozy blanket can make it all good!
Pat N., EAGC Horticulture Committee
♦ ♦ ♦ ♦ ♦
January 2019 Horticulture Tips
What Makes a Winter Garden Interesting?
The words “winter” and “garden” may not seem compatible in our sometimes-harsh New England climate, but there are a surprising number of ways to create an interesting and beautiful garden in our brown and/or white landscapes.
Winter in New Hampshire deprives us of lush greenery and mounds of blooms, but beauty is still outside our windows if we think of our winter gardens in terms of detail, texture, structure, movement and contrast. It’s a matter of choosing plants with winter interest in mind, allowing selected plants to remain throughout the winter, and gaining a new appreciation for the winter beauty of some plants that we may not have noticed before. Here are some areas of winter interest to consider.
The character of deciduous shrubs and trees shows most in the winter, when you really see the branches, providing us with contrast, shadows, and silhouettes that are especially stunning against snow. For striking texture and color, Paperbark Maples are best known for their exfoliating cinnamon-colored bark, and the River Birch for its curling, paper-like bark.
Shrubs, like this Staghorn Sumac, provide detail and structure that catch the eye throughout the winter. Evergreens are also one of the most important components of the winter landscape. They can provide structure and form for the smaller plants and shrubs in the garden.
Unlike many other plantings, shrubs can bring color to the winter garden. A Winterberry Holly bush provides beautiful red berries that persist right through the winter, feeding birds and providing winter interest when the landscape is otherwise white and brown. Other fruit bearing shrubs include other holly varieties, Cotoneaster, Heavenly Bamboo, Coralberry and Beautyberry.
In addition, rose hips are some of the most persistent winter fruit. Virginia Rose or Rosa Rugosa are hardy and prolific examples. For unexpected winter blooms, look to Witchhazel, Cornelian Cherry Dogwood, and Pussy Willow, which all should bloom before March 21.
Although this isn’t the time of year for planting perennials, it’s the perfect time to assess your winter garden to determine where perennials will perk up next winter’s garden. When choosing a perennial with winter interest, look for unusual color, particularly interesting growth pattern, or texture that is unusual or colorful. It should also be large and sturdy enough to hold snow. Seeds and seedpods are an attractive bonus.
Perennials to consider are Hydrangea, New England Aster, Echinacea, Liatris and Chrysan-themum. Climbing Hydrangea’s exfoliating reddish brown bark also adds interest all winter. If you’re used to clearing all your beds of perennials in the fall, take time next fall to choose some sturdy perennials to let stand for the winter.
Grasses are an obvious choice for the winter garden. They provide form, texture, detail, and especially, movement. Miscanthus, for example, has feathery seed heads that rise above the snow up to 12 feet. Other sturdy grasses are Switchgrass, Indian Grass, Bluestem, Feather Reed Grass, and River Oats. Under heavy wet snow, all plants fall over, but as the snow comes off, many of these grasses will stand up again.
Lastly, if you’re looking for immediate interest outside your window this winter, make a winter container garden. Tuck miniature evergreen trees, stems of winterberry or curly willow branches into a weather-safe plant container or an outdoor planter. This will add both color and architectural interest to your landscape.
LuAnn, EAGC Horticulture Committee
♦ ♦ ♦ ♦ ♦
December 2018 Horticulture Tips
Merry Christmas from the EAGC Horticulture Committee:
We’re sharing a version of The Night Before Christmas that all gardeners would love to come true!
A Gardener’s Night Before Christmas
‘Twas the night before Christmas and all through the yard
the branches were bare and the ground frozen hard;
The roses were dormant and mulched all around
to protect them from damage if frost heaves the ground.
The perennials were nestled all snug in their beds
while visions of 5-10-5 danced in their heads.
The new-planted shrubs, had been soaked by the hose
to settle their roots for the long winter’s doze;
And out on the lawn, the new fallen snow
protected the roots of the grasses below.
When what to my wondering eyes should appear
but a truck full of gifts of gardening gear.
Saint Nick was the driver – the jolly old elf
and he winked as he said, “I’m a gardener myself.
I’ve brought wilt-pruf, rootone, and gibberellin, too.
Please try them and see what they do.
To start new plants, a propagating kit.
Sparkling new shears, for the old apple tree.
To seed your new lawn, I’ve a patented sower;
in case it should grow, here’s a new power mower.
For seed-planting days, I’ve a trowel and a dibble,
and a roll of wire mesh if the rabbits should nibble.
For the feminine gardener, some gadgets she loves;
plant stakes, a sprinkler, and waterproof gloves;
A chemical agent for the compost pit,
and for pH detecting, a soil testing kit.
With these colorful flagstones, lay a new garden path,
for the kids to enjoy, and bird feeder and bath.
And last but not least, some well-rotted manure.
A green Christmas year round, these gifts will ensure.”
Then jolly Saint Nick, having emptied his load,
started his truck and took to the road.
And I heard him exclaim through the motor’s loud hum
“Merry Christmas to all and to all a green thumb!”
Richard Jauron, Horticulture Department,
Iowa State University Extension and Outreach
Adapted from The Gardener, November-December, 1983
♦ ♦ ♦ ♦ ♦
November 2018 Horticulture Tips
NATIVE GRASS
Panicum virgatum ‘Northwind’
You don’t often see perennial grasses recognized by the Perennial Plant Association as the Perennial Plant of the Year, but in 2014 ‘Northwind’ switchgrass was given that honor… only the third grass to earn the title.

I have grown other native ornamental grasses during my long gardening years but it was a move to New Hampshire and the need for more compact plants in a smaller garden space that led me to the switchgrass ‘Northwind,’ a native prairie grass. Now I sing its praises to anyone who will listen.
Is the word ‘elegant’ appropriate to label an ornamental grass? Maybe the word ‘statuesque’ is a better description. Either word is appropriate I think. It is one of the easiest and most attractive ornamental grasses I have grown. I find it to be pest free, disease free, drought tolerant, deer resistant, and stands erect facing the challenge of wind, rain, sleet, or snow.
My three ‘Northwind’ grasses have grown to about 5’ tall, just about the height limit for the plant. The sturdy blades are an attractive blue-green shade during the summer. About mid-summer, airy plums of seeds are held erect and dance above the rigid foliage in the breezes.
It does not spread beyond 2’ to 3’ and because of its compact form and its vertical heights, it can be planted as an effective hedge. In the fall, the leaves turn a tawny yellow, then more of a light tan during the winter. Do I see little brown birds darting in and out of the plants all winter? Yes! I leave the tall grasses for both of us all winter and trim them back in early spring.
Panicum virgatum ‘Northwind’
USDA Zones 4-9
Full Sun
Ann H., EAGC Horticulture Committee
♦ ♦ ♦ ♦ ♦
October 2018 Horticulture Tips

We all have experienced the joys of gardening. Most of us have suffered some losses from our inexperience or weather or pests. Many battle ground hogs, chipmunks, rabbits, and voles. Those of us living in Southern New Hampshire increasingly must deal with a creature which enjoys our gardens as much as we do——DEER!
The damage deer inflict on our gardens can be very destructive. Below is a picture of my neighbor’s arborvitae taken today. The neighbors took down a six foot fence last fall. The deer enjoyed eating the trees all winter. After growing all summer this is what the trees look like now.
How do we ready our gardens for winter and protect against the munching of deer? There are many ways to attempt to do this. But first, we must accept that deer are native to our area and they will travel on paths ingrained in their heads. We can attempt to coexist.
1. They are sensitive to odors. They do not like garlic, and rotten eggs. You may apply repellents such as Liquid Fence, Deer Off or Repels All. My experience with these is that what smells bad to the deer also smells bad to me. Also, these products need to be reapplied every few weeks. I handle this task well before the snow starts to pile up. The deer usually migrate through my yard after the snow falls.
2. Fencing – Deer can leap over fences up to 8 feet tall. Our wonderful member, Terry D., installed deer fence around her property and successfully kept the deep out. She lived in a wooded area and the fence blended in. That may not be the solution for most of us. However, deer do not like to get stuck in areas they can not leap out of… so a fence inside a fence can be effective if the space between them is less than 5 feet.
3. Another method is to string fishline on stakes around your property. String it at a height of 3 ft. The deer bump into it and are scared off. My sister does this and it is effective for deer attempting to enter her yard from the woods. However, it does not stop them from walking down her driveway and having supper.
4. I have tried a variant on the prevention by smell. Tie bars of old fashioned yellow Dial soap or Irish Spring on branches of the shrubs you wish to protect. It worked well for a while.
5. Tie tin pie plates or streamers on stakes or in trees. The reflection off the aluminum will scare off the deer.
6. The best solution I have found is shrub covers. They are available in various sizes so you can protect shrubs as they grow. You can see that they deter the deer.

Alas, once the shrubs are protected they keep growing. Last year I covered the shrubs with bird netting. It worked well until we had the heavy wet snow in March. The deer took one trip through the yard and nibbled off all he buds. So, this year I am resorting to wrapping select shrubs with burlap. My rhododendrons and azaleas have a ton of buds on them and I really would like a spring with lots of flowers.
At my home, the deer usually do not show up until late January; but this year they have already started to eat the tops off the oak leaf hydrangea. So, they too will get covered. Coexistence does entail some effort.
The best solution to deer proofing is to plant deer resistant plants. Not fool proof but better than offering up hostas and azaleas that are candy to deer.
Some tips:
1. Deer avoid plants with fuzzy or hairy foliage.
a. Lambs ears
b. Lady’s mantle
c. Ageratum
d. Spirea
e. Yarrow
2. Plants that contain compounds toxic to deer
a. Poppies
b. False Indigo
c. Bleeding Hearts
d. Spurges
e. Hellebores
f. Daffodils
g. Ferns
3. Plants with heavy fragrance in foliage
a. Herbs
b. Russian sage
c. Nepeta/Catmint
d. Boxwood
4. Plants with thick and leathery leaves
a. Iris
b. Viburnum
c. Pachysandra
d. Peonies
5. Plants with spiny or prickly laves or stems
a. Barberry
b. Globe Thistle
6. Grasses – they are hard to digest
7. Vegetables
a. Onion family
b. Squash
c. Cucumbers
Hope that you find one or more of these ideas helpful.
Linda V.
♦ ♦ ♦ ♦ ♦
September 2018 Horticulture Tips
Feeling Overwhelmed?
Weeks of heat? Days of rain? Mobs of mosquitoes? Weeds wearing you down? It is not uncommon for gardeners to feel overwhelmed at this time of year. A recent conversation between garden podcasters/bloggers Margaret Roach (awaytogarden.com) and Joe Lamp’l (joegardener.com) reminded me of excellent coping strategies.
List making is one of my favorites. So while I am still in Maine (and anticipating utter mayhem in my Stratham garden) I plan to take an hour or two this week to apply a critical and thoughtful eye to my plantings here – legal pad, pen, and camera in hand. I’m guessing that some of the things on my mind are on yours too.
Plants that Should be Moved
Sometimes we made a bad decision; sometimes growing conditions change; sometimes we don’t like a plant combination. Here’s an example: two years ago I planted a purple sage, an oregano, and chives among some perennials in what was then the sunniest spot available. After some serious tree thinning this summer, I now have a sunny spot that is also handy to the kitchen. I calculate that Spring will be a better time to move the herbs, but right now I can prepare a bed for them and clearly mark and photograph their present location. So those two tasks are top priority on my list, with a reminder for May transplanting added to the Spring list.
Some plants can be moved in the early Autumn. Those hardy souls include daylilies and hostas. If you do move plants now, reduce stress by watering well in advance; trimming off some foliage; and rinsing and trimming the rootball, removing any dead bits. I like to soak the rootball in a solution of Superthrive overnight or for several hours, and often add a teaspoon or two of superphosphate in the bottom of the new planting hole. The latter stimulates root growth. At this time of year exercise extra caution about transplanting shallow rooted plants prone to heaving – heucheras for example.
Planting Opportunities
This is a good time to make a list of any gaps in your garden, with your thoughts of what might be a good filler or replacement to move in now or next Spring. Just think how much easier Spring will be with a list of what you want to purchase or transplant. For instance, all Summer I have been irked by a lovely Hosta ‘Krossa Regal’ that really needs something around its ankles. I’m thinking of a froth of Lady’s Mantle on one side (added to the Spring shopping list) and on the other side a fringe of Hakonechloa macra aureola (on the list to snitch from a thriving nearby colony).
Deadheading and Seed Saving
While it is not a good idea to go crazy “cleaning up” your garden, removing the old blooming stems of daylilies, Siberian iris, and hostas is always on my list somewhere around the mid level priority – a chore that can be delegated if I have a volunteer. My visiting sister-in-law recently relieved me of scores of those ugly stems.
Near the top of my deadheading list is Eupatorium rugosum (white snakeroot) whose clusters of small white flowers lend a meadow-like feel to my semi-wild garden. It is, however, a prolific self-sower and is high on my list for a good shearing before it goes to seed. Deadheading such plants can save lots of tedious work in the Spring, pulling up unwanted seedlings.
Digitalis grandiflora, a short-lived perennial yellow foxglove, is a different case altogether. It is on my list for late Summer. When the seedheads are nice and dry, I bend some of the stems over so the seeds will fall around the mother plant. Others I cut and shake out over a sheet of newspaper and then funnel into labeled envelopes. They go on my list for early Spring sowing. You can do the same with some annuals – poppies and calendulas for example.
Pruning and Pinching
This is a good time to walk around your garden and start a list of plants you could have pruned early in the growing season or just after blooming. Looking at the Monarchs flitting about my Joe-Pye weed I wish I had pinched or pruned some of them to promote branching so I would have more blooms for butterfly fodder, plus plants of varied heights and extended bloom time. On my list for late June.
Other plants, such as nepeta and some salvias, will rebloom at least somewhat if given a timely shearing or selective pruning. Keeping a list of these will provide a reminder.
This is a good time to make a list of woody plants needing pruning and to research the appropriate timing. I often feel that the best time to prune is when the spirit moves me. Currently on my list for pruning and trimming now is a very old bayberry in need of rejuvenation and a volunteer pagoda dogwood (thank you Mother Nature) that needs some shaping up. My 2019 summer list will include pruning my native deciduous rhododendrons that bloom in June and early July.
The best source I know for perennial plant care is Tracy DiSabato-Aust’s The Well-Tended Perennial Garden. For trees and shrubs I turn to my old edition of Michael Dirr’s Manual of Woody Landscape Plants, but an internet search can yield much useful information if you are careful with the sources.
So get out your pad of paper and pen, ready to make your lists and set your priorities. If planting bulbs is on your list for the Autumn, check out my September 2017 tips on sources for getting top quality bulbs delivered to your door.
♦ ♦ ♦ ♦ ♦
August 2018 Horticulture Tips
A Sting Operation
It’s August now. We’re slowly approaching fall and it’s the time that many of us have black and yellows visitors attending our outdoor activities. These visitors are a nuisance and they can be life-threatening to those with a venom allergy. They are never invited to human events but still seems to crash our late summer picnics or park visits, and they can disrupt our activities in the garden. This interloper is the yellow jacket, a wasp that is responsible for half of all human insect stings.
Early in the summer, these insects can act a little threatening but if I’m careful not to provoke them, we can co-exist in the garden. Unless there’s a real infestation or a nest too near, I have a live-and-let-live philosophy because they are actually beneficial in helping with an overpopulation of often-damaging insects in the garden and play a role in pollination. You can watch them buzz around flowers in the summer and disappear beneath leaves hunting all day for insects to feed on for needed protein for the developing larvae back in their nest.
Yet the yellow jackets we are beginning to encounter in August and later in the fall are a different matter. They are bad-tempered and more aggressive. As fall approaches, the workers’ diets turn more to sugars as they scavenge the landscape, and that can bring them to a nasty encounter at your picnic…. or having several lurking around your hummingbird feeder.

There are less than perfect ways to eliminate the wasps with poisons or traps, but the good news is that days are numbered for all but the queen yellow jacket. Workers will begin to die off from our ensuing cold weather, and the fall-fertilized queen must start a nest from scratch next spring. Who knows…. perhaps that’s the real reason these yellow jacket worker wasps become so angry and ill-tempered in the fall.
Ann H., EAGC Horticulture Committee
♦ ♦ ♦ ♦ ♦
July 2018 Horticulture Tips
Allium ‘Millenium”
When you mention allium, most folks think of the lovely globular blooms of ornament onions blooming in mid-spring. Showy globes of tall allium follow the tulips in my garden giving us bright waves of purple flower umbels early in the season.
But there’s another beautiful allium in my garden that blooms in late summer. It’s Allium ‘Millenium,’ a clumping hybrid that delivers a profusion of lilac-pink flowers about one foot in height. They provide us with the oooo’s and ahhhh’s at a time when most of the garden has just given up color.
Right now, it’s the second week of July and buds are just forming on my 5 plants, but below are a few photos of blooms from August, 2017.

I was happy to learn that the Perennial Plant Association has chosen ‘Allium Millenium’ as the 2018 Perennial Plant of the Year. Annually since 1990, the PPA has showcased perennials that are “suitable for a wide range of growing climates, require low maintenance, have multiple-season interest, and are relatively pest/disease-free.” I can attest to the PPA’s description of Allium ‘Millenium’ as a butterfly magnet. It is also a pollinator magnet… bees flock to the 2” flowerheads for several weeks.

I was first introduced to Allium ‘Millenium’ when I was employed at Rolling Green Nursery. I was blown away by the profusion of bright flowers when a lot of perennials were either done or waiting for a second flush of color. Although I admired it, I hesitated bringing one home because of the ornamental onion’s reputation for profuse reseeding. I didn’t want to be pulling up babies every spring. Well, guess what… this hybrid puts a lot of energy into the blooms instead of heavy self-sowing. However, after the blooms dry to a light tan, I shear off the globes because the foliage is so lush, green and glossy and will take you through the rest of the summer and fall.

Since my original purchase, I have easily divided the clumps both in the spring and the fall. It makes a fabulous pass-along plant for grateful gardening friends. Thumbs up all around for the ornamental onion, Allium ‘Millenium.’
Allium ‘Millenium’
Zones 3 or 4 to 9
Full sun/part shade
Well-drained soils
Reseeding less a problem for this ornamental onion
Ann H., EAGC Horticulture Committee
♦ ♦ ♦ ♦ ♦
June 2018 Horticulture Tips
Mid-June Garden Chores
June may be my favorite time in the garden. Spring rains and cool weather have done the job for us on New Hampshire’s seacoast. The gardens are flourishing with lush green growth. Garden tools are cleaned, oiled, and sharpened. Weeds have been pulled. Boxwood are trimmed. Containers of annuals are filling out nicely. Borders are edged. Two inches of organic compost topped with fine 50/50 leaf mulch/compost have borders looking neat and tidy.

Early mornings and late afternoon you can often find me just sitting outdoors savoring nature’s bounty. I’m enjoying what is growing and waiting and watching in anticipation of summer blooms…. lavender, daisies, daylilies, the campanula, heuchera, and others, along with ornamental grasses, hydrangeas, and our juicy tomatoes that will soon pop in the garden.
Mid-June brings a relaxing break from the heavier chores of early spring and the work to come under the hot summer sun. I call mid-June the ‘Twixt-Season, a short lull between seasons when the list of garden chores might be shorter.
I’m not totally slacking off in mid-June. Before summer brings us her heat along with insect pests, diseases, more watering and more weeding, here are a few things I am minding in the garden today:
• I keep new plants, water-loving plants, and containers watered. I like to hit them first thing in the morning before the sun creeps above the forest tree tops. I never want to see a plant flagging in the mid-day sun.
• I am deadheading early flowering plants and pinching back blooms on annuals.
• I never stop checking plants for diseases or insect pests.
• I am staking tall flowers when they become floppy. I keep a ready supply of metal stakes handy for tall blooms like peonies and baptisia.
• Every day, I train a multitude of wayward tendrils of our clematis to the trellis
• I continue to mow grass 3-inches high, the recommended height.
• I have pinched off any side suckers from tomato plants from the first stems up to first branch of blooms. And I’ve rooted one of the suckers for a whole new tomato plant.
• I freshen water in birdbaths daily!
• And I change hummingbird food twice a week. I’ve discovered long ago that there’s nothing my hummers love better than cold nectar readymade and stored in the refrigerator.
Enjoy these last days of spring and happy ‘Twixt gardening to you!

Ann, EAGC Horticulture Chair
♦ ♦ ♦ ♦ ♦
May 2018 Horticulture Tips

https://commons.wikimedia.org, Oxydendrum arboreum, by David J. Stang
The Beautiful Oxydendrum Arboreum
Many years ago I read that a world famous botanist (whose name I forget) was asked that if he were on a desert island and could have only one plant or tree, what would he choose. He chose an Oxydendrum arboreum, so I went right out and bought one.
It is also called a Sorrel tree or Sourwood and is a native in the east and southeast of the US to zone 5. It is deciduous with small shiny green leaves similar to Mountain Laurel. These leaves turn the most handsome shade of cordovan red, very polished and leather looking in the fall.
It has clusters of creamy white flowers in late July that resemble lilies-of-the-valley and sometimes the tree is referred to as a “Lily of the Valley Tree.” It is truly a lovely sight in the fall near yellow beech trees. I have seen it listed as growing to 75-feet, but I have never seen it anywhere near that size.
This tree leafs out quite late – so late that I was ready to cut down my new tree. I thought it was dead and had not survived the winter. Fortunately, I had bought a replacement first, and then I had two!
This has been my favorite plant for years. Since it is such a lovely ornamental tree, I wonder why it has been so underused in landscapes!
Connie, EAGC Horticulture Committee
♦ ♦ ♦ ♦ ♦
April 2018 Horticulture Tips
Preparing Your Tools for Spring Gardening
There are five basic tips to keep gardeners on track caring for their garden tools.
-
Gather – Group –Assess the Damage
-
Clean and Disinfect
-
Lubricate – Oiling
-
Sharpen
-
Storage system
1. Gather, Group, Assess:
Basic tools: digging, cutting, sprayers, and your garden gloves.
Hoses: check for cracks and leaks, check for gaskets.
Wheelbarrow/Carts: check tires for pressure and wear, check handles for rough spots.
Decide what needs TLC and what needs replacing.
2. Clean and Disinfect:
Remember safety with goggles and gloves.
Give everything a good washing and make sure you dry thoroughly.
Disinfect tools by using isopropyl alcohol swabs.
Tip: If you have rust issues – spray tool with vinegar, wrap in paper towel, spray again until wet, lay in plastic container and let sit for two hours. Rinse and clean. You can do a quick rinse in a baking soda solution to neutralize the acidic vinegar. Rinse with water and dry.
Digging Tools
Rinse with the hose and scrub with stiff bristle brush is needed. Use steel wool if surface is rough.
Tip: Keep a stiff brush hanging near the spigot.
Cutting Tools
Soap and water is fine. “Scrubbing Bubbles” foaming cleanser was actually recommended for pruners. Rinse well after and DRY. If there is a buildup of “gunky” residue on the blades, you can try a brass bristle brush, SOS pads/steel wool, WD-40, Goo Gone, or a citrus based blade cleaner (woodworker type).
Sprayers
These should be cleaned after each use following device instructions.
3. Lubricate/Oiling:
Unless you have all stainless steel tools, your clean and dried tools need to be lubricated to protect them from oxidation. You can use boiled linseed oil, light machine oil, WD-40, or even mineral oil. Coat all surfaces, soak for a few minutes, then wipe away any excess.
Wooden handles need care. Check for rough surface, sand if needed, then either give it a good rubbing with a boiled linseed rag or varnish/paint.
Tip: Several articles suggested the “Sand Bucket” method for maintenance just like grandpa used, but not for jointed tools! Take a bucket deep enough to cover the metal part of tool, fill it with coarse sand add enough boiled linseed oil to make it damp moist. After cleaning and drying tools, plunge them into this bucket for quick lube. The bucket is good for years of use.
Tip: Boiled linseed oil has a small amount of solvent. You should let the tool air out for about 24 hours before putting into soil. Also, if you use a rag with the linseed oil, don’t wad it up or put in a closed container. It could be combustible.
4. Sharpen:
There are professional sharpening services available and most good pruners have replaceable blades. To do it yourself, there are many sharpening tools, such as flat file, diamond files, 2 sided whetstones, and other “gadgets.” Safety goggles and protective gloves should be used. You don’t want the small metal filings causing injury. Inspect the cutting edge of the tool or blade for damage, then decide if it worth sharpening or needs replacement. Always stabilize your tool to prevent injury.
-
Take note of the angle of the bevel on the cutting edge. You will need to work your tool at that same angle. Some tools are beveled on only one side so only sharpen that side of the blade. If there is a burr on the non-cutting edge, you may smooth it carefully.
-
For a digging tool, you will file in one direction, forward in a smooth motion.
-
For a pruning tool, you will move in small circular motions from the inner area to the edge.
-
For a folding saw, brush toward the saw tips with a brass brush.
-
Wipe away any filings, then lubricate.
Tip: While you are working with a hand held lopper this is a good time to check the tension on the bolted joint. You should be able to hold the tool in front of you, with the blades up, hold one handle and try to swing the other handle out to the side. If the tension is correct, the handle should hold in about a 90 degree position. Adjust the bolt as needed. If it’s too loose, the cut can be ragged; if it’s too tight, you will work too hard.
5. Storage System:
Now that you have worked so hard to get those tools ready for another season of gardening, think about how you store them. Moisture is the tool’s enemy. Even leaving them in contact with a concrete floor can cause issues. There are many methods to store the tools such as hanging on the wall, in an old barrel or plastic trash can, or PVC gridded cubes. Hand tools can be stored in the garden area inside a mailbox or other “dry” unit.
Cleaning, lubricating and sharpening are ongoing tasks throughout the season, as is putting the tools away each time. I promise to do better by my trusty garden tools this year. Now cleaning and sterilizing all those pots … that’s a challenge for another day!
Pat, EAGC Horticulture Committee
Sources:
www.gardentoolcompany.com
www.pallensmith.com
www.southernstates.com
♦ ♦ ♦ ♦ ♦
March 2018 Horticulture Tips
“In Like a Lion….

I consider March a winter month in New Hampshire. It “roars in like a lion,” but often takes us by the hand and gently “goes out like a lamb” by April. We have had our fair share of bad winter storms in 2018 but March still remains a month of promise. It’s a time to dream, peruse catalogues, and start seeds indoors.
Here are some March tips that I like to follow:
Birds are a part of the garden and the going has been tough with so much snow. Seeds are buried beneath the snow and the berries have long since been eaten. Think about supplementing with birdseed, nuts, and berries. While you’re out there, empty the birdhouses of old nests.
The soggy ‘Mud Season’ will follow the snow. One gardening rule to follow is not to cultivate the soil until it’s crumbly. If you dig or even walk on wet soil, you will destroy the structure and drive out air that is important to plant growth. To test whether your soil is ready, squeeze a fistful of soil into a tight ball. If water streams or drips, the soil is not ready for cultivating. If the soil is moist and no water is dripping, poke your finger into the soil ball and if it falls apart, the soil is workable. Sandy and loamy soils are ready much faster than clay. Sadly, you may have to wait until April to dig in the garden.
Once the snow melts and you can actually see the ground, it is a good time to remove old, worn out foliage before the flush of new growth on perennials, such as European Wild Ginger, Heuchera, liriope, Lenten Rose, Epimedium, ornamental grasses, and ferns. You could leave the leaves on, but it’s much more attractive if you tidy up.
March is possibly the last best time to prune because buds will soon begin to swell. Cut out dead or crossed branches and shape your shrubs. Best not to prune spring-flowering shrubs now or there go your blooms!
It’s a fun time to cut forsythia, pussy willow, and crabapple branches and force into bloom indoors. Cut at an angle, split the end, and perhaps peel a little bark there, too. Place in clean water and you should have blooms in a couple of weeks. The pussy willow are great to dry for flower arrangements once they’ve reached their peak.
Because I encourage beneficial insects in my garden, I wait until the weather warms to 50° for a few days in order to clean up the borders. Many insects overwinter in leaf litter, like bees, moths and butterflies. Removing winter protection may expose and kill them.
To speed up the month, create a terrarium like I did in this tiny greenhouse I found in an Exeter nursery. They also carried miniature ferns so I assembled this mini-woodland setting to satisfy my March gardening itch.

If you need to emerge from your own winter hibernation, here are some New Hampshire March Happenings that signal the approach of spring.
• St. Patrick’s Day on March 17 is the perfect time to add a little greenery to your home. Buy a shamrock plant and celebrate spring with a green centerpiece.
• The 23rd Annual NH Maple Weekend is coming up on March 24 – 25, 2018 and it’s a fun time to visit a sugar house near you. You will tour the facility, meet the owners, watch the process, and sample fantastic goods. We always come home with our year’s supple of syrup.
• The Seacoast Home & Garden Show, Whittemore Center Arena, Durham, NH on March 24, 25. It’s a fun place to see and meet landscapers and get great garden ideas.
• Attend Seacoast Winter Farmers’ Markets. Great place to buy healthy herbs.
Happy Spring! Ann, EAGC Horticulture Committee
♦ ♦ ♦ ♦ ♦
February 2018 Horticulture Tips
Humidify Your Houseplants
In this climate, gardeners only have one outlet for their plant-nurturing instincts: houseplants. And low humidity is probably the biggest hurdle we need to overcome during northern winters. The humidity level in heated homes can drop to 10 to 20% in winter, especially when heating systems are trying to keep up with the super-cold days we’ve experienced this winter. This humidity level is bad news for houseplants, which prefer a level closer to 50%.
It’s important to remember, though, that while winter air is drier, plants experience a slower rate of growth during the cold weather. Less watering is needed to keep them hydrated and overdoing it in the hopes of raising humidity can lead to root rot. The soil on the surface will dry quickly, so that’s not a good indicator that the plant needs water. Poke your finger into the soil and check to see if it is dry an inch or two below the surface. That’s when it’s time to pull out the watering can.
To provide more humidity for your houseplants during these dry months, here a few tried and true methods:
• Cluster your plants in groups. Plants release water through their leaves by transpiration and grouping them together will allow them to humidify each other.
• Set up a humidifier near your plants.
• Congregate your plants in a more humid room like a bathroom or kitchen, if you have space.
• Dust your plants – dust collected on leaves can reduce the amount of moisture the leaves absorb.
• Place your plants on or near a tray of water. Raise the bottom of the pots above the water level by placing stones in the tray and setting the pots on the stone.
• Pot your plants in a good quality potting soil mix that contains organic matter to hold water.
• Create a mini-greenhouse for your most sensitive plants. This can easily be made from an old aquarium, which can be fitted with a glass or plastic lid. Open it slightly for ventilation.
• Even simpler is to place a large, clear plastic bag on a waterproof surface. Arrange as many well-watered potted plants in the open bag as will fit. Pull up the sides of the bag over the plants and close it at the top, leaving an opening for ventilation. Use sticks, placed in the pots, to keep the bag from resting on the plants. Remember to keep these mini-greenhouses out of direct sunlight and check them periodically to make sure the soil is moist.
LuAnn, EAGC Horticulture Committee
♦ ♦ ♦ ♦ ♦
January 2018 Horticulture Tips
Our recent cold temperatures and extreme wind chills caused me to rethink my subject for this month. It is way too cold to be contemplating winter pruning….so we will save that for another time. This month I encourage you to cook for the birds overwintering in your backyard. Many of you have feeders full of sunflower seeds or other seed mixtures. In this severe weather our feathered friends need lots of high-calorie food rich in fat and carbohydrates. Like humans, not all birds eat the same thing. Below are some recipes to entice the particular birds that frequent your yard.
You can provide a new habitat for the birds when you discard your Christmas tree. Either chop off some branches and pile them up or stand your tree in a snow bank. Small birds love to eat under the branches out of the weather. The simplest food to put on the tree itself is peanut butter (I use crunchy) sprinkled with oatmeal or raisins. This will attract all the small Finches, Juncos, and Cardinals. Under the tree I sprinkle sunflower seeds and unsalted peanuts in their shells. You can also hang suet from the grocery store on the branches.
These fun recipes require some work. Many involve melting suet before adding the other ingredients. Yes, you can buy suet blocks with seeds in them, but these recipes are more interesting and should appeal to the birds.
Appl-icious Crumble Pie for Robins, Mourning Doves, Orioles, Bluejays
Combine:
1 cup cornmeal
1 Tbl. Thistle seed
1 Tbl millet seed
1 Tbl sunflower chips
½ cup suet base
Press the mixture into a mini pie pan like a pie crust then refrigerate until hard.
Melt ½ cup grape jelly and pour it over the crust, half way to the top.
Cut apple into thin slices and then cut them in half. Arrange the apples on top of the jelly in a circle and refrigerate overnight.
You can release the “pie” from the pan or serve it as is on a stump or tray feeder.
Double-Dipped Cone – attracts Chickadees, Titmice, Nuthatches
This is a great treat if you have pinecones available in your yard.
Tie a string around the pinecone just under the stem.
Place waxed paper on your counter.
Melt your suet and dip the pinecone or spoon suet over the pinecone.
Sprinkle seeds of your choice over the pinecone
Melt peanut butter in microwave (about 3 ten-second intervals). Dip the cones or drizzle the peanut butter over the cone. A perfect treat to hang on your discarded Christmas tree.
Eggshell Salad – provides needed calcium and minerals – House Wrens, Juncos, Bluebirds and Cardinals love them
Make yourself 6 boiled eggs and save the shells for the birds.
Heat them in a 275 degree oven for 15-20 minutes to kill any bacteria.
Crush them into small pieces and serve on a saucer feeder with a bit of sand for grit.
Raisin-Berry Relish – Cardinals, Bluebirds, Robins, Sparrows
Combine:
½ cup orange juice
• cup raisins or currants
• cups fresh or frozen cranberries
• cup brown sugar
Heat over medium high heat until it bubbles.
Then turn heat down to low, cover the pan and simmer for 30 minutes—the berries will pop.
Fill ½ orange rind with the mixture, and cool.
Place outside on flat surface or under your Christmas tree.
Squirrels, yes, we all have them. So provide them some treats away from those you made for the birds. Yes they like peanuts, but they require other nutrients. They will eat grapes, squash, zucchini, carrots, and apples.
Hope you will try some of these recipes. They came from the book, Cooking For the Birds by Adele Porter. A copy will be available on the Promise Tree at the General Meeting, $5.00.
Linda V, EAGC Horticulture Committee
♦ ♦ ♦ ♦ ♦
December 2017 Horticulture Tips
What is your best Christmas tree memory when growing up? Whether your family had a faux tree or cut down an evergreen each year, the Christmas tree was a special part of the holiday season. Christmas traditions change as we grow but Christmas memories of the people you love last forever. Enjoy the following sweet memory of a member of our horticulture committee about a special time spent with her dad at Christmas:
Christmas Tree Memories
Sunday my husband Wally and I decided it was time to put up the Christmas tree. The artificial tree has been with us for a long time and in recent years needed some jerry-rigging with the lights. When Wally started splicing wires, I called time out. Off we went to find a new tree, which in turn, got me thinking about the Christmas trees of my childhood.
Being the tallest daughter at the time, I was Dad’s assistant in choosing the live tree. It was always cold and, as a teenager, I didn’t look forward to the job. And please, Dad, don’t go to that tree place where my old boyfriend works. Too tall, too short, too skinny, too fat, it took some time to find the right tree and some extra boughs as well.
Now home in the garage, I’m turning the tree while Dad takes a critical look. There are gaps. Out comes the electric drill and jackknife. Skillfully Dad drills holes in the trunk at perfect angles to receive the boughs. Then he carves the ends of each bough and slips them into the trunk. No more gaps. Perfect tree.
All the while, Dad and I are talking about Christmas, school, and friends. It was a special time, just the two of us.
Sunday before turning in, I looked at our new perfectly shaped artificial tree and silently thanked my Dad for so many good Christmas memories.
Meredith, EAGC Horticulture Committee
♦ ♦ ♦ ♦ ♦
November 2017 Horticulture Tips
Partnering with Nature
What a summer for a tomato harvest! My four plants were overloaded with large fruit and I’m convinced that the success is due in part to the Bombus impatiens, the Common Eastern Bumblebees that nested in our garden this summer.
Tomatoes are self-fertile, meaning they act as both mother and father to their own seeds, a strategy known as “selfing.” But the pollen inside the anther needs help moving to the stigma. A tomato blossom is fertilized by motion…. wind or by tapping on the cluster of flowers to release pollen…. but the most effective pollinator of tomato blossoms seems to be the trusty bumblebee. Tomato flowers are ignored by most bees, but here comes the plump little bumblebee to save the day by “buzz pollinating” the blossom. Have you ever watched the bumblebee on a tomato blossom? It pulls down the anther, hangs on and vibrates, causing pollen to be released onto the bee’s belly. A bit of pollen exchange with the stigma and the job is done. Hundreds of these perfect tomato pollinators lived all summer in a nest nearby.

Early in the spring when the weather was still cool, I decided to try and entice bees to nest in the garden. I constructed a simple bee house from a fallen tree to attract solitary bees (semi successful…) and I prepared a site that might tempt ground-nesting bumblebees. I made some holes on barren dry soil and covered the loose earth with grass clippings and dried leaves. My efforts were rewarded. A queen moved into this bit of real estate and set about growing her colony.
My summer gardening was shared with an explosion of beautiful bumblebees. Although the bumblebee can sting repeatedly, it’s typically docile and we worked inches from one another all summer… me deadheading, planting, edging, weeding or watering as they buzzed around me or landed on me, often using my shirt as a resting spot. We co-existed and I was never stung.

Our pesticide-free garden supplied a continuous food source… from early rhododendron and crabapple, to later blooms like summersweet, alliums, hosta, hydrangeas, herbs, lavender, holly, and a favorite, the garlic chives that I grow in pots. All summer long the bumblebees fed on nectar and gathered pollen to feed their expanding family of young.


Wild bees pollinate a goodly percentage of the world’s food and the populations are declining. The greatest threat to the bumblebees is the loss of adequate habitat. I was happy to give a small assistance to the Bombus impatiens and was richly rewarded with my abundant tomato harvest. Only the mated female bees will survive the winter but my fingers are crossed that next summer will bring another bumblebee adventure.
Ann H, EAGC Horticulture Committee
♦ ♦ ♦ ♦ ♦
October 2017 Horticulture Tips
The Common Witch Hazel

I can’t think of a better time than the Halloween season to feature a native understory tree with a spooky name, the witch hazel…. although the witch hazel is NOT associated with witches or Halloween at all. The name ‘witch’ has origins from Old English wice, meaning pliant or bendable. And, according to lore, the Y-shaped witch hazel branches are the divining rods that bend toward the earth to find underground water.
This genus of small trees and shrubs contains five species and close to 100 cultivars, many native to Asia. The indigenous tree we see growing around the New Hampshire landscape is the common witch hazel (H.virginiana), native to the eastern United States. It’s rather ordinary looking in the summer with its large, oval leaves, but amazingly, late fall brings us fragrant ribbon-like blooms.
We know that most plants bloom in the spring or summer, then develop seeds and go dormant all winter. Not so with the witch hazel. This is the only tree in North America to have flowers, ripe fruit, and next year’s leaf buds on its branches at the same time. While the blooms are open, last year’s seedpods reach maturity and loudly eject one or two tiny black seeds per pod 30-feet or more. If left undisturbed, the seeds will germinate in two years.
One might question how pollination can occur when blooms appear so late in the fall when most insects are inactive. The tree compensates by blooming for a longer period. I’ve seen blooms on a day in late December. Gnats, wasps, moths, and flies replace the summer butterflies and are rewarded with sweet nectar and, of course, the pollen.
From our window, we can count on a few witch hazels along a nearby woodland to brighten up the late fall landscape. Their yellow tassles are a refreshing contrast to the bare deciduous branches on surrounding trees. And because we’ve been charmed by witch hazel, I planted another in our landscape to brighten up the fall view from one more window. If you want to add a fall blooming woody plant to your landscape, do consider our native witch hazel.
Witch Hazel (Hamamelis virginiana)
Zone 3-8
Partial to full sun
Moist, well-drained soil
Generally pest-free
Ann H, EAGC Horticulture Committee
♦ ♦ ♦ ♦ ♦
September 2017 Horticulture Tips
It’s Bulb Planting Time!
Autumn is a wonderful time of year to garden – the days are cooler while the sun still has some warmth. The plants are happy too with the soil still warm at their roots. At our September 21 meeting I’ll talk about a range of autumn garden opportunities (trying to not think of them as chores!) but I am writing this to encourage you to make your plan for planting bulbs.
Our horticultural zone on the Seacoast is now officially 6a so maybe you should think about adding some spring-flowering bulbs that previously were out of our range. I have my eye on brodeiea and Dutch Iris. Keep in mind that small bulbs should be planted as soon as you get them because they tend to dry out after harvest. Though not recommended, larger bulbs can be planted until well after a killing frost, up to the time that the top of the soil is too frozen to easily penetrate.
While I buy some bulbs locally I rely on several mail order suppliers for variety and top quality. Although bulbs will be shipped soon it is still not too late to place orders, so here are some purveyors I use:
Brent and Becky’s in Virginia (https://www.brentandbeckysbulbs.com/) is a family-owned company that has been in the bulb business for over a century. They are best known for growing and hybridizing daffodils but offer a wide range of bulbs. They have an especially complete list of Alliums – 28 varieties! And for indoor gardeners there are more than two dozen varieties of Amaryllis (Hippeastrum).
Old House Gardens (https://oldhousegardens.com/) is a wonderful employee owned company. Most of the fascinating plants and bulbs they offer are gown in their own fields or elsewhere in the U.S. but they do import some bulbs. Many are so highly sought that they sell out early.
John Scheepers (https://www.johnscheepers.com/ ) and its wholesale sister Van Engelen (https://www.vanengelen.com/) are longtime bulb importers. The latter offers good value when you are buying bulbs in large quantities – such as when you are massing small bulbs or sharing an order with a friend.
McClure & Zimmerman (https://www.mzbulb.com/) have a small but carefully selected list of bulbs and plants. They offer an especially impressive variety of species tulips many of which look wonderfully exotic.
Messelaar (http://www.tulipbulbs.com/) is almost local – Ipswich, MA – but with strong connections in the Netherlands. You can order for delivery or pick up – the latter option is particularly attractive because you can get excellent advice from the owners. They have lovely Hyacinths for forcing in glasses of water and a very nice selection of Amaryllis and Narcissi for growing indoors.
Bulb planting advice is sometimes lengthy and contradictory. My advice is to not worry too much – most bulbs are very easy going and eager to please. They have even been known to turn themselves right side up when planted upside down. However, here are a couple of sites with useful tips:
http://extension.illinois.edu/bulbs/planting.cfm
https://garden.org/learn/articles/view/62/
Fertilizing advice can be particularly contradictory or confusing. I lean toward taking the advice of Judy Glattstein, author of Bulbs for Garden Habitats, The American Gardener’s World of Bulbs (which I own and use), and Flowering Bulbs for Dummies (which I have not seen). She advises against using bone meal for a variety of scientific and observational reasons and advocates using “chemically treated forms of phosphorous and potash, muriate of potash, and superphosphate.” If you do choose to use a fertilizer when planting bulbs put it down where the growing roots will reach it – so put a cushion of soil on top of the fertilizer and then place the bulb. Often, to save time, I dig a pretty broad hole and then plant my bulbs in a group of uneven numbers – 3, 5, 7, etc. Unless there is a soaking rain in the forecast, water in your newly planted bulbs thoroughly and deeply. Then take a well-deserved nap with dreams of spring flowers.
Becky, EAGC Horticulture Committee
